Here’s the backstory… Back in May of 2021, I got an email from the keyboardist of my former old farts classic rock band asking if I’d be willing to fill in for their lead guitarist who was going to be away on a business trip. I agreed and we set up rehearsal dates leading up to the gig. I hadn’t played with them for over six years, so I was excited to get back together with them. Rehearsals went swimmingly well. It was like we have been playing together this whole time. They went so well that at the third rehearsal, our drummer, who’s also one of the band leaders, asked me if I’d like to rejoin the band as a permanent member. I agreed and have been playing with them since.
When I was doing 250+ gigs a year back in the day, I was gobbling up some kind of gear quite often. It was compulsive behavior where I spent tens of thousands of dollars on amps, guitars, effects, sound systems, etc. It was a serious case of GAS that filled up my garage with stuff; most of which got limited use. But getting all that gear helped build this blog so I have no complaints nor regrets for getting all of it. And I have since given away or sold much of the gear I acquired all those years.
The great thing about getting back to playing regularly is that though I sold off or gave away lots of gear, I still had LOTS. So, it was easy to literally “gear up” and play. I had all the effects I needed, so I didn’t need to get any new gear. The exception was my purchase of my Fender Tone Master Deluxe, which replaced my BOSS Katana Artist that went on the fritz at a gig. But other than that, I’ve purchased strings and picks. That’s it.
I still keep up on new gear that’s coming out, but to be honest, I’ve found my sound so I’m not feeling hard-pressed to explore. The only thing I may get is a BOSS CE-2W Chorus so I can retire my 1981 BOSS CE-2. It still works great, but it is pretty beat up from the hundreds of gigs I’ve played with it over the years.
And now that I’m over 60, I’m just not interested in lugging a lot of gear. I want to make one trip from my car to the stage. Here’s my equipment list:
Guitars
Taylor T5z
Squier Classic Vibe Tele
Gibson R8 Les Paul
The T5z is my #1 since it is so versatile. I switch between the CV Tele and the R8 depending on my mood, but lately I’ve been playing the CV Tele a lot more than my R8.
Amps
Fender Tone Master Deluxe Reverb
DV Mark Little 40 L34 / Avatar 1 X 12 with a Celestion Gold
Aracom VRX22 (Plexi clone) / Aracom 1 X 12 with a Jensen Jet Falcon
All my amps are set to the edge of breakup to allow me to push it if I need to but clean it up. The exception is that I will sometimes go for maximum headroom with the Little 40 and let my OD pedals provide the dirt. It’s a mood thing for me.
My main amp is the Deluxe, but lately it has been splitting time with the Little 40. I brought it to my last two gigs and I forgot just how sweet that amp sounds. When I play the Deluxe, I use the Line Out to feed my signal into the PA. For the other amps, I hang a Sennheiser e609 in front of my cabinets, positioned halfway between the center and edge of the cone.
I set my amp volume so I can hear it, and have taken to pointing it inward so my drummer can hear it. I let the PA do all the sound reinforcement. This saves my ears but also gives the band a much more balanced presentation.
Effects
Wampler Belle (Nobels ODR-1 clone)
Paul Cochrane Timmy Overdrive
BOSS CE-2 Chorus
BOSS DM-2w Delay
Pigtronix Class A Boost
Super-simple effects chain. I run everything in front of the amp. The Wampler is my primary overdrive. I prefer the flatter ODR-1 sound over a TS midrange hump. I use the Timmy almost exclusively for stacking. I use both the Chorus and Delay sparingly, though for clean tunes, I love adding that slapback sound. As for the boost, that’s for when I play leads. I don’t need a volume pedal.
Strings
The T5z is strung with Elixir Electric 11-46. This provides the perfect balance between electric and acoustic. And amazingly enough, they bend so well.
For my other guitars, I just use standard Ernie Ball Slinkys 10-42.
I was having a conversation with a fellow guitarist and gear slut who shared a story of how he first bought an Epiphone Les Paul then later purchased a Gibson Les Paul. He said to me that the difference in sound was like night and day. “I agree,” I replied, “But not for the reason you might think.”
I went on to explain that I’ve played a number of Epiphone Les Pauls over the years that were actually really killer. But even though they were named “Les Paul,” at least to me, they had a different sound than a Gibson Les Paul which, frankly, is the standard. But different, at least in this case, doesn’t mean bad. I went on to say that I’ve known several players who actually prefer an Epiphone Les Paul over a Gibson Les Paul and not because of price. They actually prefer the sound.
He chided me in owning a Custom Shop Les Paul and played devil’s advocate with me suggesting that I might think it sounds better because I paid so much for it. 🙂 But I said I didn’t pay full market value for it at the time, and I wanted the standard Les Paul sound.
Then recently, someone I know said he suggested to another that he check out the BOSS Katana 50. But that person said that he’d rather get a tube amp because the Katana was so cheap and it couldn’t be that high of quality. Of course, I laughed at that statement and immediately reminded me of a scene from Men in Black when Will Smith puts on the “last suit he’ll ever need.”
An experienced player can make anything sound decent; that is unless that thing really does suck and no one could ever hope to salvage a good tone out of it.
But here’s the thing: The Katana simply ROCKS! I’m continually blown away by the sound this amp produces. Sure, it’s an inexpensive amp. But it’s not cheap-sounding. I just used it this morning at an annual event that I play at a local high school. I used my acoustic through it, and just adored the sound!
Yeah, yeah, yeah, I’ve been extolling the Katana’s virtues for quite a while, but it is the epitome of “quality rules.” With any gear, the sound that it produces trumps the price every time. And quality can be had at ANY price; so can shite… I’ve played amps that cost thousands of dollars and have come away scratching my head after giving them a thorough – and fair – rundown, asking myself, Why the hell does this cost so much?
On the flip side, I’ve paid LOTS for some gear that I think is much better than everything else to which I compared it. Case in point, my hand-wired Mad Professor Deep Blue Delay. I paid $325 for it at the time, and it has never left my board. People have suggested lots of different analog delays and I’ve tried many. But I haven’t found anything to date that floats my boat like that pedal does.
So the point to all this is to get the gear that inspires you. Sometimes you might pay a lot for it; sometimes, you may not. And if you think I’m full of it, here’s my attitude (from Forgetting Sarah Marshall):
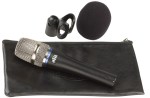
Summary: The “utility” version of the PR-22, this is the same mic, but with a single mesh (the regular PR-22 comes with three), and comes with a leatherette bag instead of a nice box; hence, the “utility.” Heil cut down on the packaging to provide an affordable tier for their popular PR-22 stage mic.
Pros: Wide frequency response, incredible rear rejection, and tons of overload protection make this an ideal stage mic. Plus, using this mic is much like removing a blanket over other mics. It’s not that the mic is tuned to higher frequencies; there’s just so much more sonic content that this mic picks up! Other mics may claim to have as wide a frequency response, but you actually hear the highs that you normally wouldn’t with mics in this price range and a little higher.
Cons: It is a nit, but not an issue for me as I always have my mic mounted on a stand, but as with other Heil mics, this is pretty sensitive to handling. But this is such a minor issue, I’m reluctant to mention it.
Price: $99.00 – $117.00 Street
Features:
Output Connection: 3-pin XLR
Element Type: Dynamic
Frequency Response: 50 Hz – 18 kHz
Polar Pattern: Cardiod
Rear Rejection @ 180 deg off-axis: -30 dB
Impedance: 600 ohms balanced
Output Level: -55 dB @ 1kHz
Weight: 14 oz.
Max SPL: 145 dB
Tone Bone Rating: 5.00 ~ I’ve been wanting this particular microphone for a long time, but already had a decent stage mic, so the will to get a new one just wasn’t there. But after my trusty Sennheiser e835 that has probably seen at least a thousand gigs and started to easily overload, it was time to replace it. I’m never going back to Sennheiser or Shure again!
As an active, gigging musician that relies on vocals, having a good mic is crucial to me. For more than a decade, I’ve relied on Sennheiser mics; specifically, the e835 as my main stage mic. It has served me well. But a couple of years ago, I did a gig where the sound guy asked if I wanted to try out a Heil PR-35. Being game for anything, I let him set it up. I didn’t know my voice actually sounded like it did.
From that point on, I resolved to get one. But it didn’t come cheap, as the PR-35 costs $265. However, I did a bit of research on other Heil mics and came across the PR-20, which has since been updated to the PR-22. And after listening to lots of comparisons, I decided to pull the trigger on the PR-22.
Wow! What a difference a mic makes! When I first plugged the mic in, the first thing I noticed was the much fuller sound of the PR-22. At the time, I had nothing to compare it to, but based on experience, there just seemed to be a lot more sonic content present in the Heil compared to my Sennheiser. And from what I could tell with the frequency analyzer in GarageBand, there really was a lot of stuff coming through.
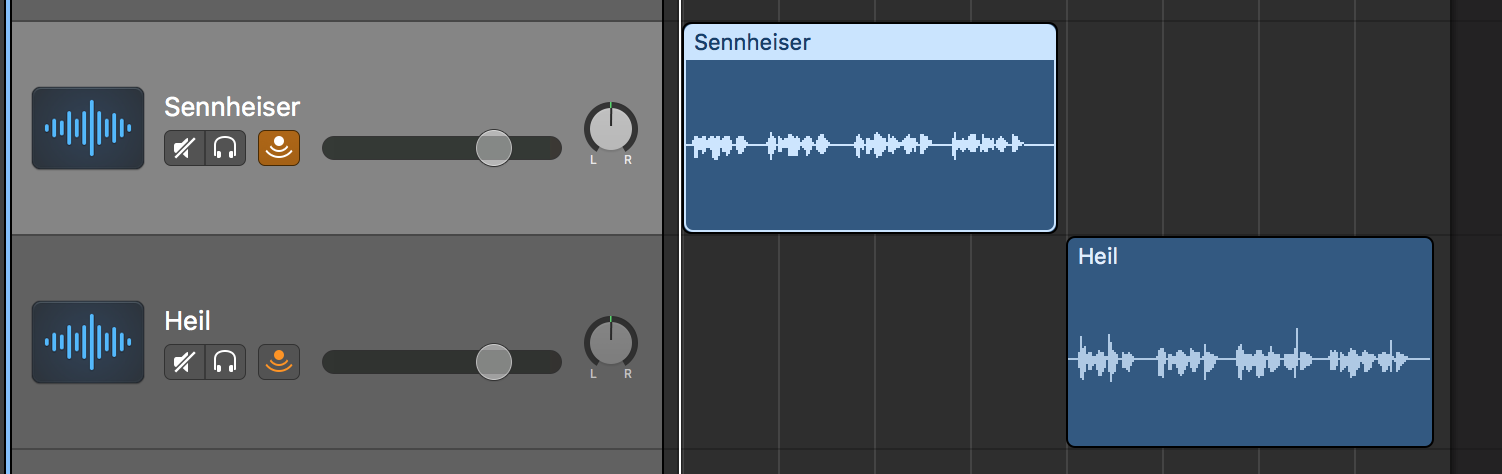
But the proof is in the pudding, so I did a direct comparison between the two. In the following clip, I speak the same testing sequence with both mics. You’ll first hear the Sennheiser, then followed by the Heil, then back to the Sennheiser, then ending with the Heil. I positioned both about an inch from my mouth.
Both mics actually sound pretty good. But there’s definitely more going on with the Heil, especially in the lower frequency ranges. It sounds much fuller than the Sennheiser, though the Sennheiser sounds pretty good as well.
As you can see, from the picture of the tracks, while both are generally being picked up at the same level, there are more defined peaks in the Heil, plus some sharp peaks not present on the Sennheiser track. What this amounts to sonically is a lot more content.
The problem with the clip I provided is that GarageBand does a bit of compression despite the fact that I exported it to SoundCloud uncompressed. But irrespective of that, there is definitely more going on with the Heil than with the Sennheiser. The difference between the two mics with my headphones on through my audio interface is marked. The Sennheiser sounds thin, while the Heil sounds rich and full.
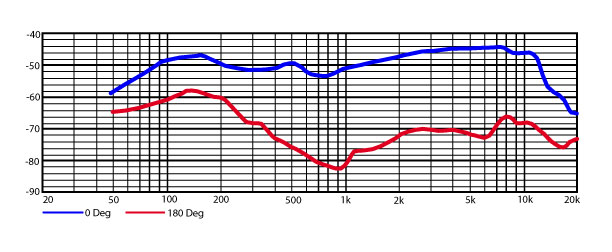
Frequency Response
Take a look at the frequency response chart for each mic:
Heil PR-22
Sennheiser e835
Just looking at the graph, it’s clear to see that overall sensitivity of the PR-22 is slightly higher than the e835. It’s not a significant difference as far as the numbers are concerned; however, especially when comparing the 1 kHz to 10 kHz range of both mics, this is where the PR-22 picks up much more content.
What first attracted me to the e835 years ago was its presence boost: That hump around 4 kHz. Sennheiser specifically called that out in its marketing. To me in actual usage, it made the mic sound so much clearer than the Shure SM-58, which sounded muddy in comparison. But with the Heil, the upper-mid to high-frequency sensitivity provide even more presence. And looking at the overall chart, there’s a lot more being picked up by the Heil in the same conditions.
In the Studio
What this means for recording is that I do a lot less EQ manipulation with the Heil than I do with the Sennheiser. In fact, re-recording a song with the Heil, the only EQ adjustments I made were to roll off the extreme highs (sizzle) and lows (muffles) and reduce a peak at around 220 Hz (it’s a trick I learned to make my vocals sound clearer). Contrast that with the Sennheiser where I actually have to roll off the extreme highs and lows, add a few dB of both lows (around 100Hz) and upper-mids and highs especially highs above 7 kHz because the mic records a bit muddy.
The net result is that I can produce a good vocal track with either mic. It just takes a lot more twiddling and tweaking when doing the EQ for the e835.
On Stage
But because there’s so much content that the Heil picks up, I have to adjust my mic technique and pull back just a bit. Proximity effect with the Heil is actually not as pronounced as I’ve experienced with other mics – especially the Shure SM-58 – but though Heil claims it’s not prone to proximity effect, all mics are prone to it. By pulling back ever so slightly, I allow the mic to pick up more mids, without sacrificing the lows.
Rear Rejection
Probably the best selling point of the mic is its rear sound rejection. While I was recording a test clip earlier, my daughter asked me a question. I had to stop recording, but after listening to what I recorded, I could hardly hear her voice, which means that the sound I was actually hearing from her voice was what bounced off the wall behind me. This makes the mic excellent for stage work and will be much less prone to feedback issues when placed close to a monitor.
Off-Axis
This is a very directional mic. While off-axis pickup is not bad, it’s not advised to stray over an inch from the capsule in any direction. I’ve been playing with the mic for the last couple of days, and for stage positioning. I found that pointing the mic a few degrees up, and placing the top edge the capsule level with my lower lip is the optimal position for me. And though I have good technique controlling my plosives (“b” and “p” sounds), positioning the mic there helps even more, and I don’t sacrifice any content.
But that said, the mic comes with a very nice foam capsule screen. I could sing straight on into the capsule with the screen on, and it protects quite a bit from plosives. It doesn’t eliminate them – nor should any screen do that – but it does help quite a bit.
Overall Impression
All that said, this mic is not for everyone. Because it picks up a lot more, it may not please everyone when they hear their voice through the mic the first time. I remember when I tried out the PR-35. I was blown away! I really didn’t know there was so much more in my voice. The PR-22 is not nearly as sensitive as the PR-35, but it’s pretty sensitive in its own right.
As far as I’m concerned, I’ve just had a defining moment with this mic. Mind you, it’s not really a super, high-end mic. But the sound quality rivals much more expensive mics. I’m a happy camper!
Summary: For me, this is a gigging musician’s wet dream as far as guitar stands go. Not only is it sturdy, well-designed and well-built, it is light AF!
Pros: Did I mention that this stand is light? It doesn’t seem to weigh much more than a pound if that. But don’t be fooled by the lightweight. The aircraft-grade aluminum is tough!
Cons: None.
Price: $16.99 – $17.99 (Amazon, depending on color)
Features (from Amazon, and I assume Aroma):
THE MOST BEAUTIFUL FOLDING STAND LASTS LONG. Top aircraft grade aluminum tubes used, with high strength ABS joints, ensure a long lifetime usage. A frame structure, when unfolded, is the most stable design to support your instruments.
THE MOST PRACTICAL STAND FOR FRET AND STRING INSTRUMENTS. The ladder designed base arms, length adjustable, let the stand suitable for different thickness instruments. The vertical arms opening degrees adjustable for different sizes of instruments. The rotatable contact surface on the stand top for different instruments leaning angles. (NOT for V-shape or other special shapes instruments)
ALL THE WAY ROUND PROTECTING YOUR INSTRUMENT. All contact points where touching your instruments are covered with soft silicone material, which is dull to any chemical reaction with your instrument surface. The 4 landing points are also covered with slip-resistance silicone material.
USE YOUR STAND ANYTIME ANYWHERE. The smart adjustable and collapsible design is to fold your stand into one piece. Lightweight. Easy to carry along with your instrument anywhere anytime.
SHARE YOUR CREATIVITY. Join Aroma Facebook account, post your using tips, your fun with this stand. Jam your thoughts with others.
Tone Bone Rating: 5.00 ~ Sometimes, even the mundane can get me excited, especially when that mundane thing makes my life so much easier.
It’s a guitar stand for goodness sake! Who the hell cares?
I do, for one. With the number of gigs I do per year, gear weight is a factor, so is compactness when you don’t have the luxury of a road crew. And when I can get those two things plus a great design that’ll protect my investment, well, I flip out!
One of my bandmates purchased one a couple of weeks ago. I thought it was cool with its compact design and adjustable base arms. But I was most impressed with how light it was. I resolved then that I’d get one. I am not disappointed in the slightest!
The days of “Made in China” being associated with poor quality are long gone. This stand is absolutely well-built. The aircraft-grade aluminum tubing is super-strong, and the plastic ABS joints should withstand a lot of wear and tear. I got mine in blue, but you can get the stand in black, rose gold, gold, and silver. The latter three will cost you a buck more for some reason. I guess black and blue sell the best. 🙂
The design of this stand is great. It folds up nice and compact. You can see in the pictures above where I placed a quarter next to the folded stand. Nice and small.
As for its sturdiness, I have no issues with it. But if you notice how I’ve set up my acoustic guitar, I have it so it stands fairly upright. This is to make sure that the bottom edge of the guitar abuts against the end stoppers of the base arms. Plus, it will put minimal pressure on the apex pad. With a stand this short, you don’t want a lot of weight at the top of the stand. You’re just asking for trouble.
Either the weight of the guitar will make the stand tip back (not too likely – I put my Les Paul on this stand and set it up to lean back and it stayed in place), or as someone reported on Amazon, the top pad put a slight depression into the back of his ES-335. To me, it’s just common sense to let physics work for you. When you place the guitar in a more upright position, more of the body surface will contact the pads. So stand the freakin’ guitar up! 🙂 Sheesh!
Finally, I dig the bottom footpads. They elevate the entire structure of the frame, so the chance of spilled liquid contacting my guitar is pretty much nullified.
Overall Impression
I love this stand! I’m probably going to get a couple more of these. Well-made, well-designed and lightweight. A perfect combination, even it’s just a lowly stand.
Summary: The SA-6 MagMic combines a magnetic pickup with a condenser mic to capture full tone of your acoustic guitar, but does it at a lower price point than similar pickups. But don’t let the more than $100 price difference fool you. This acoustic pickup captures the full spectrum of your sound, down to the little harmonics. And being able to dial in the amount of condenser mic signal is a boon to adjusting the pickup for whatever sound system and venue you may play. There’s no midrange, lifeless tone with this pickup. But most importantly, once you dial in the amount of condenser mic that you like, what you’re left with is a very natural sound. It’s truly amazing!
Pros: Super, super, easy to install and use right away. Very easy to dial in a great balance between magnetic pickup and condenser mic to get the sonic presentation you want. The pickup is also super-quiet, no buzz or hum at all, which is what you’d expect out of a good acoustic pickup.
Cons: None. To be fair though, dialing in the condenser mic picks up a lot of high frequency, but rolling it off a tad fixes that nicely.
Price: $179.00 – $189.00 Street
Features:
Magnetic Pickup:
DC Resistance: 3.8K Ohms
Resonant Frequency: 16KHz
Gauss Strength: 780 max (adjustable)
Microphone Capsule:
Pattern: Omni-directional
Sensitivity: -35dB (it’s sensitive)
Frequency Range: -20 to 20 KHz
Signal to Noise Ratio: >62dB
Current Consumption: -0.5mA (you’ll get 450 hours out of a single 9V battery)
Onboard Electronics
2 Channels, summed at ouput
Supply Voltage: 9V
Current Consumption: 1.1mA (preamp + capsule)
Battery Life: 450+ hours
Noise:
Pickup channel: -102dBV with 5K ohm source resistance
Mic channel: -96dBV with mic capsule attached
Tone Bone Rating: 5.00 ~ Once I got it installed, which took about 5 minutes, I was off to the races! I have to admit that I had my doubts about this pickup. But I’m glad I got it. It’s a keeper!
I’ve been searching for a pickup for my Simon and Patrick PRO guitar for months. I’ve evaluated and played several guitars equipped with different pickups and pickup configurations. But every review I read and every video I viewed of the Seymour Duncan SA-6 MagMic further convinced me that this was the pickup I should go with. Funny thing was that I broke my own rule with gear and purchased it without doing an in-person test. I had to trust my instincts on this purchase and I can confidently say that my instincts were spot on with this acoustic pickup.
Fit and Finish
The MagMic is well-made. Built with what appears to be high-velocity plastic, I have no doubt at all that it will survive the test of time; especially after I have it mounted permanently in my guitar. But I’d expect no less from Seymour Duncan. I’ve got Duncan pups installed in half of my guitars, and they’re built to last. Once installed, the controls are easily accessible and reside on either side of the pickup. The volume knob is closest, sitting on the 6th string side of the pickup, while the condenser mic level sits on the 1st string side.
Luckily the battery lasts 450+ hours because the housing sits on the neck block, and the only way to change out the battery is to loosen all the strings and remove the pickup. Mind you, this is an expected inconvenience, not a complaint, per se. It’s the price you have to pay to be minimally invasive.
How It Sounds
As they say, the proof is in the pudding, and this “pudding” is freakin’ incredible! As soon as I plugged my guitar into my DAW, I knew I had something special. Playing a dreadnought, I wanted whatever electronics I installed on it to pick up the deep lows and shimmery highs of my guitar, and this pickup does hands-down. To prove it, I recorded some sound samples. The first three were recorded completely dry. No EQ, no compression. I play the same riff three times in each clip, varying the amount of condenser mic in each. The first part isolates the magnetic pickup with no condenser, the second part has the condenser opened up wide. The third part has the condenser mic set to about 50%. Here they are:
Strum
Percussive Strum
Fingerstyle
Note that with the MagMic, the magnetic pickup is always on. From what I can hear, this picks up the low- and mid-range frequencies and provides a fairly warm, almost mechanical sound. The condenser mic picks up the higher midrange and high frequencies and harmonics. It’s sensitive and provides a bit too much high-frequency content for my tasts, which is why I dial back the amount of condenser mic to about 90%. In this final clip, I again recorded the guitar with no EQ, but I added compression, some stereo spread, and reverb like I would if I was recording the guitar for a song. The sound is natural and haunting.
To me, not having to EQ my guitar is important as I want my guitars recorded with as much of their natural sound as possible.
Overall Impression
I’m really at a loss for words with this pickup. I don’t think I can utter any further superlatives that could sufficiently describe the feeling I get from it.
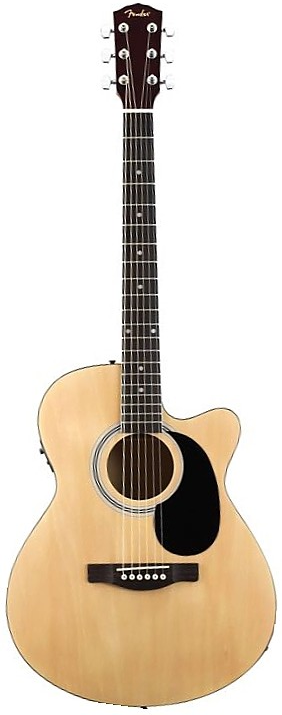
Summary: Part of the Fender Classic Design series, this lower-end model is a real surprise; especially in the sound department. Nice, low action, and a great feel. If you’re looking for a starter guitar or getting your child his or her very first guitar, you can’t go wrong with the FA 135 CE.
Pros: Some reviews have questioned the build quality of this guitar, but I’m very impressed with how solid this guitar is built. The guitar stays in tune and playing it is so, so easy. And for a smaller concert size guitar, this has a very rich sound; it’s quite unexpected.
Cons: The only nit that I have – and it’s really just a nit – is that the tuners are bit fast for my tastes. Fine tuning is a little challenging at first, but it’s easy to get used to.
Price: $179 street
Features:
Laminated bass wood sides and back
Laminated spruce top with X-bracing reinforcement
Nato wood neck
Rosewood fretboard
Compensated rosewood saddle
Single cutaway
Fishman Ion-T Preamp with built-in tuner
Tone Bone Rating: 4.75 ~ For what it is, I can’t help but give this guitar a great rating. Fender really surprised me with this guitar!
My 12-year-old son has been taking Ukelele lessons for a couple of years, and after he finished his last lesson, he came out and told me that he wanted to start playing guitar. His teacher, Michael, had accompanied him out of the lesson room and told me that he was ready. And since his birthday was coming up, I thought I’d get him a new one, as opposed to fixing up one of my old ones. My thought is that just like my dad did for me, I’d give my son a brand new guitar for his first one.
So today I went to Guitar Center and spent a couple of hours in their acoustic room evaluating all sorts of acoustic guitars. I didn’t want to spend over $200 for this guitar, but luckily, as a big-box retailer, Guitar Center has a pretty wide selection of “value” guitars. I tried guitars from Mitchell, a used “Little Martin,” several Yamaha guitars, and even a Gretsch.
The Little Martin was impressive and solidly built and was at a great price of $189, but it wouldn’t be available until Wednesday due to some city ordinance about a waiting period for used guitars. I needed a guitar today. So I sat in the acoustic room, and my gaze fell upon the Fender. I immediately thought to myself that it looked really nice. But, the thought also occurred that it was a Fender acoustic, and my previous experiences with those haven’t been all that good.
But in spite of my preconceptions, I decided to give it a try and was immediately surprised by the tone of the guitar. For a smaller-body guitar, I wasn’t expecting much sound-wise. But this had a sweet, gorgeous, rich tone. It completely took me by surprise. Then I started playing it, and thought, This couldn’t be a Fender acoustic! It sounds and plays way too nice – especially at $179!
Folks, this guitar is a sleeper, and it reminds me of the experience I had with my Squier Classic Vibe Tele. Great sound, great playability at a SUPER-affordable price!
Fit and Finish
The build quality of this guitar is awesome, just like my CV Tele. There are no uneven paint lines, and all the seams are clean and straight. The neck is straight, and the action is set up low, though it does raise just a little bit in the higher registers; but it’s not so bad that it’s not playable. This is a great guitar for fingerstyle playing, but even strummed, there’s no buzz. But more importantly, the setup is perfect for a beginning guitarist like my little boy.
Playability
Quite frankly, the main criterium for choosing a guitar for my son was playability. I could live with a guitar that had only okay sound just as long as it was easy to play. The frets are medium wire. Not great for bending and vibrato, but hey! This is a beginner’s guitar, so that’s not a big issue. The spacing is great between the frets as this is a shorter-scale guitar. For a seasoned player, this guitar plays with ease. For a beginner and a young player at that, the short scale will help them build up confidence.
How It Sounds
For a low-priced guitar, the FA 135 CE is amazingly articulate. As expected, it has a bit brighter voice as compared to a larger body guitar. But it has some nice sustain, and the spruce soundboard resonates with a surprisingly rich tone. Projection is great with this guitar due to the X-bracing under the top to provide stability and to help with projection. What also surprised me about this guitar is that it’s louder than I expected.
Tone-wise, as for me, I prefer a brighter-sounding guitar. While I liked the Little Martin, doing an A/B with that vs. the FA 135, it was as if a blanket was put over the Martin. The sound was much warmer and a bit too subdued for my tastes. That guitar projected very loud, but it would get lost in the mix when played with other guitars. This shouldn’t happen with the FA 135 CE.
Quick Demo
Here’s a quick demo I recorded just before posting this review. Sorry for the sound quality – and background noises – as this was recorded using my MacBook’s built in microphone, my new puppy was being a little playful across the room… 🙂
Preamp Test
As mentioned above, the guitar comes equipped with a Fishman Ion-T preamp. It’s a pretty simple preamp, so I thought I would give it a whirl. It’s not a bad preamp as preamps go, but it’s nothing special. In fact, its output is only okay. In order to record, I had to peg the guitar’s volume and add a lot of gain on my audio interface. Not a big deal. What was important to me was if I could get a good enough guitar signal to use the guitar in a song.
I have to say that I was pretty impressed with the result. I didn’t have to tweak the EQ at all. Of course, I did some production processing, but that was the point of the exercise, which was to see if I could get a good, mixable acoustic guitar sound from a plugged in guitar.
Overall Impression
I love this guitar! Who cares if it was manufactured in China. I have to commend Fender for finding an overseas manufacturer that does a great job at building guitars. The build, play and sound quality of this guitar have far exceeded my expectations. I think this is a guitar that my son will enjoy for years to come!
Peterson StroboClip HDTM High Definition Clip-On Strobe Tuner
Summary: Peterson is the pioneer in strobe tuning and this new version of the highly-acclaimed StroboClip is a huge improvement over the original StroboClip which, in my opinion, just couldn’t be beaten. But add to that a larger, high-definition, and a high-contrast screen, then throw in a high degree of accuracy, then add Peterson’s unrivaled “Sweeteners,” what’s not to like?
Pros: I said pretty much everything in the summary. This thing just works and it’s accurate – very accurate. But it’s really the Sweeteners that have always sealed the deal for me.
Cons: None for me as I used the original for a long time (until some a-hole stole it at a gig), but using a strobe tuner will take a newbie a bit of time to get used to. But that shouldn’t discourage anyone.
Price: $59.99 street
Features:
0.1 cent accuracy
50+ Sweeteners for different kinds of instruments – thank goodness the guitar ones are first. 🙂
Comparatively larger, HD, backlit LCD readout.
Tuning Range: C0 to B6 (very wide)
Concert Pitch Range 390-490Hz
Tone Bone Rating: 5.00 ~ After my original StroboClip got stolen last year, I went with a cheap Snark tuner. It did the job okay, but there was always something special about the sound of a guitar tuned with my StroboClip. It just sounded better. And with this updated, upgraded version, I’m a very happy camper!
What could be so special about a tuner?
Believe me, not all tuners are made the same. An accurately tuned guitar can make the difference between sounding just okay and sounding incredible. So it stands to reason that the more accurate your tuning, the better you’ll sound. So tuner manufacturers have strived to get as accurate as possible, getting into the tenths of a cent (or even the hundredths of a cent). The StroboClip is super-accurate at 0.1 cent, which is pretty incredible. And that’s great – you might be thinking that at this point, there might be a “but” in there… Yes, there is…
As James Taylor puts it, because of how guitars are constructed, and how the strings vibrate, the actual sound that they produce when plucked is not actually in tune if you tune the strings to their exact tuning. According to JT, strings will ring a little sharp, so he actually tunes each string down a few cents per string – not evenly – as each different string requires a different adjustment.
And this is where Peterson tuners have always stood out. They’ve gone to great lengths studying the actual sounds that come off a stringed instrument and have come up with special tuning algorithms for different types of instruments that they call “Sweeteners.” A Peterson rep shared with me that for their acoustic Sweetener, JT’s tuning influenced their algorithm. Hey! If it’s good enough for JT…
In any case, the Sweeteners are extremely subtle, but the first time I used a sweetener for a recording, I noticed that my guitar just sounded better. The difference is like wearing a nicely shined pair of shoes. People don’t necessarily know that you’ve shined your shoes, but they notice that you look a bit sharper. That’s the best analogy I can come up with for Peterson’s Sweeteners.
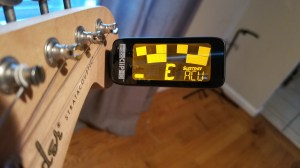
I noticed it especially with recording my acoustic guitar. With standard, equivalent tuning, it sounded okay but tuned with the ACU (acoustic) Sweetener, it just seemed to ring so much better. That said, you have to get used to the sound because up close, it might sound a little off. But when I listened to the recording, wow! It was truly a revelation.
Fit and Finish
All Peterson products are built rock-solid. And even though they’ve gone with a plastic body, it doesn’t feel at all cheap.
The kicker for me is the comparatively large screen to other tuners. Damn! That thing is readable! And with the higher number of pixels, the readout is super smooth. And for my aging eyes, I love it!
The clip’s springs are pretty tight, but not so much that you can’t squeeze the clip open, and combined with the silicon pads will ensure that the clip stays put on your headstock.
Ease of Use Tuning with a Strobe Tuner
It has three buttons. The middle turns on the unit and acts as the menu selector. The + and – buttons scroll through choices. Doesn’t get much easier than this.
Tuning with a Strobe Tuner
I have to admit that the first time I used a strobe tuner, it was a little weird. I was so used to seeing a needle sweep over a gauge. With a strobe tuner, what you get is a checkerboard pattern that sweeps left and right to indicate the sharpness or flatness of your string. If it moves clockwise, the string is sharp and vice-versa if the string is flat. When the string is in tune, the checkerboard stops moving. The bigger screen really helps.
But there is a bit of a trick to tuning. You have to get used to moving in much smaller increments than what you might be used to. Also, the tuner is so sensitive that once you make an adjustment, you have to remove your hand from the tuning knob because the slightest pressure will affect the tuning. But believe me, once you get used to tuning this way, it’ll become second-nature.
One feature that I didn’t mention is the Drop/Capo setting. If you drop your tuning or use a capo, you can get into the Drop/Capo mode, set the number of semitones you’re going up or down, and then tune accordingly. That’s a really powerful feature, and as I often use a capo, knowing that my strings are all in tune with the right compensations for each string is comforting.
Overall Impression
You can probably tell based on the rating I gave and the review, I love this tuner! I know that Peterson’s marketing push is for the HD screen, but to me, this tuner has always been about the underlying technology. It’s second to none. But I do have to say that the larger screen is simply awesome!
At $59.99, it’s not a cheap tuner, especially compared to something like a Snark 2 that you can get for under $25 (I got mine for $21 on sale). And you know me, I’m not one to say that just because you pay more for something, it’s better. But in this case, it’s totally worth the extra money.
You might be wondering why I might be so excited about this. After all, it’s only a tuner. But once you tune with a Peterson tuner and hear the difference in your sound, you’ll become a believer.
What About Other Strobe Tuners?
The only one I can think of is the Turbo Tuner with an amazing .02 cent accuracy; yes, you read that right. But as I said before, while extreme accuracy is great, what makes the Peterson technology stand out to me are the Sweeteners. They really make a difference. And at some point, I’m wondering if our ears can actually hear the difference between 0.1 and .02 cent. I’m not so sure. It’s almost like a tube amp. The more gain you throw at a tube, the less effect it’ll have on volume. But to each their own. If extreme accuracy is your thing, that’s awesome. And that’s the beauty of having so many choices out in gear land. There’s bound to be something to please any taste.
Over the years, I’ve probably spent in the tens of thousands of dollars on gear; from guitars to amps and effects, to cords and power strips, to microphones and recording/PA equipment, to chairs and stands. Looking back, that stuff adds up! On top of that, when I started going on a gear-buying binge back in the early 2000’s then started writing about the gear I’d buy or potentially buy, I started to gain a keen insight on evaluating gear, so I thought I’d share how I evaluate gear for purchase.
This isn’t intended to include stuff like music/gear stands or cords or other common things like that (I know, some may argue about some cords not being common, but I’m not going to go there). It also doesn’t include things like recording hardware and software or microphones and what-not. What I want to focus on is gear that actually directly produces or affects your tone in some way, shape, or form; specifically, guitars, amps, and effects. So here goes…
The Seven Steps to Gear Nirvana
Check its visual appeal
Does it look good? If so, move on…
Plug it in and play as is
Tweak it to dial in volume and EQ (if necessary)
Play it again.
Play chord progressions and little solos.
NOTE: Be honest, and play it how you’d normally play it. For instance, don’t try to see it does metal if you’re a blues player. That’s a distraction.
Repeat 3 and 4 until you get a feel for it in all its playable range from both a sound and touch perspective. At this point, you might say it’s crap. But if you like it after playing it, move on.
Check it for construction quality:
Are there any loose knobs?
Are there any obvious flaws?
Are there open seams that you don’t expect to be there?
Is it sturdy enough to withstand your intended use for it.
For instance, if it’s plastic, but you’re just going to use it in your bedroom, chances are it’ll be okay.
This is a late addition and a great suggestion by a reader: Check the weight.
Think about what you’re lugging on stage. I gig – a lot – and it’s an issue.
Finally, check your wallet.
Everyone has a different budget, so what you’re willing to pay is entirely up to you.
Some might question item 1. But more often than not, I hear people say, “This thing LOOKS SO COOL!” So, visual appeal is a factor to consider. For me, I can’t stand the look of pre-worn guitars, no matter how good they might sound or play (though I did make an exception with my pre-worn ’59 Les Paul Replica). If my guitar shows scratches, dings, or wear marks, I want to be the one who does all that. But that’s me. Frankly, I prefer a nice, shiny guitar. Or take, for instance, my Mad Professor Deep Blue Delay. For goodness sake, it’s a pedal! But that blue power coat finish and the bright blue LED just look killer on my board! 🙂
At first blush, this process seems almost too simplistic. But I developed this process from reviewing gear for this blog. After all, I’d only review gear that I would consider buying. But also, since I have a regular day job and review time was at a premium, I had to find a simple, repeatable way to evaluate gear, and it had to be simple enough so that I could easily remember what I did. Turns out, I could use this process not matter where I was, and on any kind of gear.
In any case, try it out when you evaluate your next set of gear!
Summary: Inexpensive but incredibly playable and most importantly, very nice sounding, the BOHO Motor Oil really took me by surprise. Yeah, it seems a bit gimmicky, but these guitars are inspired by the founder’s South African roots where people put instruments together from whatever they could find.
Pros: Super-easy and comfortable to play. Pickups are voiced such that there’s a clear distinction between the positions. Very response to volume knob variation.
Cons: These are nits at most: The tuners need to be tightened a bit, as the strings can go out of tune fairly easy. Tone knob almost acts like a volume knob, but it’s serviceable.
Price: $299.00 Direct
Features:
Model: Motor Oil!
Body: Recycled metal hollow body w/ removable back panel. Basswood frame for increased amplification and structural integrity
Neck Wood: Maple
Neck type: Bohemian Through-Body
Fretboard: Rosewood
Headstock: Red
Finish: Golden Glaze
Frets: 21
Nut Width: 1 3/4″
Width at 12th Fret: 2 1/8″
Width at 21st Fret: 2 3/8″
Neck Thickness: 7/8″
Scale Length: 25 1/2″
Hardware: Chrome
Tuners: 3R 3L screw in w/ removable keys
Bridge/Tailpiece: Tune-o-Matic
Pickups: Humbucker, Humbucker
Electronics: Volume, Tone
Switch: 3-way toggle
Self-standing: This model has a built in stand made from recycled rubber.
Inspired by South Africa. Designed in Atlanta. Produced in China.
Tone Bone Rating: 4.75 ~ The best word to describe this guitar is FUN. It plays as fun as it looks!
I’ll admit it right out of the gate: I really tried NOT to like this guitar. The moment I took it out of the box, my first reaction was literally, “Oh shit! HAHAHAHAHA!” and I chuckled about it for several minutes. In fact, I let the guitar stand in my living room for a few days before I even decided to play it because I didn’t think this was a very “serious” guitar. I imagined myself in a clown suit playing it. But since I asked for the review unit, my sense of obligation overcame my initial amused disdain for it. So I took it to my man-cave, plugged it into my amp, tuned up the guitar, then started to play. And play. And play.
A couple of hours passed by with me just tooling with the guitar, and I finally had to stop when my wife opened the kitchen door glaring at me because I hadn’t gotten to my honey-do projects for the day.
Did I really lose track of time? I asked myself, That ONLY happens when I’m getting lost in the sound and what I’m playing is pleasing to me. When something gets me in the “zone,” it’s special, and all my initial thoughts and bias about its appearance completely disappeared.
When I put the BOHO down, I resolved to do a sound test with it as soon as I could. I had a gig that night, so I couldn’t get to it until the next day, but I looked forward to playing that guitar throughout my gig.
Even still, this guitar reeks of “gimmick” when you look at it. But how it plays and sounds completely overshadows any gimmickry that its appearance may imply. It totally took me by surprise, and I have to say that hands-down I love it! And the fact that it’s made in China is actually a good thing. Chinese guitar construction has come a long, long way over the years, and labor is still cheap, which means these guitars are affordable, so you shouldn’t let price-bias get in your way.
Fit and Finish
I could see nothing wrong with the guitar’s appearance. Other people have reported dents in the past, but my review unit had none. Note that those reports were from earlier models, and I don’t think they had the bracing that the new models have that make them tougher. The only nit I really had was that bending the first string at around the 12th or 13th fret while really digging in would fret out the string. But I attributed that more to a setup problem, and it’s quite possible that the bridge settled a bit during shipping. Raising the bridge a millimeter or two would solve that issue. It certainly wasn’t a neck angle issue. Everything appeared to line up just fine.
As far as overall construction is concerned, amazingly enough, the guitar’s pretty solid-feeling. I was thinking that it might be a bit flimsy; after all, its body is a freakin’ gas can! But the internal bracing provides plenty of structural integrity, so fragility isn’t an issue at all.
But other than my little nit, the guitar actually looks pretty cool, and over time, as I played it, it grew on me. That had more to do with how it plays and sounds than its appearance.
Playability
Amazingly enough, moving around the neck is smooth as silk. I love that it has a rosewood fret board because it provides a tactile feel that makes it feel familiar (most of my many guitars have rosewood fret boards). I personally prefer fatter fret wire, but that’s just personal preference, and doesn’t take away from how well the guitar feels and plays. And surprisingly enough, even with my belly, the guitar’s very comfortable to play despite the obviously fatter body from the can.
How It Sounds
Okay, so this is where the rubber hits the road, and where, most importantly, the guitar impacted me the most. Once I got past the guitar’s appearance, it was its voice that really struck me. While the folks at Bohemian Guitars tout this as the “rock” model, and it certainly has a great voicing for rock, I actually loved its voicing clean or just slightly dirty. For comparison, the voicing has elements of a later model Les Paul with sort of deep voice, but also has the “woody” elements of a semi-hollow body like a 335. It’s a cool voice. I would’ve liked to have a better EQ response with the tone knob because changes in the tone knob affected volume, but I found a good spot that worked for all three pickups and kept it there.
The first three clips you’ll hear are the same phrase played through each of the pickup positions, starting with neck pickup and moving to the bridge. With the first two, I just made up stuff off the top of my head, but with the third clip, I used the main riff from Oasis’ Wonderwall. No matter what I’m playing, the one thing I always look for is note separation, especially when played dirty. I didn’t play any lead lines because frankly, 97% of the time I’m playing rhythm. So it’s important to get a sense of how well the guitar articulates. The amp I used for this was my trusty Aracom VRX18 with EL84’s, played in the drive channel. The amp was set to the very edge of breakup so I could get it to overdrive with volume knob changes and attack.
All clips were recorded raw with the exception of the last clip where I added some hall reverb.
Clean, all three pickups
Dirty, all three pickups
Edge of breakup, all three pickups
Jazzy Blues w/reverb, middle pickup
Admittedly, the clean and edgy tones were the ones that got me to lose myself for those couple of hours when I first played the guitar. And to be completely honest, I love the sound this guitar produces clean and at the edge of breakup best. This probably has to do with my Les Paul bias with respect to a “rock” sound. It’s not that I don’t like the overdriven sound of the guitar, it’s just that I have a preference for the sound I want to produce when playing with overdrive.
Overall Impression
Once I got over my initial doubts about the guitar, I discovered a very nice-playing and nice-sounding guitar under the covers. And at $299, this an incredibly approachable guitar that won’t break the bank in the process. Would I gig with it? To be honest, I’m not sure. But I have no doubts with its solid construction that it would be able to stand the rigors of gigs. But for its gorgeous clean tones, I’d certainly use it in the studio, especially for the new reggae-style tunes I’m working on.
And truth be told, its appearance has actually grown on me. I still don’t know if I’d gig with it regularly, but that has nothing to do with how it looks. With a gigging guitar, I typically look for versatility. I’d have to bring it to band rehearsal to see how it would perform. But other than that, I love this guitar. For what it is, it’s the ultimate in “cool.”
Summary: This amp is truly a tone chameleon, capable of delivering vintage to modern tones in one 18 Watt package. I daresay that it is pretty much the most versatile amp I’ve ever owned; not only from a tone standpoint, but also from a power standpoint. 18 Watts too loud in your space? Bring it down to 5W or 1W or even 0W! The on-board RedBox DI is absolutely killer, and provides for truly silent recording, which is a huge for late-night recording when the kids are asleep (or roommates, etc.). Super-responsive EQ makes for tons of tone shaping possibilities.
Pros:Where do I begin? This amp has it all for me; especially in the recording department.
Cons: This is a very minor nit, but even with a Strat, the lead channel can really compress at high gain settings.
Price: $599 Street ($50 for the optional footswitch)
Tube Safety Control (TSC) – keeps power tubes biased properly for optimal performance.
Padded, protective cover included
Optional channel switching footswitch.
Tone Bone Rating: 5.00 ~ I have to admit, I really lucked out with this amp. I bought it used from a good buddy who had only gigged with it once, and to be honest, didn’t know too much about it. But after I researched it, what originally attracted me to the amp was the on-board RedBox DI. But after playing with it for several hours since I picked it up, I simply love all the tones I can get from this amp – and I’ve only played one guitar through it! It’s a winner!
I’m such a gear slut. When I got this amp, my buddy, who’s also a fellow gear slut chuckled and said, “As if you need another amp…” I also laughed, and almost got buyer’s remorse. BUT what I didn’t have was an amp that had an on-board DI. But the RedBox is a special DI in that it has speaker simulation, which means you’re going to get the reactance of an amp connected to a speaker. It’s one thing to DI into a DAW, but it sounds like an amp plugged directly into a speaker. Add speaker simulation and there’s something special that happens when you add reactance into the mix. You get the dynamics you expect when plugged into a cabinet.
Fit and Finish
This amp is built like a tank. I’m sure H&K had the gigging musician in mind when they built the amp because it’s very solid. The only nit I’d have with respect to it’s physical appearance is that the level dots on the knobs can be a bit difficult to see from certain angles because of the chrome finish. It’s a small nit, and when I gig with the amp, I’ll probably either paint dark lines or stick some thin pieces of colored tape to the top of the knobs so I know where I’m setting things.
Also, when switched on, that blue LED glow is pretty cool. To be honest, I don’t really care about how the thing looks and focus much more on the sounds it can produce. But hey! If it sounds good and looks great in the process, I’m not going to complain.
How It Sounds
To start off, whether plugged into a cab or outputting directly from the DI into an audio interface, this amp is dead quiet when idle, except at high gain settings where the power amp will hum just a tiny bit. But that humming also has a lot to do with my Strat’s single coils. Haven’t tried it with any of my Les Pauls just yet, and I’m anticipating that they’d be quieter. But any amp fully cranked is going to make some noise.
Now to be completely honest, none of the clips I’m supplying here are with the amp hooked up to a cabinet and me miking the cab. My focus was on using the DI to capture my guitar sounds to see if I could get a usable recording that I could then tweak in production. Circling back a little with the DI, one thing that having a speaker simulation is that you get the subtle overtones and dynamics in the signal that you wouldn’t get with a direct signal. It’s typically a little dead when using a regular DI with no speaker simulation, thus no reactance. Truth be told, it’s not perfect, and it doesn’t sound nearly as good as the amp plugged into a cabinet. But it’s close. Real close, and though it doesn’t sound as good as a speaker moving air, it doesn’t suck tone. Dynamics are all retained. My thought behind getting this amp was to get a usable signal that I could then process in Logic and add the texturing there. So without further ado, let’s take a look (BTW, for these clips, I used my Strat plugged directly into the amp, with an XLR going direct to my MBox 2):
Raw signal, clean
My first test was to record a simple clean clip raw to see how it sounded. This clip has absolutely no plug-ins employed in neither the guitar tracks nor the output track.
When I finished the “rhythm” track for this, I immediately smiled. Not only did I have a usable signal, it sounded like my amp was plugged into a cabinet because the dynamics that I was expecting were all there, but with the added plus of no ambient room noise.
Clean, slightly processed
Since I had a usable signal, I wanted to fatten it up a bit and add some reverb to give the sound more space. Here’s the same clip as above, but slight processed (Note: I didn’t do any EQ on the either track).
After doing just those simple tweaks, I knew I had a winner with respect to a recording amp.
Dirty
I wasn’t going to originally include this clip because if there’s one nit I had with the amp while recording this last night, was that at real cranked up settings, the signal compresses – a lot. I guess I’m used to using vintage-style amps that never get that far. But with this amp, I have to be careful about cranking the amp too high. It’s a little hard to hear in the clip itself, but while playing, I noticed a reduction in note separation. But granted, I had the Master wide open, and the gain knob at 3pm. I’ve learned to set the Gain to around 10am, and I still get plenty of sustain, but much less compression.
Sustain test
Finally, I wanted to experience that noted H & K tube sag, and see how well the amp would sustain my guitar signal. In a nutshell, it sustains incredibly well.
The most impressive thing about this clip was at the end where the amp is picking up the overtones of the guitar. OMG! I couldn’t believe that when I was playing last night!
Final Impression
I don’t know what it is, but I’m running across a lot of game-changers for me. While I love my vintage-style amps, and will continue to gig with them, I have a feeling that I’ll be getting a of mileage from the TubeMeister 18. As a bonus, check out this video review from Guitar World. Paul’s a killer player, and he really brings out the gorgeous tones the TubeMeister 18 can produce. There are actually two videos, and the second video where he starts playing the lead channel, had me swooning over the gorgeous overdrive this amp can produce.


 What could be so special about a tuner?


