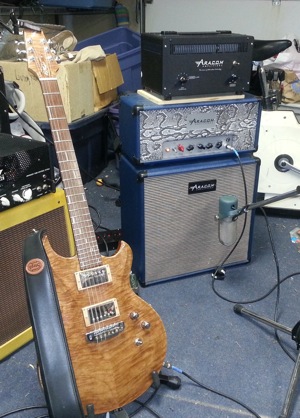
Feeds:
Posts
Comments

Posts Tagged ‘Music’

As in Gear Acquisition Syndrome…

Here’s the backstory… Back in May of 2021, I got an email from the keyboardist of my former old farts classic rock band asking if I’d be willing to fill in for their lead guitarist who was going to be away on a business trip. I agreed and we set up rehearsal dates leading up to the gig. I hadn’t played with them for over six years, so I was excited to get back together with them. Rehearsals went swimmingly well. It was like we have been playing together this whole time. They went so well that at the third rehearsal, our drummer, who’s also one of the band leaders, asked me if I’d like to rejoin the band as a permanent member. I agreed and have been playing with them since.

When I was doing 250+ gigs a year back in the day, I was gobbling up some kind of gear quite often. It was compulsive behavior where I spent tens of thousands of dollars on amps, guitars, effects, sound systems, etc. It was a serious case of GAS that filled up my garage with stuff; most of which got limited use. But getting all that gear helped build this blog so I have no complaints nor regrets for getting all of it. And I have since given away or sold much of the gear I acquired all those years.

The great thing about getting back to playing regularly is that though I sold off or gave away lots of gear, I still had LOTS. So, it was easy to literally “gear up” and play. I had all the effects I needed, so I didn’t need to get any new gear. The exception was my purchase of my Fender Tone Master Deluxe, which replaced my BOSS Katana Artist that went on the fritz at a gig. But other than that, I’ve purchased strings and picks. That’s it.

I still keep up on new gear that’s coming out, but to be honest, I’ve found my sound so I’m not feeling hard-pressed to explore. The only thing I may get is a BOSS CE-2W Chorus so I can retire my 1981 BOSS CE-2. It still works great, but it is pretty beat up from the hundreds of gigs I’ve played with it over the years.

And now that I’m over 60, I’m just not interested in lugging a lot of gear. I want to make one trip from my car to the stage. Here’s my equipment list:

Guitars

  1. Taylor T5z
  2. Squier Classic Vibe Tele
  3. Gibson R8 Les Paul

The T5z is my #1 since it is so versatile. I switch between the CV Tele and the R8 depending on my mood, but lately I’ve been playing the CV Tele a lot more than my R8.

Amps

  1. Fender Tone Master Deluxe Reverb
  2. DV Mark Little 40 L34 / Avatar 1 X 12 with a Celestion Gold
  3. Aracom VRX22 (Plexi clone) / Aracom 1 X 12 with a Jensen Jet Falcon

All my amps are set to the edge of breakup to allow me to push it if I need to but clean it up. The exception is that I will sometimes go for maximum headroom with the Little 40 and let my OD pedals provide the dirt. It’s a mood thing for me.

My main amp is the Deluxe, but lately it has been splitting time with the Little 40. I brought it to my last two gigs and I forgot just how sweet that amp sounds. When I play the Deluxe, I use the Line Out to feed my signal into the PA. For the other amps, I hang a Sennheiser e609 in front of my cabinets, positioned halfway between the center and edge of the cone.

I set my amp volume so I can hear it, and have taken to pointing it inward so my drummer can hear it. I let the PA do all the sound reinforcement. This saves my ears but also gives the band a much more balanced presentation.

Effects

  1. Wampler Belle (Nobels ODR-1 clone)
  2. Paul Cochrane Timmy Overdrive
  3. BOSS CE-2 Chorus
  4. BOSS DM-2w Delay
  5. Pigtronix Class A Boost

Super-simple effects chain. I run everything in front of the amp. The Wampler is my primary overdrive. I prefer the flatter ODR-1 sound over a TS midrange hump. I use the Timmy almost exclusively for stacking. I use both the Chorus and Delay sparingly, though for clean tunes, I love adding that slapback sound. As for the boost, that’s for when I play leads. I don’t need a volume pedal.

Strings

  1. The T5z is strung with Elixir Electric 11-46. This provides the perfect balance between electric and acoustic. And amazingly enough, they bend so well.
  2. For my other guitars, I just use standard Ernie Ball Slinkys 10-42.

Read Full Post »

4.75 Tone Bones - Almost perfect but not quite

polarity_j3

Polarity J3

Summary: Made out of one of the hardest woods in nature, the Polarity J3 pick produces a warm, but also “spanky” tone that is perfect for leads.

Pros: I’m a big fan of natural materials for plectrums, and the J3 doesn’t disappoint with its feel in the hand. Natural materials also tend to not squeak when striking a vibrating string. As far as sound is concerned, I dig the sound that this pick produces – A LOT!

Cons: My only concern with this pick is its lifetime. I took the picture I supplied to the left after playing with the pick for about an hour on various guitars, strumming and playing solos. If you click on it, you can see where some of the Carnuba wax has already started wearing away, so I’m not sure just how long the pick will last. However, I’ll have a better idea after I gig with it this coming weekend and will post a follow-up article. NOTE: This is a fairly small nit because I only put a few hours of playing on it, and note that the only wear was the wax coating. The wood itself didn’t have any wear on it.

Price: $29.00 ea

Specs:

  • 1.3 millimeters thick
  • 7/8″ wide X 1″ long
  • Handmade
  • Magnetic

Tone Bone Rating: 4.75 – If I didn’t have the initial concern that this pick might have a short lifetime, I’d give the pick a 5 Tone Bones as it plays and feels and most importantly, sounds great.

As with most gear I write about, how good it feels, plays, and sounds is a matter of personal preference. That also affects what I’d be willing to pay for gear as well. So based upon my initial experience with the Polarity J3 pick, though the pick is on the pricey side, I’d make an investment in it just the same. It plays and feels and sounds fantastic. Is it something I’d use for general use? Probably not, simply because despite the wood being extremely hard, it’s still wood, and will most probably wear at a quicker rate than harder materials. I certainly wouldn’t use it for rhythm playing with a Strat that has vintage-style pickups with the poles that protrude. I nicked several Red Bear picks on my Strats, so I never play a Strat with a Red Bear pick.

But for leads? This is a great pick for that. Here’s a little ditty I put together last night to demonstrate how it sounds (I used my Slash L Katie May through a Fender Twin AmpliTube model):

I already have the perfect application for it. As of late, at my solo gigs, I’ve been making a lot of use of my looper to create live tracks that I can improv over. The “backing tracks” are usually recorded finger-style or using a variation on a clawhammer technique, and most of the time, I just hold my pick in my hand. This is a perfect pick to use for that application, and it’ll get a lot of use; especially this Friday and Saturday. So I’m looking forward to playing with it!

I love a number of things about this pick.

  • Being a rigid pick, it has a relatively fast attack, as compared to standard flexible picks. Even for strumming the quick response helps to stay in time.
  • The pointy tip produces a nice, bright tone, but the wood helps balance that out with some warmth in the mid-range.
  • Amazingly enough, I was expecting to have a bit of friction because of the wood. But it’s so hard that it slides over the strings quite easily, but the awesome thing is that it’s just soft enough so you don’t get that ugly squeak when you’re hitting a vibrating string, as you often get with hard plastic picks.
  • I was a little dubious about its size when I first got it, but after playing with it for just a few minutes, it’s extremely comfortable to hold plus, there’s a lot to be said about holding natural and natural-feeling material.

Will it last?

That’s really the big question, isn’t it? Despite being made of a hardwood, it’s still wood, and wood is somewhat delicate. Only time will tell if it holds up. As I mentioned above, I was a little concerned about the wax coating wearing so quickly after just a little bit of time playing the pick, but the wood was absolutely intact, so my feeling is that as long as I keep the scope of how I use it fairly narrow, this pick should hold up for a long time.

Overall Impression

I’m diggin’ this pick, and will use it this coming weekend at three gigs, so I will get a really good idea about its durability. But as it stands now, I’ve put in a few hours of playing with the pick on acoustic and electric guitars, and even used it with my bass. This is not a pick that I’d use for strumming; not that I’m concerned that it’ll break, but because of its size and shape, it just seems to be made for doing solos.

Read Full Post »


Keeley Luna Overdrive

Summary: Two-and-a-half years in the making and combining what Robert Keeley feels are the best in overdrive pedals, tube amps, and tone stacks. The Luna overdrive is the result. This pedal covers a wide range of overdrive possibilities, from light grit to fuzz-like, square-wave distortion.

Pros: The Baxandall tone stack is KILLER and totally sells me on the pedal. On top of that though, the pedal reacts to attack and guitar volume adjustments just like a tube amp, so you’ll be right at home.

Cons: It’s pricey for one, and the tight interplay between the EQ, Drive and Master controls makes it difficult to dial in just the right amount of overdrive. But these aren’t big enough cons to give it a lower score.

Features:

  • Hand-made in the USA
  • Op-amp clipping and JFET gain stages
  • Baxandall tone stack
  • Drive and Master controls
  • Classic and Modded overdrive modes

Price: ~$219 Street

Tone Bone Score: 4.75 ~ This is a great pedal. I’d give it a 5 on tone alone, but I knocked off just a bit for making it difficult to get a decent tone out of my amp. I suppose that’s part of the fun in playing around and discovering what a pedal can do, but I have to be fair. It got a little frustrating as the Drive knob is pretty sensitive.

After my beloved Timmy pedal, I thought I was done with overdrive pedals! 🙂 I should know better because I’ve been a slut for overdrive pedals, and I guess there’s really no cure for that. Playing around with the Keeley Luna Overdrive has been a joy, though I will admit I did briefly get frustrated while trying to dial in the pedal. It simply took a bit of time to get used to the active Baxandall EQ. Unlike other EQ’s, it’s not a cut type of EQ, where the EQ knobs turned all the way up give you flat response. With a Baxandall EQ, the 12 o’clock position is flat response. Turn up an EQ knob and you get a boost, turn it down, and you get a cut. But the midrange is left alone. That means that if you turn both knobs fully counter-clockwise, you get a midrange hump; fully clockwise, and you get a scooped tone.

This is a totally different animal from other EQ’s, and it takes awhile getting used to. However, despite the learning curve, this type of EQ provides a much better way of dialing in your tone to fit your guitar, amp, and cabinet. For instance, for my test, I played the pedal in front of my DV Mark Little 40, which goes out to a 1 X 12 cabinet that has a Jensen Jet Falcon speaker, which has a pretty big bottom end. Putting the pedal in flat response made my tone sound really muffled because of the lows (I had my amp’s EQ completely flat). But after playing around, I found that placing the bass at 11 o’clock and the treble at 1 o’clock brightened up the tone just the right amount, then it was all about getting the Master and Drive knobs set.

About the Drive knob… it’s super-sensitive, and you’ll start getting breakup as soon as you start turning the knob clockwise from its minimum position, which is about 7-8 o’clock. I found that the sweet spot for me was the Drive just past 9 o’clock and the Master set between 2 and 3 o’clock. With my amp set at just the edge of breakup, the boost from the Master got the tubes overdriving, and the combination of distortion from both the pedal and the amp was quite pleasing to my ears.

How It Sounds

In my First Impressions article that I wrote earlier today, I said that the pedal adds some color. I’m going to retract that now because depending upon where you set the EQ’s, you can have a transparent tone, or add as much color as you want. I like to err on the side of transparency with most overdrives, and when it came down to it, this pedal was no different. I originally had a nice treble boost, but when I did some test recordings, found that I didn’t like how I had set the EQ’s because of the color. Here are a couple of test clips. Note that both of these were done in the Classic mode, and I was using my Gibson Les Paul ’58 Historic Reissue.

In the first clip, I do a quick clean rhythm riff with an almost imperceptible grit, then do the same riff with the pedal to add some dirt.

With the next clip, I decided to do a dark rhythm track then play a lead alongside it. In both rhythm and lead, the pedal was set the same way, and I vary the amount of overdrive simply by adding more guitar volume or hitting my strings harder. This clip was made purely to demonstrate the pedal’s dynamic response. I also added just a touch of reverb to grease the sound a bit,.

I absolutely love the tone of the lead track. I started out with my LP in the middle position, with the neck pickup at 5 and the bridge pickup at 6. Then when I started driving it harder, I switched to the bridge pickup entirely and dimed it. From there I just closed my eyes. The sonic content that the pedal produces is amazing. There are lots of little harmonics and overtones in the signal, and the note separation is awesome. The note separation takes a little getting used to as well. But this is a good thing because this pedal does not produce mush – even at high gain settings.

In this third clip, I just do a few seconds of a Journey riff. here the tone is scooped with both the EQ knobs at about 2 pm, the Master cranked wide open and the Drive at about 10 o’oclock. Unfortunately, my mic didn’t pick up all the little harmonics and overtones, but the point to this one was that even pushing my amp hard, and with much more gain, the note separation is still maintained.

I know, I only have a couple of clips, but admittedly, I’m still playing around with the pedal. I want to try it front of one my Plexi-style amps to see how it performs.

I did take it through its paces with the Modded mode, and that mode with my amp just past the edge of breakup created some real aggressive overdrive; not over the top, but I have to play around more with this mode and cranking up the gain to experience the upper limits of the pedal.

Overall Impression

As I said above, this is a great pedal. It’s a little steep in price at $219; Keeley pedals have never come cheap. But that said, I’d totally add this to my board to stack with my Timmy (hmm… going to have to try that out). It has been a long time since I’ve been jazzed about an overdrive, and I’m really jazzed about this one.

Interestingly enough, besides a few video reviews out there (that do nothing but blues licks), and one that I saw done by Musicians Friend staff member, there’s not much in the way of reviews, which is surprising. Some of the feedback I saw on a couple of forums said it didn’t work well with people’s amps. I think that has more to do with not playing around with the pedal enough. That Baxandall EQ takes some getting used to, but once you “get it,” this pedal rocks!

For more information, visit Keeley Luna Overdrive product page!

Read Full Post »


Sebago Sound PrototypeSummary: I don’t know what an original Steel String Singer sounds like, but if Sebago’s take on that amp is any indication, we have a winner here! This is an incredibly versatile amp that can fit any genre of music. This is my next amp.Pros: Versatility is the key with this amp. The notch High and Low notch filters let you dial in your tone to fit the genre or help fine tune the amp to your guitar.

Cons: None. But not a 5.0? I’ll explain below…

  • 100-150 Watts (150 with 6550’s) from 4 power tubes
  • Reverb “loop” with send and receive knobs (send is signal gain into tank, receive is similar to mix)
  • Single input with switchable FET circuit
  • Gain control
  • Three-band EQ
  • Bright, Mid, Rock/Jazz mini toggles
  • Master control
  • Presence control
  • Individual High and Low notch filter knobs.
  • Power and Standby switches

Price: TBD, but will probably be somewhere between $2500 and $3000

Tone Bone Score: 4.75 ~ The only reason I took off a quarter point is because the reverb receive circuit was a bit noisy. I was able to dial back the hum by upping the send gain and dialing down the receive signal, but this is a prototype, so it’s understandable that there would be some tiny issues, and believe me, this is tiny.


My First Impressions article pretty much said everything that I had to say about this amp. My opinion hasn’t changed. This is an absolutely SUPERB amp that has me GAS-ing VERY BADLY. And after playing with this amp for the last few days, I’m in a dream state from the hypnotic tone that this amp produces – with all my guitars.

One thing I will add is that Bill Dunham emphasized that the amp is a great pedal platform. I still agree with that assessment, but frankly, this amp produces almost all the tones that I need, so I haven’t hooked my pedal board once this past week. The reverb is fantastic, and when I’ve taken the amp into overdrive, I just haven’t seen the need to use a pedal. The only exception to that is with the last clip I recorded where I ran my Strat through my Timmy overdrive before going into the amp, which was not quite at the breakup level; just slightly below.

Granted, at 100 Watts, I couldn’t take the amp into breakup without an attenuator. But luckily, my trusty Aracom PRX150-Pro comes to the rescue yet again in that department. A quick note on the distortion. I wasn’t really liking the fully cranked up tone of the amp with my Strat. It’s an entirely different matter with my Les Paul. The lead tone – which you’ll hear shortly – is just incredible. With the FET activated, and both Gain and Master cranked up (Gain at 9, Master at 10), the sustain, harmonics and overtones create this absolutely gorgeous lead tone. Now by itself, this amp won’t do metal. It’s not made for that, and I don’t think it was ever intended to do that. But crank it up and throw a distortion pedal in front of it, and I believe you could easily do metal.

Fit and Finish

I really won’t comment on this much because the final face plate is being produced so Bill modified a Double Trouble face plate. That’s also why I didn’t take pictures. It’s not finished, and I don’t want people to get the wrong idea that the amp will be in the condition in which it was tested. It looks great, but I’d rather get pictures of the finished product.

How It Sounds

Bill kept on saying when he dropped off the amp that it’s real strong point was clean. After playing with it, I heartily disagree. 🙂 Clean, dirty, it don’t matter. I dug the sound. In any case, I’ve recorded three clips to give you a general idea of the amp’s tonal possibilities. Mind you, I don’t have a mild breakup clip with a Strat. Once I get the real thing, I’ll share lots more clips. For now, you check out the ones I’ve recorded thus far. Note that these tracks are raw tracks. I used no EQ nor compression because I wanted to ensure that I’d capture all the dynamics of the amp.

Clean, Gretsch Electromatic (thin body)

Clean, Les Paul

Rock, Crunchy Rhythm (left), Solo (right)

Clip from an SRV tribute song I wrote called “In The Vibe”

All the clips were recorded using an Avatar  1 X 12 closed back cabinet with the fantastic Fane Medusa 150 speaker. I used a single mic – a Sennheiser e609 – positioned about 18″ from the cabinet pointed directly at the center of the cone. Part of why you might hear a little static is the ambient room noise from my garage. Barely detectable, but it’s there.

With the rock clip, one thing I had to get used to was the note separation in touch sensitivity of the amp when I’ve got it cranked; actually, even in heavy overdrive. I didn’t really have to change the way I play, I just had to make sure that if I was chording, then I needed to be smooth with my strums, otherwise you’d hear every dang string being plucked. 🙂 It was a pretty easy adjustment.

With the SRV tribute song, as with the other clips, I didn’t EQ the guitars at all, though with the lead, I did add some reverb and a touch of delay to give the tone some air. I also ran the guitar through my Timmy overdrive in front of the amp. Other than that, what you hear is what the amp and the Strat are producing naturally though the final recording has a touch of compression. With the first part of the clip, I’m playing through the neck pickup, then switch to the bridge pickup and turn the volume of the guitar up a couple of notches.

In any case, to me, the clips I’ve provided tell a good story of what this amp is capable of. As I mentioned, in a clips, what I’ve laid down is the raw amp sound, completely unprocessed except for the SRV tribute. The tones are absolutely gorgeous!

Overall Impression

I suppose you can pretty much guess what my impression is of this amp. Once Bill gets this into production, it’ll be my next amp. Better start saving my pennies. 🙂

Read Full Post »

This morning, I was taking stock of gear that I hadn’t played in a awhile, and saw my little ’58 Fender Champ sitting on my workbench. I hadn’t played it for several months. So I hooked it up, and started playing. Now mind you, I’ve had some serious work done on it. I had to have the leaky caps replaced, and I had the amp set up with an A/B switch so I could bypass the stock, internal speaker and use a different speaker cabinet if I wanted. Plus, my good buddy, Jeff Aragaki lent me a custom tweed cabinet that he built that houses a Weber 10″ Alnico speaker.

After getting it all hooked up (I ran the amp into a 1 X 12 with a Jensen Jet Falcon speaker), one thing struck me right away after playing my Strat through it. To me, this is THE classic Tweed sound. But it is also the perfect platform to record completely raw signal, then tweak, which has been done in lots of studios over the years, as a Champ was used to record all sorts of rock and roll.

Take, for instance the following recording:

This was recorded straight into my computer with no EQ, no nothin’ attached. It’s a clean, dry signal that simply captures the tone of my Strat. But apply some reverb and delay effects, some compression, EQ, and that plain signal becomes something else entirely. Here’s the same track, but this time, I’ve textured it with reverb, delay, compression and EQ.

Had the compression make-up gain a little high, so there’s a tiny bit of clipping, but what I was able to get was a super-rich and full sound.

Even dirtied up, the Champ is simply a great platform. Here’s a raw clip of the Champ completely cranked up:

Again, this is simply a fantastic platform from which to shape the guitar sound. So, in this next clip (which again is the same track, but tweaked) I added some compression, reverb, a tiny bit of stereo delay and beefed up the lows with some Fat EQ:

It’s no surprise to me why so many studios have these Champs in their amp lineups.

As for gigging this bad boy, I always run it through speakers that have a good bottom-end response. What results is a nice, scooped tone – VERY American tone-wise.

Anyway, if you can find one of these, get it. Or you can get the ’57 Champ re-issue, which lots of players love. Me, I got mine for $700 (that’s the actual picture of the amp above), and spent roughly $200 on getting the caps replaced and putting in some NOS tubes. Still comes out under the price of the ’57 reissue.

Read Full Post »

…We know it’s good for us, but we don’t enjoy the taste.

That’s a corollary on a saying my cousin shared on Facebook: Truth is a bully we all pretend to like. It got me thinking about some feedback I gave to a young singer/songwriter this weekend on her playing, which was not very good. I first didn’t say it directly and simply said, “That’s a great song you’ve written. If you have a chart, I could accompany you, so you could focus on your singing and not have to think about the accompaniment.”

“I play just fine,” she said.

I replied, “Well… truth be told, some customers last week did mention that while they liked the song, they felt the piano playing was a bit choppy.” (That’s actually the truth; as a few asked me why I didn’t accompany her).

“To you, maybe,” she shortly replied, “I’m not here to be the brilliant musician.”

I said, “Look, you’re reading me completely wrong. I want to make you and your song look absolutely the best, and frankly, your playing is choppy, and you’d have a much better appeal if you had backup that’ll make you shine.”

She wasn’t having any of it. There was a bit more in the exchange that I’d rather not dive into, but I was really taken aback by the arrogance and total lack of humility. I do know one thing, having been performing for over 40 years, she’s in for some serious smack-down. I’ve encountered many performers like that over the years that operate off their own hubris. They get their bubble popped and it’s like their world comes crashing down around them.

Hell! I even operated like that years ago, thinking my own music was something special; only to get feedback from a pro that lyrically, it was cliche, and a lot of my musical phrasing was something that had been done hundreds of time over – in other words, it wasn’t very original. Yikes! I was crushed.

But as Sylvester Stallone said in the movie, Rocky Balboa, “It ain’t about how hard you hit, but about how hard you can get hit and keep moving forward…” And that’s kind of the crux of this entry, dear readers.

We all tout wanting to be honest and receive honesty in return. But honesty is like taking cold medicine. Rarely do we enjoy the taste. But in the end, we actually do feel better. After having experienced that crushing review of my music, I just happened to watch Rocky Balboa and that saying shook me to the core, and I realized that a little humility goes a long, long way. It’s good to believe in ourselves and our abilities, but don’t let that belief turn into hubris. Besides, with humility, we give ourselves room to grow and get better.

After I got that feedback, it actually took me awhile to do some soul-searching – a couple of years, in fact. But I jumped on the horse again, so to say, and started writing again. This time ’round, I went at it with no particular goal in mind; just let the music and lyrics flow. Don’t have expectations of where I think my music should be. It it goes nowhere, that’s okay. But most importantly, really listen to the feedback. So as opposed to parading my music in front of friends and family first, none of my newest songs go out without a professional review from producers in the music industry who critique the songs on their structure, lyrics, and melody. As a result, I think I’ve become a much better writer.

It’s not that I’m following a formula that they prescribe. The reviewer I use the most stresses originality, and absolutely nails me on being cliche. But they are keen on flow and making sure my lyrics make sense. All in all, it has been a great growing experience.

Who knows where my music will go? I’ll be heading into the studio in the next couple of months to start recording and then I’ll get my album out. We’ll see where it goes from there…

Read Full Post »

I recently received an interesting article from the folks over at AmplifiedParts.com entitled, “Describing Tone.” It takes both a scientific (quantitative) look at tone as well as presenting more qualitative ways of describing it. The qualitative section seems geared to describing tone within the context of selling gear, but if you think about it, when we’re talking about tone, we’re doing a selling job. The author, Kurt Prange makes an interesting statement in the article: “If someone told you that a particular speaker sounds ‘rich and creamy with buttery mids and crisp highs,’ they might as well have said, ‘it sounds great, trust me.'” I’ll speak more to that in a little bit. But without further ado, here’s the article:

—————

The Audible Frequency Range and Describing Tone

by Kurt Prange


As guitarists, most of us sooner or later find ourselves in pursuit of tone. A talented guitarist can find a way to make anything sound good, but there should be no doubt that our equipment and the tone it provides can inspire and help fuel our creativity. In pursuit of tonal inspiration, we need to develop a vocabulary to help us find what we’re looking for in our sound.


The Audible Frequency Range

Most guitarists start out by learning the names of the musical notes corresponding to a particular string and fret number, but they are not initially aware that these notes also correspond to the fundamental frequency of the vibrating string. For example, the sixth string played at the 5th fret (low A) in standard tuning has a fundamental frequency of 110 Hz. Any doubling or halving of a frequency is an octave, so the next octave up from 110 Hz would be 220 Hz. In order to develop a vocabulary for tone, we have to think in terms of frequencies as opposed to musical notes.

The audible frequency range for us human beings is about 20 Hz to 20,000 Hz (20 kHz). For descriptive purposes, it’s common to divide this range into at least three parts: lows, mids and highs. The specific border frequencies where, for example, lows end and mids begin are not definite. Look at a guitar speaker’s frequency response chart and you’ll see three commonly accepted ranges: lows from 20 to 200 Hz, mids from 200 Hz to 2 kHz and highs from 2 kHz to 20 kHz. With respect to these divisions, the fundamental guitar frequencies are all low to mid range; however, the sound we hear from each note we play also consists of harmonic frequencies in addition to the fundamental. To get an idea of what the fundamental would sound like on its own, just play a note and turn the guitar’s tone control all the way down. You’ve just “rolled-off the highs.”

If you play through an amp with treble, middle and bass controls, you can experiment with the extremes of each control setting to get a feel for how the relative level of each frequency range shapes the overall sound. “Scoop the mids” by turning the middle control down. “Roll-off the lows” and “thin-out” the tone by turning down the bass control. Now, “Fatten-up” the tone by turning the bass control back up.

Describing Tone

Using words to describe how something sounds is not always easy, but in the pursuit of tone it is often necessary. Browse through websites and ads for guitars, pickups, effects, amps, tubes, speakers, etc. and you’ll see a plethora of tonal verbiage that would probably seem like nonsense to the non-musician. When reading through this jargon, you can usually separate the adjectives into at least two groups to get a better perspective of the big picture.

First, there are the basic tonal adjectives that stand on their own. Most guitarists would understand their meaning without the need for much clarification. The words in this group stand on their own because they are closely related to common control settings. Describing tone is simplified considerably when a comparison can be made and most of the adjectives in this group can be paired with a clear opposite. For example, you might compare bright vs. dark for highs, full vs. scooped for mids, fat vs. thin for lows or some other variation to express more or less of a particular attribute. You could say, ‘I’m using Acme brand 12AX7 tubes in my amp and they sound too muddy, I need something that will brighten up the highs and give me more gain.’

Second, there are the ambiguous adjectives that leave you with some doubt as to what they really mean. They serve as a kind of garnish to add personality and make a tonal description sound more appealing or marketable. For example, the highs might be crisp or bell like with sparkle or chime, the mids might be buttery or woody, there might be mid-range honk, the tone could be warm, rich or creamy. This is good stuff if you don’t take it too seriously, but these words don’t really mean much on their own. If someone told you that a particular speaker sounds ‘rich and creamy with buttery mids and crisp highs,’ they might as well have said, ‘it sounds great, trust me.’ Another aspect of this group of adjectives is that they can allow you to identify a target audience that the product was designed to reach. For example, you probably wouldn’t target the death metal crowd with a ‘warm, vintage-voiced pickup with rich fat lows and top-end sparkle to express the subtleties of your playing style in fine detail.’ You’d be more likely to describe ‘fat, thunderous lows with upper mid-range sizzle and crisp highs for brutal rhythm and scorching leads.’

When communicating with other people to get suggestions for which product might get you closer to the sound you’re looking for, it’s usually best to make comparisons, while using mostly adjectives from the first group and going light on those from the second. Of course, the best way to know if something is right for your sound is to play through it yourself and set up an A/B comparison, but that’s just not always possible. So as we journey along in our pursuit of tone, we have to develop a vocabulary to help ourselves and others find the way.

Kurt Prange (BSEE) is the Sales Engineer for Amplified Parts (www.amplifiedparts.com) in Tempe, Arizona, United States. Kurt began playing guitar at the age of nine in Kalamazoo, Michigan. He is a guitar DIY’er and tube amp designer who enjoys helping other musicians along in the endless pursuit of tone.

————————-

Addressing the “ambiguous adjectives” paragraph, I tend to agree with what Mr. Prange has to say for the most part, but I do think that ambiguous adjectives play a key role in describing tone; so long as you make the distinction between the unabiguous and ambiguous. I agree that on their own, ambiguous adjectives do very little to inform me, though they are certainly effective at raising hype – something that happens a lot on forums like The Gear Page. So as a bit of a follow-on to Mr. Prange’s words of wisdom, be very wary of those who do nothing but use unambiguous adjectives to describe the tone of their gear; especially if they’re trying to sell it to you.

The problem with unambiguous adjectives is that they are purely subjective. What might seem “muddy” to one person may be perfectly acceptable to another. To me, I find most Fender amps to be muddy, with really booming lows, but those people who dig that tone, would call them “smooth.” Get the picture?

And then of course, I totally agree with Kurt Prange in that the only way to really see if some gear fits you and your style of playing is to play it yourself. Ultimately, you’re the best judge of great tone. Don’t defer that to anyone else.

Read Full Post »


The Rock Lock

Summary: After a year-long wait, the Rock Lock has finally hit the market! What started out as an ingenious idea to provide some gig security for your guitar is not finally a reality.

Pros: Rubberized (or what appears to be rubberized) material around an obviously sturdy, metal locking “C” and attached to a 1/4″ steel braid rope, provide ample security for when you’re gigging, or even in a studio where you want to provide a level of deterrence as well as security.

Cons: None

Features (from the web site):

-Core Constructed from Cutting Edge Metal Replacement Technology

-Heavy-Duty Braided Steel Cable

-1 Year Full Warranty with Registration

-2 Keys Included, with optional Key Registration

-Fits almost all standard 6 string Guitars.
This excludes: 12 String Instuments, Flamenco/Spanish Guitars, and Bass Guitars.

Price: $49.95

Tone Bone Score: 5.0 ~ I’ve been waiting for this to come out since Chris Goulet originally contacted me a year ago. For the gigging musician, this is a must-have.

To me, having a Rock Lock is like putting strap-locks on your guitar. The funny thing about strap locks is that you never think you need them until your guitar comes off your strap button and crashes unceremoniously to the floor. Once that happens, you heed the warnings. But it shouldn’t take having your guitar stolen at a gig to make you buy a Rock Lock. At least for me, even the prospect of having my guitar stolen is enough to make sure I always have good security  for my axes at gigs. But I almost had to learn the hard way.

From late spring to early fall, I play on the patio area outside of the restaurant where I do my Friday gigs. Where I play is a major thoroughfare into the shopping center, so it gets lots of traffic – it’s a great way for me to entertain lots of folks. But the high traffic also presents a much greater danger of my gear being tampered with or stolen. While there are plenty of staff and customers at hand to watch my gear when I take breaks, the position of the “stage” is such that if someone wanted to make a running grab at my guitar, they could do it and get away pretty easily.

Last summer, there was a kid who was watching me play. He was what you might call an “emo,” with long hair swept across his face and a brooding expression underneath. He paid me a couple of compliments on my playing which was pretty cool, then after awhile, he asked if he could play my guitar while I was on break. I nicely told him no as I didn’t have a backup guitar with me, and he walked away, though I saw him a few times walk by eying my guitar. About an hour later, I took a break, and left my guitar out. Lo and behold, there was the kid. He was just about to grab my guitar!

I rushed over and said, “What part of ‘No you can’t play my guitar while I’m on break did you not understand?'”

“I thought it would be cool with you, dude,” he responded.

I said, “No. It’s not cool. Please leave.”

He did, and didn’t return. But in hindsight, if he took my guitar, it would’ve been my fault for not making it secure. And while I assumed that my gear would be safe because so much staff and people were around, the mere fact that that kid could just walk up to my guitar and pick it up made me think that I needed some sort of security.

For awhile after that, I resorted to packing my guitar during breaks and putting it my car or in the restaurant. But either of those options was a bit of a pain. However, with the Rock Lock, I no longer have to do that. I just lock up my guitar and it’s safe!

So how does it work? Well, it works very much like a computer laptop tether in that it has a loop at the end of the metal rope that you use to secure to a fixed object. The other end of the rope has a metal stud that gets inserted into the locking mechanism that is essentially a “C” clamp that goes around the neck of your guitar. The locking mechanism has one of those unpickable cylindrical keys. So talk about security! Look at the picture sequence below:

1. First, attach the cable to a fixed object like a pole:

2. Next, attach the cable to the locking mechanism (the stud end slides into an opening at the joint of the lock:

3. Finally, lock your guitar:

How much easier can it be? As I said, this is a must-have like strap locks for security-conscious guitar player. I’ll probably be getting a couple of more of these pretty soon!

For more information on the Rock Lock and to purchase one, visit The Rock Lock Company!

Read Full Post »

I mentioned the DV Mark Little 40 at the end of my previous post yesterday, which was a review on the DV Mark Galileo 15. That Galileo is a great little amp, but the DV Mark Little 40 is what I’m really taking a serious look at right now. If you want more information and specs on this great little amp, then read the product page on it. But what I’m going to discuss here goes beyond just the plain old facts and talk about why I think this amp deserves such a serious look.

What about the title? Well, it’s something that I brought over from my web engineering background, and that is that the best web sites aren’t the ones that are the prettiest or the most technically robust. They’re the ones that are so obvious to use, you don’t have to think about it. With the Little 40, DV Mark has lived up to “Don’t Make Me Think” in a variety of ways.

First off, while DV Mark offers the amp in L34 and L6 models (for EL34 and 6L6), the amp can take either, and will even do 6V6’s (though I think it may have to be JJ 6V6’s that’ll take a higher plate voltage – but I’d have to confirm that). But here’s the kicker: With the Little 40, you’ll never have to bias tubes again! The Little 40 sports smart circuitry that will auto-bias AND match your power tubes (so long as they’re within 20% of each other). How convenient is that? I don’t have the equipment to bias tubes myself – frankly I’m scared to death of working on electrical stuff – so every time I get new power tubes, I have to have someone bias them for me. With the Little 40, I just need to get reasonably matched tubes, and the amp will bias them to their optimal settings. Damn!

In addition to automagically biasing the tubes, there’s a switch on the rear panel that lets you set Low or High bias settings, which means you have even more tonal capabilities at the flick of a switch. This is a really huge thing in my opinion because again, instead of having to do this by hand, you need only toggle a switch to find the right bias setting for what you’re playing.

Also, the Little 40 is absolutely versatile, with its patent-pending Continuous Power Control that allows you to vary the output power of the tubes – not just for volume, but to break up the power tubes early. Full out to 40 Watts, you’ll get maximum clean headroom. But you can dial down the power to 1 Watt, and get breakup a lot earlier. Plus, you can switch between pentode and triode tube operation to get different tones on top of bringing the power down. Then on top of all that, you have a 0/6dB pad to compensate for passive and active pickups.

Finally, at $799, which is only $200 more than the Galileo, getting this amp is absolute no-brainer! And mind  you, these amps are all hand assembled in Italy. How DV Mark is able to sell them so inexpensively is beyond me, but we players can definitely reap the benefits. This is my next amp!

Here’s a nice demo video of the DV Mark Little 40:

Read Full Post »

As many know who’ve frequented this blog over the past couple of years, they know my love for the Aracom PRX150-Pro attenuator. It has allowed me to record in my garage till the wee hours of the morning, and not get complaints from my wife or the neighbors about being too loud, as I can get down to conversation levels; but more importantly, I can get down to those levels and still retain my tone and especially my dynamics.

With other attenuators, as you increase attenuation, it’s like putting a blanket over your tone. Not so with the PRX150-Pro. I’ve been using it now both in the studio and at gigs for the last couple of years, and it never ceases to amaze me.

For instance, I shared a song the other day called, “Come Together.” I’ve since changed the name to “God’s Love Will Set Us Free” but what I failed to mention was that the electric guitar parts were recorded, close-miked with the volume level being normal conversation level! Though I was using just a 6 Watt amp, even that cranked up is simply too loud to be playing completely cranked at midnight – at least in my neighborhood.

Here’s the final cut of the demo. The electric guitars haven’t been tweaked except for adding just a touch more highs in the EQ (the original tone was fine, but I wanted the guitars to cut through the mix a bit better because there was lots of overdrive):

What great quality at normal conversation levels!

I know, there are those out there that poo-poo the whole attenuator thing, and that’s fine. But for me, I couldn’t live without it – especially in my studio. It’s saving my ears. 🙂

Read Full Post »

Older Posts »