Feeds:
Posts
Comments

Posts Tagged ‘guitar gear reviews’

SONY DSC
Aracom PLX100

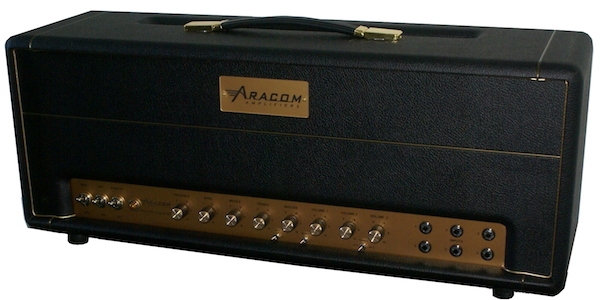
Summary: Based upon the PLX amp “platform” that Jeff Aragaki has created for creating customer-specific amps, this 100-watt beast is actually 3 classic Marshall amps in 1: Plexi 100 SuperLead (JMP), Plexi PA, and JCM800 (high gain).

Features

  • Three channels (Plexi SuperLead, Plexi PA, JCM800)
  • “Bite” Switch (mild mid boost)
  • Master Volume Control with Bypass Switch
  • Presence, Treble, Middle, B ass Tone Controls
  • Solid State/Tube Rectifier Simulation Switch
  • Channel Disable Switch
  • Bias Test Points with user accessible bias pot
  • Handwired turret board construction
  • “M” style large box head cabinet

Price: ~$2900

Tone Bone Score: 5.0 ~ Talk about high-gain versatility. This is no gimmick. Each different channel has voicing that you’d expect out of that particular model. The SuperLead is classic, bright Plexi, while the JCM800 has a darker, much more aggressive tone, and the SuperPA is all about clean headroom. While the amp in an of itself is special; the PLX platform is what make all this possible. If I’ve said it once, I’ll say it to the grave: Jeff Aragaki is genius!

About three years ago, Jeff Aragaki and I were talking about a new amp design. I told him that I would love to have a high-gain amp either in a 50 or 100 Watt version, but gave me the flexibility to voice it in various ways to fit the particular sound I wanted. We affectionately called this a “FlexPlex” because for me in particular, I wanted that Plexi sound, but wanted to be able to tweak it. Jeff actually built it, and I saw the prototype for it a couple of weeks ago.

But in the process of building the FlexPlex, you might say he “stumbled” upon a completely new way to build his amps; and that was basing his builds upon a platform. This wasn’t trivial, and no, I’m not just bandying about some buzzword. The platform that Jeff discovered has allowed him to create all sorts of different amps; starting with a common construct. I’m not sure about all the details, but the proof is in the pudding. Here Jeff’s words that describe this particular amp:

“The ARACOM PLX100 amplifier is a platform that allows us to build customer specific amplifiers with the features and specifications they desire.   For this custom build, our customer wanted a 100 watt amplifier with the vintage Marshall Super PA look.   The Super PA head cabinet has a “wide mouth” front panel opening, allowing access to four separate P.A. channels.    The model designation for this custom ARACOM amplifier is” Super H.T”.,  H.T. representing the initials of our customer.  However, instead of having 4 identical channels like a standard Super PA amplifier, the Super H.T. has 3 different channels, allowing for a highly versatile amplifier. 

“The JMP channel offers clean and overdriven tones as expected with a Plexi SuperLead amplifier.  It has two separate Bright switches that allow the channel to go from a Plexi Normal (Dark) channel tone to Plexi Bright channel tone, or something in between.   The Super PA channel provides slightly less gain than the JMP channel, with a fuller bass response.   The JCM channel is the high gain channel, designated for overdriven/distorted tones.   The JCM’s Bright switch allows for the standard JCM800 bright tone or a slightly darker tone.   The Master Volume control with a true bypass switch, allows for cranked up tone at lower volume levels.   The rear panel Bias Test points, allows for quick and easy tube biasing.”

Fit and Finish

It sure looks like a Marshall… 🙂 But in all seriousness, it’s an Aracom Amp, and that means quality. Jeff doesn’t skimp on components, and he takes a lot of pride in making sure everything that leaves his shop looks absolutely professional, and the PLX100 is no exception. The tolex is perfect, and all the knobs are snug and turn smoothly. And since this amp was going overseas, you can bet that Jeff made sure that everything was sturdy to eliminate or severely reduce the risk of breakage.

Ease of Use

I normally don’t have this section in my reviews, but I thought it necessary in this case. While I absolutely love the amp, with all the switches and the push-pull knobs, I have to admit that I’d have to take a lot of time getting familiar with it. I don’t call that really a negative mark on the amp. For goodness’ sake! How else do you pack in all those features? But despite that, the knob and switch layout is pretty clear. It would take me awhile to find the sweet spot in each channel for all the guitars I’d play through it. But that’s the beauty of discovery and experimentation, wouldn’t you say?

How It Sounds

This amp sounds amazing! Jeff explained each channel as I would have, so I’ll just reiterate and say that his descriptions of each channel reflect my own experience with it. When I was in his shop testing the amp, we must’ve played around with it for at least an hour as he twiddled knobs and flipped switches to demonstrate the amazing number of voices that could come from this amp. The permutations of settings make this amp able to tackle practically any style of music. Oh! We did all the testing through a huge 4 X 12 at gig volumes, so it was LOUD! 🙂 I played a Les Paul, a Gene Baker prototype (it was a hybrid that is VERY cool), and a Strat through the amp, and each guitar sounded killer through it. My favorite channel by far was the SuperLead channel, which had lots of gain on tap, but wasn’t at all over the top. Next was the JCM channel – especially its dark mode which produced thumping overdrive. I wasn’t too wild about the SuperPA with a Les Paul, but with single coils, that channel was absolutely SWEET! It would be a perfect channel to use with overdrive pedals because of its clean headroom.

Overall Impression

What strikes me the most about the PLX100 is that you literally have three amps in one. If you had all three, you’d probably be close to $10,000. That this amp is only $2900 is pretty amazing to me. But that’s Jeff. He doesn’t make a huge profit on the gear he builds – that’s a personal choice. He just wants to build great amps. This is like my friend Perry Riggs of Slash L Guitars. He makes absolutely awesome guitars but sells them at a price-point that’s rather incredible. Both of these gentlemen are true artisans of their trade, and I’m glad there are folks like this.

With respect to the PLX100, I sure wish I played in venues where I really open up an amp like this and really do it justice. For my particular uses, this is way too much amp. But if I ever get the chance to regularly play large venues, you can bet that I’ll be calling Jeff Aragaki to build me an amp on the PLX100 platform. Or… maybe he has a 50 Watt version. 🙂

For more information, visit the Aracom PLX100 product page!

Read Full Post »


Keeley Luna Overdrive

Summary: Two-and-a-half years in the making and combining what Robert Keeley feels are the best in overdrive pedals, tube amps, and tone stacks. The Luna overdrive is the result. This pedal covers a wide range of overdrive possibilities, from light grit to fuzz-like, square-wave distortion.

Pros: The Baxandall tone stack is KILLER and totally sells me on the pedal. On top of that though, the pedal reacts to attack and guitar volume adjustments just like a tube amp, so you’ll be right at home.

Cons: It’s pricey for one, and the tight interplay between the EQ, Drive and Master controls makes it difficult to dial in just the right amount of overdrive. But these aren’t big enough cons to give it a lower score.

Features:

  • Hand-made in the USA
  • Op-amp clipping and JFET gain stages
  • Baxandall tone stack
  • Drive and Master controls
  • Classic and Modded overdrive modes

Price: ~$219 Street

Tone Bone Score: 4.75 ~ This is a great pedal. I’d give it a 5 on tone alone, but I knocked off just a bit for making it difficult to get a decent tone out of my amp. I suppose that’s part of the fun in playing around and discovering what a pedal can do, but I have to be fair. It got a little frustrating as the Drive knob is pretty sensitive.

After my beloved Timmy pedal, I thought I was done with overdrive pedals! 🙂 I should know better because I’ve been a slut for overdrive pedals, and I guess there’s really no cure for that. Playing around with the Keeley Luna Overdrive has been a joy, though I will admit I did briefly get frustrated while trying to dial in the pedal. It simply took a bit of time to get used to the active Baxandall EQ. Unlike other EQ’s, it’s not a cut type of EQ, where the EQ knobs turned all the way up give you flat response. With a Baxandall EQ, the 12 o’clock position is flat response. Turn up an EQ knob and you get a boost, turn it down, and you get a cut. But the midrange is left alone. That means that if you turn both knobs fully counter-clockwise, you get a midrange hump; fully clockwise, and you get a scooped tone.

This is a totally different animal from other EQ’s, and it takes awhile getting used to. However, despite the learning curve, this type of EQ provides a much better way of dialing in your tone to fit your guitar, amp, and cabinet. For instance, for my test, I played the pedal in front of my DV Mark Little 40, which goes out to a 1 X 12 cabinet that has a Jensen Jet Falcon speaker, which has a pretty big bottom end. Putting the pedal in flat response made my tone sound really muffled because of the lows (I had my amp’s EQ completely flat). But after playing around, I found that placing the bass at 11 o’clock and the treble at 1 o’clock brightened up the tone just the right amount, then it was all about getting the Master and Drive knobs set.

About the Drive knob… it’s super-sensitive, and you’ll start getting breakup as soon as you start turning the knob clockwise from its minimum position, which is about 7-8 o’clock. I found that the sweet spot for me was the Drive just past 9 o’clock and the Master set between 2 and 3 o’clock. With my amp set at just the edge of breakup, the boost from the Master got the tubes overdriving, and the combination of distortion from both the pedal and the amp was quite pleasing to my ears.

How It Sounds

In my First Impressions article that I wrote earlier today, I said that the pedal adds some color. I’m going to retract that now because depending upon where you set the EQ’s, you can have a transparent tone, or add as much color as you want. I like to err on the side of transparency with most overdrives, and when it came down to it, this pedal was no different. I originally had a nice treble boost, but when I did some test recordings, found that I didn’t like how I had set the EQ’s because of the color. Here are a couple of test clips. Note that both of these were done in the Classic mode, and I was using my Gibson Les Paul ’58 Historic Reissue.

In the first clip, I do a quick clean rhythm riff with an almost imperceptible grit, then do the same riff with the pedal to add some dirt.

With the next clip, I decided to do a dark rhythm track then play a lead alongside it. In both rhythm and lead, the pedal was set the same way, and I vary the amount of overdrive simply by adding more guitar volume or hitting my strings harder. This clip was made purely to demonstrate the pedal’s dynamic response. I also added just a touch of reverb to grease the sound a bit,.

I absolutely love the tone of the lead track. I started out with my LP in the middle position, with the neck pickup at 5 and the bridge pickup at 6. Then when I started driving it harder, I switched to the bridge pickup entirely and dimed it. From there I just closed my eyes. The sonic content that the pedal produces is amazing. There are lots of little harmonics and overtones in the signal, and the note separation is awesome. The note separation takes a little getting used to as well. But this is a good thing because this pedal does not produce mush – even at high gain settings.

In this third clip, I just do a few seconds of a Journey riff. here the tone is scooped with both the EQ knobs at about 2 pm, the Master cranked wide open and the Drive at about 10 o’oclock. Unfortunately, my mic didn’t pick up all the little harmonics and overtones, but the point to this one was that even pushing my amp hard, and with much more gain, the note separation is still maintained.

I know, I only have a couple of clips, but admittedly, I’m still playing around with the pedal. I want to try it front of one my Plexi-style amps to see how it performs.

I did take it through its paces with the Modded mode, and that mode with my amp just past the edge of breakup created some real aggressive overdrive; not over the top, but I have to play around more with this mode and cranking up the gain to experience the upper limits of the pedal.

Overall Impression

As I said above, this is a great pedal. It’s a little steep in price at $219; Keeley pedals have never come cheap. But that said, I’d totally add this to my board to stack with my Timmy (hmm… going to have to try that out). It has been a long time since I’ve been jazzed about an overdrive, and I’m really jazzed about this one.

Interestingly enough, besides a few video reviews out there (that do nothing but blues licks), and one that I saw done by Musicians Friend staff member, there’s not much in the way of reviews, which is surprising. Some of the feedback I saw on a couple of forums said it didn’t work well with people’s amps. I think that has more to do with not playing around with the pedal enough. That Baxandall EQ takes some getting used to, but once you “get it,” this pedal rocks!

For more information, visit Keeley Luna Overdrive product page!

Read Full Post »


Sebago Sound PrototypeSummary: I don’t know what an original Steel String Singer sounds like, but if Sebago’s take on that amp is any indication, we have a winner here! This is an incredibly versatile amp that can fit any genre of music. This is my next amp.Pros: Versatility is the key with this amp. The notch High and Low notch filters let you dial in your tone to fit the genre or help fine tune the amp to your guitar.

Cons: None. But not a 5.0? I’ll explain below…

  • 100-150 Watts (150 with 6550’s) from 4 power tubes
  • Reverb “loop” with send and receive knobs (send is signal gain into tank, receive is similar to mix)
  • Single input with switchable FET circuit
  • Gain control
  • Three-band EQ
  • Bright, Mid, Rock/Jazz mini toggles
  • Master control
  • Presence control
  • Individual High and Low notch filter knobs.
  • Power and Standby switches

Price: TBD, but will probably be somewhere between $2500 and $3000

Tone Bone Score: 4.75 ~ The only reason I took off a quarter point is because the reverb receive circuit was a bit noisy. I was able to dial back the hum by upping the send gain and dialing down the receive signal, but this is a prototype, so it’s understandable that there would be some tiny issues, and believe me, this is tiny.


My First Impressions article pretty much said everything that I had to say about this amp. My opinion hasn’t changed. This is an absolutely SUPERB amp that has me GAS-ing VERY BADLY. And after playing with this amp for the last few days, I’m in a dream state from the hypnotic tone that this amp produces – with all my guitars.

One thing I will add is that Bill Dunham emphasized that the amp is a great pedal platform. I still agree with that assessment, but frankly, this amp produces almost all the tones that I need, so I haven’t hooked my pedal board once this past week. The reverb is fantastic, and when I’ve taken the amp into overdrive, I just haven’t seen the need to use a pedal. The only exception to that is with the last clip I recorded where I ran my Strat through my Timmy overdrive before going into the amp, which was not quite at the breakup level; just slightly below.

Granted, at 100 Watts, I couldn’t take the amp into breakup without an attenuator. But luckily, my trusty Aracom PRX150-Pro comes to the rescue yet again in that department. A quick note on the distortion. I wasn’t really liking the fully cranked up tone of the amp with my Strat. It’s an entirely different matter with my Les Paul. The lead tone – which you’ll hear shortly – is just incredible. With the FET activated, and both Gain and Master cranked up (Gain at 9, Master at 10), the sustain, harmonics and overtones create this absolutely gorgeous lead tone. Now by itself, this amp won’t do metal. It’s not made for that, and I don’t think it was ever intended to do that. But crank it up and throw a distortion pedal in front of it, and I believe you could easily do metal.

Fit and Finish

I really won’t comment on this much because the final face plate is being produced so Bill modified a Double Trouble face plate. That’s also why I didn’t take pictures. It’s not finished, and I don’t want people to get the wrong idea that the amp will be in the condition in which it was tested. It looks great, but I’d rather get pictures of the finished product.

How It Sounds

Bill kept on saying when he dropped off the amp that it’s real strong point was clean. After playing with it, I heartily disagree. 🙂 Clean, dirty, it don’t matter. I dug the sound. In any case, I’ve recorded three clips to give you a general idea of the amp’s tonal possibilities. Mind you, I don’t have a mild breakup clip with a Strat. Once I get the real thing, I’ll share lots more clips. For now, you check out the ones I’ve recorded thus far. Note that these tracks are raw tracks. I used no EQ nor compression because I wanted to ensure that I’d capture all the dynamics of the amp.

Clean, Gretsch Electromatic (thin body)

Clean, Les Paul

Rock, Crunchy Rhythm (left), Solo (right)

Clip from an SRV tribute song I wrote called “In The Vibe”

All the clips were recorded using an Avatar  1 X 12 closed back cabinet with the fantastic Fane Medusa 150 speaker. I used a single mic – a Sennheiser e609 – positioned about 18″ from the cabinet pointed directly at the center of the cone. Part of why you might hear a little static is the ambient room noise from my garage. Barely detectable, but it’s there.

With the rock clip, one thing I had to get used to was the note separation in touch sensitivity of the amp when I’ve got it cranked; actually, even in heavy overdrive. I didn’t really have to change the way I play, I just had to make sure that if I was chording, then I needed to be smooth with my strums, otherwise you’d hear every dang string being plucked. 🙂 It was a pretty easy adjustment.

With the SRV tribute song, as with the other clips, I didn’t EQ the guitars at all, though with the lead, I did add some reverb and a touch of delay to give the tone some air. I also ran the guitar through my Timmy overdrive in front of the amp. Other than that, what you hear is what the amp and the Strat are producing naturally though the final recording has a touch of compression. With the first part of the clip, I’m playing through the neck pickup, then switch to the bridge pickup and turn the volume of the guitar up a couple of notches.

In any case, to me, the clips I’ve provided tell a good story of what this amp is capable of. As I mentioned, in a clips, what I’ve laid down is the raw amp sound, completely unprocessed except for the SRV tribute. The tones are absolutely gorgeous!

Overall Impression

I suppose you can pretty much guess what my impression is of this amp. Once Bill gets this into production, it’ll be my next amp. Better start saving my pennies. 🙂

Read Full Post »

Aracom Amps VRX18 Tweed ComboSummary: No… Surprisingly enough, I didn’t buy this one, as I already have the VRX18 head. But my good friend and bandmate just bought this, and I tested it out for him so he could listen while he was making his decision. Anyway, this is classic Marshall 18 Watt Plexi tone, but with Jeff Aragaki’s tweaks and modifications. It’s such a sweet-sounding amp, clean or dirty.

Pros: Handmade, and hand-wired on turret board. The VRX18 brings out the best of what I love about EL84-powered amps, and combined with the custom Weber speaker that’s in the cabinet to balance out the natural highs of the amp, this amp is capable of producing some of the most gorgeous clean tones I’ve heard, plus some incredible vintage overdrive.

Cons: None.

Features

– Channel 1: Volume and Tone Controls
– Channel 2: Volume and Tone Controls
– Master Volume Control (PPIMV)
– On/Off Switch
– Indicator Lamp
– (2) EL84 Power Tubes
– (2) 12AX7 & (1) 12AT7 Preamp Tubes
– Cathode Biased Power Tubes
– S.S. Rectifier with “sag” circuit
– Custom Heavy Duty Aluminum Chassis
– ARACOM Power Transformer: hand-wound and interleaved
– ARACOM Output Transformer: hand-wound, interleaved on a paper bobbin
– 4, 8, 16 ohm Speaker Jacks
– Detachable Power Cord (IEC320-C13 Socket)
– External Fuse Holder
– Custom Turret Board (G-10/FR4 Flame Resistant)
– Handwired and Handcrafted in the USA.

Price: $1095 for Combo (see Pricing Schedule for complete options)

Tone Bone Score: 5.0 ~ Yeah, I’m biased towards Aracom Amps as I am a faithful customer, but this amp is yet another example and an affirmation of why I love Aracom amps so much!

As most know who read this blog with any regularity, I’m a faithful Aracom Amps customer. I play three of them: VRX22 (6V6), VRX18 (EL84), and the PLX18 (EL84); plus I have the venerable PRX150-Pro Attenuator. Can’t believe I’ve been playing Aracom equipment for almost four years now, but I can’t think of any other amp to play, except for, perhaps, the DV Mark Little 40, which I still intend to get eventually.

In any case, my bandmates have known my passion for Aracom equipment, but have purchased other amps in lieu of the fact that I’ve been raving about Aracom for years, and in lieu of them commenting on how great the Aracom tone is. It always puzzled me, but hey! To each, their own.

A few of weeks ago, my right-hand and cohort in the band Dave started looking into getting a new amp, and to my pleasant surprise started taking a look at the Aracom site and listening to the clips. He was actually considering buying a Carr Viceroy, but held back until he took some time to evaluate amps. Now he’s glad he did.

In any case, he contacted Jeff and set up a meeting to go out to Jeff’s shop, and asked if I wanted to tag along. Never one to turn down an invitation to hang out with Jeff if I can help it, I accepted and a couple of days later, we made the short trek out to Jeff’s shop.

The wonderful thing about working with a builder like Jeff is that because he’s a small operation, he can be fairly agile in the combinations of equipment that he offers. So on that day, we took a couple of hours to play through different cabinet/speaker combinations to find a combo that “fit.” After playing through the tweed cabinet with a custom Weber 1 X 12, it was clear that that combination was the best for the style that Dave plays, which is mostly clean.

Jeff told Dave that he should take the amp with him and play around with it before he made the decision, so we loaded the amp in Dave’s car. On the way home, I mentioned to Dave that he will probably not want to return the amp and left it that while we talked about other stuff.

A few hours after I had returned home, Dave called me. He wasn’t returning the amp. 🙂 I knew that would happen. That amp was magical. Earlier, I shared with Dave on the way home that he’d know if he found the right amp if he lost track of time. He did. Now he is the proud owner of the best amp he’s ever played.

Fit and Finish

I love the classic tweed finish of this amp. Jeff personally built the enclosure and covered it with tweed. It’s really beautiful to look at. He also used 1/2-inch ply to construct the cabinet, which is something I look for in cabinets. With 1/2-inch ply, I believe the wood provides a lot more resonance as opposed to cabs built with thicker boards. Compared side-by-side with my Avatar 1 X 12, which uses thicker wood, the Aracom cab sounds so much more deep and lush (I’m not knocking my Avatar – that cab is perfect for more aggressive tones).

How It Sounds

Unfortunately, I don’t have any clips to demonstrate, but Dave’s VRX18 sounds absolutely KILLER! I’ve played three of Dave’s guitars through the amp, which include a custom Carvin acoustic/electric, a custom Rick Turner Renaissance, and a Gibson ES-335. All three guitars sound absolutely gorgeous through the amp which, with the custom Weber and dynamite cabinet produce a very lush and deep clean tone, while retaining great note separation and definition. Note separation and definition are especially important with an amp that produces such deep cleans because it could become extremely muddy. Not so with the Aracom VRX18 combo.

It’s important to note also that in addition to such great cleans, the amp really projects the sound well, with a very three-dimensional quality about it that makes it sound as if it has a reverb tank. Jeff attributes a lot of this quality to the sag simulation circuit that he built into the amp. It provides just a touch of sustain to add depth to the sound.

Playing right next to Dave is another guitarist (another Dave) who has a Carr Mercury. Maybe the “higher end” Carr models sound better, but the Mercury’s tone pales in comparison to the VRX18. Where the VRX18 sounds three-dimensional, the Carr sounds brittle and hollow. I don’t like the tone of that amp at all, and constantly have to help the other Dave dial in his EQ to make it sound even halfway decent. Also, the reverb on that amp is horrible, and I always have him turning it WAY down. Amazing that that amp costs more than twice as much as the VRX18. Anyway, I don’t want to make this a Carr amp smack-down. Suffice it to say that the Aracom VRX18 simply outperforms the Carr hands-down.

Overall Impression

Jeff Aragaki makes killer amps. He’s not building near the amount of amps at this point in time as he has in the past because his attenuator business is so good. But when he does get amp orders, he takes extra-special care that it’s right; and that’s exactly what he did with this particular amp. In fact, this particular model of the VRX18 is much more simple than his other models in that it doesn’t have the 1/2 power switch, nor does it have a tube rectifier. But it sounds incredible as it is. And as I mentioned above, this amp is yet another example of why I will remain a faithful Aracom customer!

For more information, go to the Aracom Amps web site!

Read Full Post »

This morning, I was taking stock of gear that I hadn’t played in a awhile, and saw my little ’58 Fender Champ sitting on my workbench. I hadn’t played it for several months. So I hooked it up, and started playing. Now mind you, I’ve had some serious work done on it. I had to have the leaky caps replaced, and I had the amp set up with an A/B switch so I could bypass the stock, internal speaker and use a different speaker cabinet if I wanted. Plus, my good buddy, Jeff Aragaki lent me a custom tweed cabinet that he built that houses a Weber 10″ Alnico speaker.

After getting it all hooked up (I ran the amp into a 1 X 12 with a Jensen Jet Falcon speaker), one thing struck me right away after playing my Strat through it. To me, this is THE classic Tweed sound. But it is also the perfect platform to record completely raw signal, then tweak, which has been done in lots of studios over the years, as a Champ was used to record all sorts of rock and roll.

Take, for instance the following recording:

This was recorded straight into my computer with no EQ, no nothin’ attached. It’s a clean, dry signal that simply captures the tone of my Strat. But apply some reverb and delay effects, some compression, EQ, and that plain signal becomes something else entirely. Here’s the same track, but this time, I’ve textured it with reverb, delay, compression and EQ.

Had the compression make-up gain a little high, so there’s a tiny bit of clipping, but what I was able to get was a super-rich and full sound.

Even dirtied up, the Champ is simply a great platform. Here’s a raw clip of the Champ completely cranked up:

Again, this is simply a fantastic platform from which to shape the guitar sound. So, in this next clip (which again is the same track, but tweaked) I added some compression, reverb, a tiny bit of stereo delay and beefed up the lows with some Fat EQ:

It’s no surprise to me why so many studios have these Champs in their amp lineups.

As for gigging this bad boy, I always run it through speakers that have a good bottom-end response. What results is a nice, scooped tone – VERY American tone-wise.

Anyway, if you can find one of these, get it. Or you can get the ’57 Champ re-issue, which lots of players love. Me, I got mine for $700 (that’s the actual picture of the amp above), and spent roughly $200 on getting the caps replaced and putting in some NOS tubes. Still comes out under the price of the ’57 reissue.

Read Full Post »


The Rock Lock

Summary: After a year-long wait, the Rock Lock has finally hit the market! What started out as an ingenious idea to provide some gig security for your guitar is not finally a reality.

Pros: Rubberized (or what appears to be rubberized) material around an obviously sturdy, metal locking “C” and attached to a 1/4″ steel braid rope, provide ample security for when you’re gigging, or even in a studio where you want to provide a level of deterrence as well as security.

Cons: None

Features (from the web site):

-Core Constructed from Cutting Edge Metal Replacement Technology

-Heavy-Duty Braided Steel Cable

-1 Year Full Warranty with Registration

-2 Keys Included, with optional Key Registration

-Fits almost all standard 6 string Guitars.
This excludes: 12 String Instuments, Flamenco/Spanish Guitars, and Bass Guitars.

Price: $49.95

Tone Bone Score: 5.0 ~ I’ve been waiting for this to come out since Chris Goulet originally contacted me a year ago. For the gigging musician, this is a must-have.

To me, having a Rock Lock is like putting strap-locks on your guitar. The funny thing about strap locks is that you never think you need them until your guitar comes off your strap button and crashes unceremoniously to the floor. Once that happens, you heed the warnings. But it shouldn’t take having your guitar stolen at a gig to make you buy a Rock Lock. At least for me, even the prospect of having my guitar stolen is enough to make sure I always have good security  for my axes at gigs. But I almost had to learn the hard way.

From late spring to early fall, I play on the patio area outside of the restaurant where I do my Friday gigs. Where I play is a major thoroughfare into the shopping center, so it gets lots of traffic – it’s a great way for me to entertain lots of folks. But the high traffic also presents a much greater danger of my gear being tampered with or stolen. While there are plenty of staff and customers at hand to watch my gear when I take breaks, the position of the “stage” is such that if someone wanted to make a running grab at my guitar, they could do it and get away pretty easily.

Last summer, there was a kid who was watching me play. He was what you might call an “emo,” with long hair swept across his face and a brooding expression underneath. He paid me a couple of compliments on my playing which was pretty cool, then after awhile, he asked if he could play my guitar while I was on break. I nicely told him no as I didn’t have a backup guitar with me, and he walked away, though I saw him a few times walk by eying my guitar. About an hour later, I took a break, and left my guitar out. Lo and behold, there was the kid. He was just about to grab my guitar!

I rushed over and said, “What part of ‘No you can’t play my guitar while I’m on break did you not understand?'”

“I thought it would be cool with you, dude,” he responded.

I said, “No. It’s not cool. Please leave.”

He did, and didn’t return. But in hindsight, if he took my guitar, it would’ve been my fault for not making it secure. And while I assumed that my gear would be safe because so much staff and people were around, the mere fact that that kid could just walk up to my guitar and pick it up made me think that I needed some sort of security.

For awhile after that, I resorted to packing my guitar during breaks and putting it my car or in the restaurant. But either of those options was a bit of a pain. However, with the Rock Lock, I no longer have to do that. I just lock up my guitar and it’s safe!

So how does it work? Well, it works very much like a computer laptop tether in that it has a loop at the end of the metal rope that you use to secure to a fixed object. The other end of the rope has a metal stud that gets inserted into the locking mechanism that is essentially a “C” clamp that goes around the neck of your guitar. The locking mechanism has one of those unpickable cylindrical keys. So talk about security! Look at the picture sequence below:

1. First, attach the cable to a fixed object like a pole:

2. Next, attach the cable to the locking mechanism (the stud end slides into an opening at the joint of the lock:

3. Finally, lock your guitar:

How much easier can it be? As I said, this is a must-have like strap locks for security-conscious guitar player. I’ll probably be getting a couple of more of these pretty soon!

For more information on the Rock Lock and to purchase one, visit The Rock Lock Company!

Read Full Post »

I mentioned the DV Mark Little 40 at the end of my previous post yesterday, which was a review on the DV Mark Galileo 15. That Galileo is a great little amp, but the DV Mark Little 40 is what I’m really taking a serious look at right now. If you want more information and specs on this great little amp, then read the product page on it. But what I’m going to discuss here goes beyond just the plain old facts and talk about why I think this amp deserves such a serious look.

What about the title? Well, it’s something that I brought over from my web engineering background, and that is that the best web sites aren’t the ones that are the prettiest or the most technically robust. They’re the ones that are so obvious to use, you don’t have to think about it. With the Little 40, DV Mark has lived up to “Don’t Make Me Think” in a variety of ways.

First off, while DV Mark offers the amp in L34 and L6 models (for EL34 and 6L6), the amp can take either, and will even do 6V6’s (though I think it may have to be JJ 6V6’s that’ll take a higher plate voltage – but I’d have to confirm that). But here’s the kicker: With the Little 40, you’ll never have to bias tubes again! The Little 40 sports smart circuitry that will auto-bias AND match your power tubes (so long as they’re within 20% of each other). How convenient is that? I don’t have the equipment to bias tubes myself – frankly I’m scared to death of working on electrical stuff – so every time I get new power tubes, I have to have someone bias them for me. With the Little 40, I just need to get reasonably matched tubes, and the amp will bias them to their optimal settings. Damn!

In addition to automagically biasing the tubes, there’s a switch on the rear panel that lets you set Low or High bias settings, which means you have even more tonal capabilities at the flick of a switch. This is a really huge thing in my opinion because again, instead of having to do this by hand, you need only toggle a switch to find the right bias setting for what you’re playing.

Also, the Little 40 is absolutely versatile, with its patent-pending Continuous Power Control that allows you to vary the output power of the tubes – not just for volume, but to break up the power tubes early. Full out to 40 Watts, you’ll get maximum clean headroom. But you can dial down the power to 1 Watt, and get breakup a lot earlier. Plus, you can switch between pentode and triode tube operation to get different tones on top of bringing the power down. Then on top of all that, you have a 0/6dB pad to compensate for passive and active pickups.

Finally, at $799, which is only $200 more than the Galileo, getting this amp is absolute no-brainer! And mind  you, these amps are all hand assembled in Italy. How DV Mark is able to sell them so inexpensively is beyond me, but we players can definitely reap the benefits. This is my next amp!

Here’s a nice demo video of the DV Mark Little 40:

Read Full Post »

As many know who’ve frequented this blog over the past couple of years, they know my love for the Aracom PRX150-Pro attenuator. It has allowed me to record in my garage till the wee hours of the morning, and not get complaints from my wife or the neighbors about being too loud, as I can get down to conversation levels; but more importantly, I can get down to those levels and still retain my tone and especially my dynamics.

With other attenuators, as you increase attenuation, it’s like putting a blanket over your tone. Not so with the PRX150-Pro. I’ve been using it now both in the studio and at gigs for the last couple of years, and it never ceases to amaze me.

For instance, I shared a song the other day called, “Come Together.” I’ve since changed the name to “God’s Love Will Set Us Free” but what I failed to mention was that the electric guitar parts were recorded, close-miked with the volume level being normal conversation level! Though I was using just a 6 Watt amp, even that cranked up is simply too loud to be playing completely cranked at midnight – at least in my neighborhood.

Here’s the final cut of the demo. The electric guitars haven’t been tweaked except for adding just a touch more highs in the EQ (the original tone was fine, but I wanted the guitars to cut through the mix a bit better because there was lots of overdrive):

What great quality at normal conversation levels!

I know, there are those out there that poo-poo the whole attenuator thing, and that’s fine. But for me, I couldn’t live without it – especially in my studio. It’s saving my ears. 🙂

Read Full Post »

If you look on my rig page, you’ll see that for my solo gigs, I use the very wonderful Fishman SoloAmp. This is a great, integrated PA that I’ve been using to great success for the past year or so. Very easy to set up, and it has a nice on-board mixer with decent reverb effects (which I never use, since I always use my vocalizer’s reverb). But the other day, I demoed the HK Audio Elements system while I was browsing “The Music Tree” in Morgan Hill, CA. This is an audio system that is similar to the Bose L1, but unlike the Bose L1, the Elements system allows you to expand by adding more “elements” as your audience size grows. Super-cool!!!

Sound-wise, I plugged an acoustic guitar directly into the system, and was absolutely blown away by the sound! While I love my Fishman, and it has served me well, compared to something like the Elements system, a subwoofer really makes a difference, despite the fact that the SoloAmp’s speakers have good bass response.

But honestly, this entry isn’t about the Elements system. 🙂 While trying to get more information online about the Elements system, I ran across another, just-released, integrated PA system from HK Audio called the Sound Caddy One, that is based upon the same audio technology as the Elements system. But with the Sound Caddy One, there are NO parts to put together! The line array is housed within the PA’s body (which also serves as the housing for the subwoofers), and to set up the system, you release the line array, that pops up out of the housing, secure it, plug in, turn on and you’re ready to go! Damn!

Check out this demo video from Musikmesse 2011:

Here are the Sound Caddy’s technical features:

Model SOUNDCADDY ONE
Max SPL calculated 125 dB
Max SPL peak 125 dB
Max SPL 120 dB @10% THD
Output power system 600W Class D
Frequency response +/- 3 dB 49 Hz – 18 kHz
Frequency response -10 dB 42 Hz – 18 kHz
Connections integrated 4-channel-mixer
LF Speaker 3x 6″
Mid/High Speaker 6x 3,5″
Directivity 70° x 15°
Crossover frequency 150 Hz, 12 dB/oct.
Enclosure 15 mm (5/8“), 13-ply (plywood)
Dimensions (WxHxD) 27 x 102 x 34 cm 10-5/8“ x 40-5/32 x 13-25/64
Weight 29 kg / 63,9lbs

Delivering a max 125dB at 600 Watts, this unit can move some air. Some people have said it isn’t powerful enough for their uses, but for a solo musician, this is more than enough power! Also, I have to question the negative feedback because systems like this are all about sound dispersal, getting an even volume anywhere within the sound dispersal cone which, for this system, is 70 degrees. When I first started using a line array system, it took me awhile to get used to the volume seemingly not being as loud. But it’s deceptive with a line array because the sound actually reaches fairly extreme angles, and what you’re trying to do is get your sound dispersed, and not necessarily through volume.

I dig that unlike the Elements system which is pure sound reinforcement, this has an integrated 4-channel mixer, which is an absolute MUST for me. But the only thing that I’d be wary of is the stability of the system. The base seems rather narrow, and I’m wondering how it would fair in windy conditions. In any case, here’s another demo video that demonstrates the sound. The singer aside, even through the camcorder’s microphone, it’s clear that the Sound Caddy One provides some very clear, clean sound.

As for cost, the video above mentioned a price of “2000.” If that’s in German deutsche marks, then the price would be around $1450 USD. That’s not bad, even as an MSRP, which would make the street price even lower. I’ll have to find out more information.

In any case, for more information on HK Audio products, go to: http://www.hkaudio.com.

Read Full Post »

Awesome Guitars TCP-T2 Telecaster Control Plate
Summary: Want to expand the tonal possibilities of your Tele? This solderless control plate assembly will give you six distinct tones.Pros: Undoubtedly, the pros here are that you’re going to get tones that you’ve never heard from your Tele.

Cons: Not quite as easy to install as advertised – but what is? One of the bridge settings created a far too thin and reedy tone for my liking. As there were no instructions to be found as to what switch does what, it took awhile to figure out the different switch settings (though note that the wiring diagrams are all available online).

Features – Check out the link above…

Price: $127.97 direct

Tone Bone Score: 4.5 ~ Though I didn’t like that one setting for the bridge pickup, I do like the fact that I have a couple more very usable tones for my Tele.

I’m pretty wary of hyperbole, especially when it comes from a manufacturer. So when Awesome Guitars contacted me about their products, I was a little dubious, especially since the original email read like an Adam St. James guitar lessons spam. It’s not that I doubted what their Tone MultiplierTM could do, it was the delivery that made me a bit wary. But having an open mind, I replied to see if they’d send me a control panel replacement unit for my CV Tele. I got a very quick reply saying they’d send one right away. That was about six weeks ago. Due to vacation, and leading a busy life in general, I didn’t get the unit installed until recently, but since then, I’ve been messing around with my Tele a lot, and have played it in a couple of gigs.

So what’s the verdict? The manufacturer’s claims of the products being life-changing aside, this is a solid product, and something that I’ve been able to put to use. To be fair though, the unit I tested will only give you 6 different tones. But with dual humbuckers, the other products they offer will give you up to 68 different tones! Pretty amazing stuff.

Ease of Use

Okay… so you lose the sliding 3-position switch, which is replaced by three mini-toggles. On the surface, that might seem to be a burden, but once you’ve played around with the system, it’s fairly easy to get to the tones you want. Even without the instructions, I was able to figure out the functions of the switches relatively easily, and was up and running- and gigging – in a matter of an hour. By the end of the gig, I knew where I wanted the switches. Admittedly, it will take a little more time to switch on the fly during a song, but I was still able to do it pretty easily, if not completely cleanly.

How It Sounds

Sounds like my Tele, but with a couple of more very usable tones. I wish I had the instructions that charted what switch does what, so I could tell if the pickups were in or out of phase or serial or parallel when both are on, but I did manage to figure out the two different sounds for each different pickup combinations. In a way, I’m sort of glad I didn’t have the instructions because it forced me to explore what tones worked for me, which is probably more important than the actual knowledge of each switch configuration. That would probably be a different story if I installed the six-switch model on a dual-humbucker guitar. For that, I’d want to know what each switch is doing.

In any case, here are six versions of the same phrase with each different configuration:

Neck 1

Neck 2

Both 1

Both 2

Bridge 1

Bridge 2

With both pickups on, and switching between parallel and serial configuration (mind you, I still don’t which is serial or parallel), the tonal difference is extremely subtle, and admittedly the recordings didn’t seem to capture that, but suffice it to say that I heard a difference; but also, and more importantly, the dynamics were different. Bridge 1 setting was pretty thin – too thin for my liking, but I my favorite is Bridge 2, which gives me the full power of my bridge pickup, which I love for playing leads.

Overall Impression

At least to me, this upgrade isn’t life-altering, but it does expand the tonal palette of my Tele, and that’s a great thing, and who knows, I may find a use for the thin tone of the Bridge 1 setting. With the Neck 2 setting, I get a similar sound to the neck/middle setting of a Strat, which is jangly. I dig that sound for playing finger-style rhythm. So all in all, I’m pretty satisfied with this unit.

As for the lack of instructions, as I mentioned that’s not a bad thing, necessarily – at least the wiring diagrams were online. The site does mention that two of the switches control the pickups, the other switch controls whether the pickups are in parallel or serial. But which two and which one? 🙂 Doesn’t matter because it was easy to figure out.

Read Full Post »

Older Posts »