Feeds:
Posts
Comments

Archive for the ‘guitar gear’ Category

5 Tone Bones - Gear has stellar performance, value, and quality. This is definitely top of the class, best of breed, and it's a no-brainer to add this to your gear lineup!

Heil Sound PR-22 UT (Utility) Dynamic Microphone

Summary: The “utility” version of the PR-22, this is the same mic, but with a single mesh (the regular PR-22 comes with three), and comes with a leatherette bag instead of a nice box; hence, the “utility.” Heil cut down on the packaging to provide an affordable tier for their popular PR-22 stage mic.

Pros: Wide frequency response, incredible rear rejection, and tons of overload protection make this an ideal stage mic. Plus, using this mic is much like removing a blanket over other mics. It’s not that the mic is tuned to higher frequencies; there’s just so much more sonic content that this mic picks up! Other mics may claim to have as wide a frequency response, but you actually hear the highs that you normally wouldn’t with mics in this price range and a little higher.

Cons: It is a nit, but not an issue for me as I always have my mic mounted on a stand, but as with other Heil mics, this is pretty sensitive to handling. But this is such a minor issue, I’m reluctant to mention it.

Price: $99.00 – $117.00 Street

Features:

  • Output Connection: 3-pin XLR
  • Element Type: Dynamic
  • Frequency Response: 50 Hz – 18 kHz
  • Polar Pattern: Cardiod
  • Rear Rejection @ 180 deg off-axis: -30 dB
  • Impedance: 600 ohms balanced
  • Output Level: -55 dB @ 1kHz
  • Weight: 14 oz.
  • Max SPL:  145 dB

Tone Bone Rating: 5.00 ~ I’ve been wanting this particular microphone for a long time, but already had a decent stage mic, so the will to get a new one just wasn’t there. But after my trusty Sennheiser e835 that has probably seen at least a thousand gigs and started to easily overload, it was time to replace it. I’m never going back to Sennheiser or Shure again!

As an active, gigging musician that relies on vocals, having a good mic is crucial to me. For more than a decade, I’ve relied on Sennheiser mics; specifically, the e835 as my main stage mic. It has served me well. But a couple of years ago, I did a gig where the sound guy asked if I wanted to try out a Heil PR-35. Being game for anything, I let him set it up. I didn’t know my voice actually sounded like it did.

From that point on, I resolved to get one. But it didn’t come cheap, as the PR-35 costs $265. However, I did a bit of research on other Heil mics and came across the PR-20, which has since been updated to the PR-22. And after listening to lots of comparisons, I decided to pull the trigger on the PR-22.

Wow! What a difference a mic makes! When I first plugged the mic in, the first thing I noticed was the much fuller sound of the PR-22. At the time, I had nothing to compare it to, but based on experience, there just seemed to be a lot more sonic content present in the Heil compared to my Sennheiser. And from what I could tell with the frequency analyzer in GarageBand, there really was a lot of stuff coming through.

But the proof is in the pudding, so I did a direct comparison between the two. In the following clip, I speak the same testing sequence with both mics. You’ll first hear the Sennheiser, then followed by the Heil, then back to the Sennheiser, then ending with the Heil. I positioned both about an inch from my mouth.


Both mics actually sound pretty good. But there’s definitely more going on with the Heil, especially in the lower frequency ranges. It sounds much fuller than the Sennheiser, though the Sennheiser sounds pretty good as well.

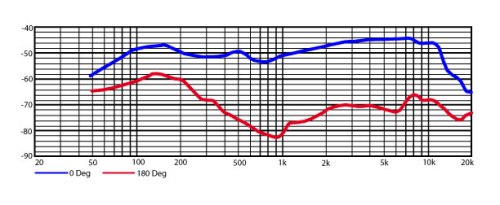
As you can see, from the picture of the tracks, while both are generally being picked up at the same level, there are more defined peaks in the Heil, plus some sharp peaks not present on the Sennheiser track. What this amounts to sonically is a lot more content.

The problem with the clip I provided is that GarageBand does a bit of compression despite the fact that I exported it to SoundCloud uncompressed. But irrespective of that, there is definitely more going on with the Heil than with the Sennheiser. The difference between the two mics with my headphones on through my audio interface is marked. The Sennheiser sounds thin, while the Heil sounds rich and full.
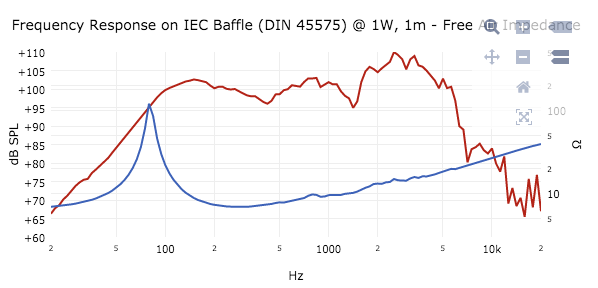
Frequency Response 

Take a look at the frequency response chart for each mic:

Heil PR-22

heil_pr22_frequency

Sennheiser e835

e-835-frequency-response

Just looking at the graph, it’s clear to see that overall sensitivity of the PR-22 is slightly higher than the e835. It’s not a significant difference as far as the numbers are concerned; however, especially when comparing the 1 kHz to 10 kHz range of both mics, this is where the PR-22 picks up much more content.

What first attracted me to the e835 years ago was its presence boost: That hump around 4 kHz. Sennheiser specifically called that out in its marketing. To me in actual usage, it made the mic sound so much clearer than the Shure SM-58, which sounded muddy in comparison. But with the Heil, the upper-mid to high-frequency sensitivity provide even more presence. And looking at the overall chart, there’s a lot more being picked up by the Heil in the same conditions.

In the Studio

What this means for recording is that I do a lot less EQ manipulation with the Heil than I do with the Sennheiser. In fact, re-recording a song with the Heil, the only EQ adjustments I made were to roll off the extreme highs (sizzle) and lows (muffles) and reduce a peak at around 220 Hz (it’s a trick I learned to make my vocals sound clearer). Contrast that with the Sennheiser where I actually have to roll off the extreme highs and lows, add a few dB of both lows (around 100Hz) and upper-mids and highs especially highs above 7 kHz because the mic records a bit muddy.

The net result is that I can produce a good vocal track with either mic. It just takes a lot more twiddling and tweaking when doing the EQ for the e835.

On Stage

But because there’s so much content that the Heil picks up, I have to adjust my mic technique and pull back just a bit. Proximity effect with the Heil is actually not as pronounced as I’ve experienced with other mics – especially the Shure SM-58 – but though Heil claims it’s not prone to proximity effect, all mics are prone to it. By pulling back ever so slightly, I allow the mic to pick up more mids, without sacrificing the lows.

Rear Rejection

Probably the best selling point of the mic is its rear sound rejection. While I was recording a test clip earlier, my daughter asked me a question. I had to stop recording, but after listening to what I recorded, I could hardly hear her voice, which means that the sound I was actually hearing from her voice was what bounced off the wall behind me. This makes the mic excellent for stage work and will be much less prone to feedback issues when placed close to a monitor.

Off-Axis

This is a very directional mic. While off-axis pickup is not bad, it’s not advised to stray over an inch from the capsule in any direction. I’ve been playing with the mic for the last couple of days, and for stage positioning. I found that pointing the mic a few degrees up, and placing the top edge the capsule level with my lower lip is the optimal position for me. And though I have good technique controlling my plosives (“b” and “p” sounds), positioning the mic there helps even more, and I don’t sacrifice any content.

But that said, the mic comes with a very nice foam capsule screen. I could sing straight on into the capsule with the screen on, and it protects quite a bit from plosives. It doesn’t eliminate them – nor should any screen do that – but it does help quite a bit.

Overall Impression

All that said, this mic is not for everyone. Because it picks up a lot more, it may not please everyone when they hear their voice through the mic the first time. I remember when I tried out the PR-35. I was blown away! I really didn’t know there was so much more in my voice. The PR-22 is not nearly as sensitive as the PR-35, but it’s pretty sensitive in its own right.

As far as I’m concerned, I’ve just had a defining moment with this mic. Mind you, it’s not really a super, high-end mic. But the sound quality rivals much more expensive mics. I’m a happy camper!

Read Full Post »

5 Tone Bones - Gear has stellar performance, value, and quality. This is definitely top of the class, best of breed, and it's a no-brainer to add this to your gear lineup!

Maker:0x4c,Date:2017-12-19,Ver:4,Lens:Kan03,Act:Lar01,E-Y

Aroma AGS8 Instrument Stand

Summary: For me, this is a gigging musician’s wet dream as far as guitar stands go. Not only is it sturdy, well-designed and well-built, it is light AF!

Pros: Did I mention that this stand is light? It doesn’t seem to weigh much more than a pound if that. But don’t be fooled by the lightweight. The aircraft-grade aluminum is tough!

Cons: None.

Price: $16.99 – $17.99 (Amazon, depending on color)

Features (from Amazon, and I assume Aroma):

  • THE MOST BEAUTIFUL FOLDING STAND LASTS LONG. Top aircraft grade aluminum tubes used, with high strength ABS joints, ensure a long lifetime usage. A frame structure, when unfolded, is the most stable design to support your instruments.
  • THE MOST PRACTICAL STAND FOR FRET AND STRING INSTRUMENTS. The ladder designed base arms, length adjustable, let the stand suitable for different thickness instruments. The vertical arms opening degrees adjustable for different sizes of instruments. The rotatable contact surface on the stand top for different instruments leaning angles. (NOT for V-shape or other special shapes instruments)
  • ALL THE WAY ROUND PROTECTING YOUR INSTRUMENT. All contact points where touching your instruments are covered with soft silicone material, which is dull to any chemical reaction with your instrument surface. The 4 landing points are also covered with slip-resistance silicone material.
  • USE YOUR STAND ANYTIME ANYWHERE. The smart adjustable and collapsible design is to fold your stand into one piece. Lightweight. Easy to carry along with your instrument anywhere anytime.
  • SHARE YOUR CREATIVITY. Join Aroma Facebook account, post your using tips, your fun with this stand. Jam your thoughts with others.

Tone Bone Rating: 5.00 ~ Sometimes, even the mundane can get me excited, especially when that mundane thing makes my life so much easier.

It’s a guitar stand for goodness sake! Who the hell cares?

I do, for one. With the number of gigs I do per year, gear weight is a factor, so is compactness when you don’t have the luxury of a road crew. And when I can get those two things plus a great design that’ll protect my investment, well, I flip out!

One of my bandmates purchased one a couple of weeks ago. I thought it was cool with its compact design and adjustable base arms. But I was most impressed with how light it was. I resolved then that I’d get one. I am not disappointed in the slightest!

Fit and Finish

The days of “Made in China” being associated with poor quality are long gone. This stand is absolutely well-built. The aircraft-grade aluminum tubing is super-strong, and the plastic ABS joints should withstand a lot of wear and tear. I got mine in blue, but you can get the stand in black, rose gold, gold, and silver. The latter three will cost you a buck more for some reason. I guess black and blue sell the best. 🙂

The design of this stand is great. It folds up nice and compact. You can see in the pictures above where I placed a quarter next to the folded stand. Nice and small.

As for its sturdiness, I have no issues with it. But if you notice how I’ve set up my acoustic guitar, I have it so it stands fairly upright. This is to make sure that the bottom edge of the guitar abuts against the end stoppers of the base arms. Plus, it will put minimal pressure on the apex pad. With a stand this short, you don’t want a lot of weight at the top of the stand. You’re just asking for trouble.

Either the weight of the guitar will make the stand tip back (not too likely – I put my Les Paul on this stand and set it up to lean back and it stayed in place), or as someone reported on Amazon, the top pad put a slight depression into the back of his ES-335. To me, it’s just common sense to let physics work for you. When you place the guitar in a more upright position, more of the body surface will contact the pads. So stand the freakin’ guitar up! 🙂 Sheesh!

Finally, I dig the bottom footpads. They elevate the entire structure of the frame, so the chance of spilled liquid contacting my guitar is pretty much nullified.

Overall Impression

I love this stand! I’m probably going to get a couple more of these. Well-made, well-designed and lightweight. A perfect combination, even it’s just a lowly stand.

Read Full Post »

5 Tone Bones - Gear has stellar performance, value, and quality. This is definitely top of the class, best of breed, and it's a no-brainer to add this to your gear lineup!

Seymour Duncan SA-6 MagMic

Summary: The SA-6 MagMic combines a magnetic pickup with a condenser mic to capture full tone of your acoustic guitar, but does it at a lower price point than similar pickups. But don’t let the more than $100 price difference fool you. This acoustic pickup captures the full spectrum of your sound, down to the little harmonics. And being able to dial in the amount of condenser mic signal is a boon to adjusting the pickup for whatever sound system and venue you may play. There’s no midrange, lifeless tone with this pickup. But most importantly, once you dial in the amount of condenser mic that you like, what you’re left with is a very natural sound. It’s truly amazing!

Pros: Super, super, easy to install and use right away. Very easy to dial in a great balance between magnetic pickup and condenser mic to get the sonic presentation you want. The pickup is also super-quiet, no buzz or hum at all, which is what you’d expect out of a good acoustic pickup.

Cons: None. To be fair though, dialing in the condenser mic picks up a lot of high frequency, but rolling it off a tad fixes that nicely.

Price: $179.00 – $189.00 Street

Features:

  • Magnetic Pickup:
    • DC Resistance: 3.8K Ohms
    • Resonant Frequency: 16KHz
    • Gauss Strength: 780 max (adjustable)
  • Microphone Capsule:
    • Pattern: Omni-directional
    • Sensitivity: -35dB (it’s sensitive)
    • Frequency Range: -20 to 20 KHz
    • Signal to Noise Ratio:  >62dB
    • Current Consumption: -0.5mA (you’ll get 450 hours out of a single 9V battery)
  • Onboard Electronics
    • 2 Channels, summed at ouput
    • Supply Voltage: 9V
    • Current Consumption: 1.1mA (preamp + capsule)
    • Battery Life: 450+ hours
  • Noise:
    • Pickup channel: -102dBV with 5K ohm source resistance
    • Mic channel: -96dBV with mic capsule attached

Tone Bone Rating: 5.00 ~ Once I got it installed, which took about 5 minutes, I was off to the races! I have to admit that I had my doubts about this pickup. But I’m glad I got it. It’s a keeper!

I’ve been searching for a pickup for my Simon and Patrick PRO guitar for months. I’ve evaluated and played several guitars equipped with different pickups and pickup configurations. But every review I read and every video I viewed of the Seymour Duncan SA-6 MagMic further convinced me that this was the pickup I should go with. Funny thing was that I broke my own rule with gear and purchased it without doing an in-person test. I had to trust my instincts on this purchase and I can confidently say that my instincts were spot on with this acoustic pickup.

Fit and Finish

The MagMic is well-made. Built with what appears to be high-velocity plastic, I have no doubt at all that it will survive the test of time; especially after I have it mounted permanently in my guitar. But I’d expect no less from Seymour Duncan. I’ve got Duncan pups installed in half of my guitars, and they’re built to last. Once installed, the controls are easily accessible and reside on either side of the pickup. The volume knob is closest, sitting on the 6th string side of the pickup, while the condenser mic level sits on the 1st string side.

Luckily the battery lasts 450+ hours because the housing sits on the neck block, and the only way to change out the battery is to loosen all the strings and remove the pickup. Mind you, this is an expected inconvenience, not a complaint, per se. It’s the price you have to pay to be minimally invasive.

How It Sounds

As they say, the proof is in the pudding, and this “pudding” is freakin’ incredible! As soon as I plugged my guitar into my DAW, I knew I had something special. Playing a dreadnought, I wanted whatever electronics I installed on it to pick up the deep lows and shimmery highs of my guitar, and this pickup does hands-down. To prove it, I recorded some sound samples. The first three were recorded completely dry. No EQ, no compression. I play the same riff three times in each clip, varying the amount of condenser mic in each. The first part isolates the magnetic pickup with no condenser, the second part has the condenser opened up wide. The third part has the condenser mic set to about 50%. Here they are:

Strum

Percussive Strum

Fingerstyle

Note that with the MagMic, the magnetic pickup is always on. From what I can hear, this picks up the low- and mid-range frequencies and provides a fairly warm, almost mechanical sound. The condenser mic picks up the higher midrange and high frequencies and harmonics. It’s sensitive and provides a bit too much high-frequency content for my tasts, which is why I dial back the amount of condenser mic to about 90%. In this final clip, I again recorded the guitar with no EQ, but I added compression, some stereo spread, and reverb like I would if I was recording the guitar for a song. The sound is natural and haunting.

To me, not having to EQ my guitar is important as I want my guitars recorded with as much of their natural sound as possible.

Overall Impression

I’m really at a loss for words with this pickup. I don’t think I can utter any further superlatives that could sufficiently describe the feeling I get from it.

Read Full Post »

fender_fa135ce

Fender FA 135 CE Concert Acoustic-Electric Guitar

Summary: Part of the Fender Classic Design series, this lower-end model is a real surprise; especially in the sound department. Nice, low action, and a great feel. If you’re looking for a starter guitar or getting your child his or her very first guitar, you can’t go wrong with the FA 135 CE.

Pros: Some reviews have questioned the build quality of this guitar, but I’m very impressed with how solid this guitar is built. The guitar stays in tune and playing it is so, so easy. And for a smaller concert size guitar, this has a very rich sound; it’s quite unexpected.

Cons: The only nit that I have – and it’s really just a nit – is that the tuners are bit fast for my tastes. Fine tuning is a little challenging at first, but it’s easy to get used to.

Price: $179 street

Features:

  • Laminated bass wood sides and back
  • Laminated spruce top with X-bracing reinforcement
  • Nato wood neck
  • Rosewood fretboard
  • Compensated rosewood saddle
  • Single cutaway
  • Fishman Ion-T Preamp with built-in tuner

Tone Bone Rating: 4.75 ~ For what it is, I can’t help but give this guitar a great rating. Fender really surprised me with this guitar!

My 12-year-old son has been taking Ukelele lessons for a couple of years, and after he finished his last lesson, he came out and told me that he wanted to start playing guitar. His teacher, Michael, had accompanied him out of the lesson room and told me that he was ready. And since his birthday was coming up, I thought I’d get him a new one, as opposed to fixing up one of my old ones. My thought is that just like my dad did for me, I’d give my son a brand new guitar for his first one.

So today I went to Guitar Center and spent a couple of hours in their acoustic room evaluating all sorts of acoustic guitars. I didn’t want to spend over $200 for this guitar, but luckily, as a big-box retailer, Guitar Center has a pretty wide selection of “value” guitars. I tried guitars from Mitchell, a used “Little Martin,” several Yamaha guitars, and even a Gretsch.

The Little Martin was impressive and solidly built and was at a great price of $189, but it wouldn’t be available until Wednesday due to some city ordinance about a waiting period for used guitars. I needed a guitar today. So I sat in the acoustic room, and my gaze fell upon the Fender. I immediately thought to myself that it looked really nice. But, the thought also occurred that it was a Fender acoustic, and my previous experiences with those haven’t been all that good.

But in spite of my preconceptions, I decided to give it a try and was immediately surprised by the tone of the guitar. For a smaller-body guitar, I wasn’t expecting much sound-wise. But this had a sweet, gorgeous, rich tone. It completely took me by surprise. Then I started playing it, and thought, This couldn’t be a Fender acoustic! It sounds and plays way too nice – especially at $179!

Folks, this guitar is a sleeper, and it reminds me of the experience I had with my Squier Classic Vibe Tele. Great sound, great playability at a SUPER-affordable price!

Fit and Finish

The build quality of this guitar is awesome, just like my CV Tele. There are no uneven paint lines, and all the seams are clean and straight. The neck is straight, and the action is set up low, though it does raise just a little bit in the higher registers; but it’s not so bad that it’s not playable. This is a great guitar for fingerstyle playing, but even strummed, there’s no buzz. But more importantly, the setup is perfect for a beginning guitarist like my little boy.

Playability

Quite frankly, the main criterium for choosing a guitar for my son was playability. I could live with a guitar that had only okay sound just as long as it was easy to play. The frets are medium wire. Not great for bending and vibrato, but hey! This is a beginner’s guitar, so that’s not a big issue. The spacing is great between the frets as this is a shorter-scale guitar. For a seasoned player, this guitar plays with ease. For a beginner and a young player at that, the short scale will help them build up confidence.

How It Sounds

For a low-priced guitar, the FA 135 CE is amazingly articulate. As expected, it has a bit brighter voice as compared to a larger body guitar. But it has some nice sustain, and the spruce soundboard resonates with a surprisingly rich tone. Projection is great with this guitar due to the X-bracing under the top to provide stability and to help with projection. What also surprised me about this guitar is that it’s louder than I expected.

Tone-wise, as for me, I prefer a brighter-sounding guitar. While I liked the Little Martin, doing an A/B with that vs. the FA 135, it was as if a blanket was put over the Martin. The sound was much warmer and a bit too subdued for my tastes. That guitar projected very loud, but it would get lost in the mix when played with other guitars. This shouldn’t happen with the FA 135 CE.

Quick Demo

Here’s a quick demo I recorded just before posting this review. Sorry for the sound quality – and background noises – as this was recorded using my MacBook’s built in microphone, my new puppy was being a little playful across the room… 🙂

Preamp Test

As mentioned above, the guitar comes equipped with a Fishman Ion-T preamp. It’s a pretty simple preamp, so I thought I would give it a whirl. It’s not a bad preamp as preamps go, but it’s nothing special. In fact, its output is only okay. In order to record, I had to peg the guitar’s volume and add a lot of gain on my audio interface. Not a big deal. What was important to me was if I could get a good enough guitar signal to use the guitar in a song.

I have to say that I was pretty impressed with the result. I didn’t have to tweak the EQ at all. Of course, I did some production processing, but that was the point of the exercise, which was to see if I could get a good, mixable acoustic guitar sound from a plugged in guitar.

Overall Impression

I love this guitar! Who cares if it was manufactured in China. I have to commend Fender for finding an overseas manufacturer that does a great job at building guitars. The build, play and sound quality of this guitar have far exceeded my expectations. I think this is a guitar that my son will enjoy for years to come!

Read Full Post »

5 Tone Bones - Gear has stellar performance, value, and quality. This is definitely top of the class, best of breed, and it's a no-brainer to add this to your gear lineup!

Peterson StroboClip HDTM High Definition Clip-On Strobe Tuner

Summary: Peterson is the pioneer in strobe tuning and this new version of the highly-acclaimed StroboClip is a huge improvement over the original StroboClip which, in my opinion, just couldn’t be beaten. But add to that a larger, high-definition, and a high-contrast screen, then throw in a high degree of accuracy, then add Peterson’s unrivaled “Sweeteners,” what’s not to like?

Pros: I said pretty much everything in the summary. This thing just works and it’s accurate – very accurate. But it’s really the Sweeteners that have always sealed the deal for me.

Cons: None for me as I used the original for a long time (until some a-hole stole it at a gig), but using a strobe tuner will take a newbie a bit of time to get used to. But that shouldn’t discourage anyone.

Price: $59.99 street

Features:

  • 0.1 cent accuracy
  • 50+ Sweeteners for different kinds of instruments – thank goodness the guitar ones are first. 🙂
  • Comparatively larger, HD, backlit LCD readout.
  • Tuning Range: C0 to B6 (very wide)
  • Concert Pitch Range 390-490Hz

Tone Bone Rating: 5.00 ~ After my original StroboClip got stolen last year, I went with a cheap Snark tuner. It did the job okay, but there was always something special about the sound of a guitar tuned with my StroboClip. It just sounded better. And with this updated, upgraded version, I’m a very happy camper!


What could be so special about a tuner?

Believe me, not all tuners are made the same. An accurately tuned guitar can make the difference between sounding just okay and sounding incredible. So it stands to reason that the more accurate your tuning, the better you’ll sound. So tuner manufacturers have strived to get as accurate as possible, getting into the tenths of a cent (or even the hundredths of a cent). The StroboClip is super-accurate at 0.1 cent, which is pretty incredible. And that’s great – you might be thinking that at this point, there might be a “but” in there… Yes, there is…

As James Taylor puts it, because of how guitars are constructed, and how the strings vibrate, the actual sound that they produce when plucked is not actually in tune if you tune the strings to their exact tuning. According to JT, strings will ring a little sharp, so he actually tunes each string down a few cents per string – not evenly – as each different string requires a different adjustment.

And this is where Peterson tuners have always stood out. They’ve gone to great lengths studying the actual sounds that come off a stringed instrument and have come up with special tuning algorithms for different types of instruments that they call “Sweeteners.” A Peterson rep shared with me that for their acoustic Sweetener, JT’s tuning influenced their algorithm. Hey! If it’s good enough for JT…

In any case, the Sweeteners are extremely subtle, but the first time I used a sweetener for a recording, I noticed that my guitar just sounded better. The difference is like wearing a nicely shined pair of shoes. People don’t necessarily know that you’ve shined your shoes, but they notice that you look a bit sharper. That’s the best analogy I can come up with for Peterson’s Sweeteners.

I noticed it especially with recording my acoustic guitar. With standard, equivalent tuning, it sounded okay but tuned with the ACU (acoustic) Sweetener, it just seemed to ring so much better. That said, you have to get used to the sound because up close, it might sound a little off. But when I listened to the recording, wow! It was truly a revelation.

Fit and Finish

All Peterson products are built rock-solid. And even though they’ve gone with a plastic body, it doesn’t feel at all cheap.

The kicker for me is the comparatively large screen to other tuners. Damn! That thing is readable! And with the higher number of pixels, the readout is super smooth. And for my aging eyes, I love it!

The clip’s springs are pretty tight, but not so much that you can’t squeeze the clip open, and combined with the silicon pads will ensure that the clip stays put on your headstock.

Ease of Use Tuning with a Strobe Tuner

It has three buttons. The middle turns on the unit and acts as the menu selector. The + and – buttons scroll through choices. Doesn’t get much easier than this.

Tuning with a Strobe Tuner

I have to admit that the first time I used a strobe tuner, it was a little weird. I was so used to seeing a needle sweep over a gauge. With a strobe tuner, what you get is a checkerboard pattern that sweeps left and right to indicate the sharpness or flatness of your string. If it moves clockwise, the string is sharp and vice-versa if the string is flat. When the string is in tune, the checkerboard stops moving. The bigger screen really helps.

But there is a bit of a trick to tuning. You have to get used to moving in much smaller increments than what you might be used to. Also, the tuner is so sensitive that once you make an adjustment, you have to remove your hand from the tuning knob because the slightest pressure will affect the tuning. But believe me, once you get used to tuning this way, it’ll become second-nature.

One feature that I didn’t mention is the Drop/Capo setting. If you drop your tuning or use a capo, you can get into the Drop/Capo mode, set the number of semitones you’re going up or down, and then tune accordingly. That’s a really powerful feature, and as I often use a capo, knowing that my strings are all in tune with the right compensations for each string is comforting.

Overall Impression

You can probably tell based on the rating I gave and the review, I love this tuner! I know that Peterson’s marketing push is for the HD screen, but to me, this tuner has always been about the underlying technology. It’s second to none. But I do have to say that the larger screen is simply awesome!

At $59.99, it’s not a cheap tuner, especially compared to something like a Snark 2 that you can get for under $25 (I got mine for $21 on sale). And you know me, I’m not one to say that just because you pay more for something, it’s better. But in this case, it’s totally worth the extra money.

You might be wondering why I might be so excited about this. After all, it’s only a tuner. But once you tune with a Peterson tuner and hear the difference in your sound, you’ll become a believer.

What About Other Strobe Tuners?

The only one I can think of is the Turbo Tuner with an amazing .02 cent accuracy; yes, you read that right. But as I said before, while extreme accuracy is great, what makes the Peterson technology stand out to me are the Sweeteners. They really make a difference. And at some point, I’m wondering if our ears can actually hear the difference between 0.1 and .02 cent. I’m not so sure. It’s almost like a tube amp. The more gain you throw at a tube, the less effect it’ll have on volume. But to each their own. If extreme accuracy is your thing, that’s awesome. And that’s the beauty of having so many choices out in gear land. There’s bound to be something to please any taste.

For me, that taste is the Peterson Sweeteners!

Read Full Post »

I love overdrive pedals. I have a bunch of them. But I realized that part of why I have so many has a lot to do with not really understanding how to set them up properly. I’d get an overdrive pedal because a demo I heard sounded great, or I loved how it was voiced. But when I’d get it home, it just wouldn’t sound quite right, so I’d put it in my “storage” area.

But as I got more experienced with setting up my amps, I also began to understand how to set up my overdrive pedals. And now that I have a bunch, I’ve got a variety of pedals to choose from to get the sound I want depending on my sets or my mood – okay, I admit it: It’s mostly due to my mood. 🙂

Admittedly, I did a lot of forum lurking as well to gain insights on setting up an overdrive, so a lot of what I’ll be sharing here comes from the things I’ve learned from others in addition to the stuff I’ve learned on my own.

What actually motivated me to write this was a conversation that I had with a friend. I asked him what he thought of a particular overdrive pedal, and he said he didn’t like the way it sounded. I looked at him a little puzzled and said, “Maybe you didn’t set it up right.” And that led me to say that not all overdrives are created equal, and you have to set them up according to how they work best, or how they were intended to be used. Truth be told, I haven’t spoken to him since that conversation, so I have no idea if he tried what I suggested. But in light of that, I decided to share my thoughts.


Related Articles


Types of Overdrives – Not Necessarily What You Might Think

Before we get into the actual setup of an overdrive, I thought I’d go into a discussion about types of overdrives because how you set up an overdrive has a lot to do with the type of overdrive it is. No, this isn’t a discussion about circuit types or transparency. I suppose this could be related to the circuit type on which an overdrive is based, but I’m not that electrically savvy, so I’ll discuss this in more practical terms.

From my experience with having played several overdrives over the years, I’ve found that they fall into roughly two different categories (mind you, these are my own terms): Interactive and Standalone. Interactive overdrives are meant to interact with the preamp of your amp, and together they produce the overdrive sound.

Standalone overdrives are typically purpose-built to mimic an amplifier, and though they can certainly be set up to be interactive, they can function just fine on their own in front of a clean amp.

Notice that I haven’t named any specific overdrive models. The reason why is that overdrives sound different with different amps. For instance, the EHX Soul Food sounds great as a standalone overdrive in front of my Fender amp. But it doesn’t sound nearly as good as a standalone overdrive in front of my Plexi-style amps, so I set it up as an interactive overdrive for those amps.

So the idea behind interactive vs. standalone has little to do with a specific type or model of overdrive; rather, it has to do with how the overdrive sounds with your amp.

Setting Up an Overdrive

I have two processes that I go through to set up an overdrive. At this point, I know all my pedals and whether they’re standalone or interactive, but I still follow the same processes for my different pedals when I set them up on my board. Also, if I come across or get a new overdrive, I first assume that it can be a standalone overdrive, then if I find it doesn’t work well that way, I’ll then set it up to be interactive. Here are the step-by-step processes I follow:

Setting Up a Standalone Overdrive

  1. Set up the amp:
    1. Clean
    2. Set EQ to work with your guitar
  2. Set guitar volume to the middle
  3. Guitar EQ where you want it
  4. Set overdrive with all knobs to the middle.
  5. Engage the overdrive and get it to unity gain (so that when you engage it, your volume doesn’t change), or to just get a small volume bump when the pedal’s engaged.
  6. Set the EQ on the overdrive
  7. Adjust the overdrive/gain knob to get your desired amount of distortion from the pedal.
    1. You will probably have to make adjustments to the level knob to maintain unity gain.
  8. Evaluate the sound and feel by playing around with chord progressions and licks.
    1. All the while, raise and lower your guitar volume to see how the pedal responds.
  9. Repeat steps 5 and 6 until you dial in the right volume/sound/feel.
    1. If the volume, sound, and feel are fine for you, then you’re all set and ready to gig and the overdrive pedal will work fine as a standalone device.
    2. If the sound doesn’t feel “right,” chances are you’ll have to do some interaction with the preamp of your amp, so continue to the next section.

Setting Up an Interactive Overdrive

  1. Set your guitar volume to the middle (It’s important you start here)
  2. Set up the amp
    1. Set Gain/Volume so the amp is at the edge of breakup.
      1. You’ll know it’s there when you turn up the guitar’s volume and the amp begins to distort, then cleans up when you turn it down. Also, if the guitar’s volume is set to the middle, if you strum hard, it will break up.
      2. This is the reason you set your guitar volume to the middle so you can affect the preamp easily.
    2. Set EQ on the amp
  3. Set guitar EQ where you like it
  4. Set overdrive with all knobs at their middle positions
  5. Engage the overdrive
    1. More likely than not, you’ll get a big volume boost when you engage at this level, so you’ll have to adjust both the overdrive’s level and amp’s volume/master knobs to get to the right volume.
      1. If you don’t have a master volume, turn down the overdrive’s volume/level knob to get to a manageable volume.
    2. Because you want to get both overdrive AND amp distortion, you’ll want to get a small volume bump when you engage the pedal as you want the amp to go over the edge of breakup.
  6. Now, play around.
    1. See how the combination responds to volume swells on your guitar.
    2. Make adjustments to the overdrive gain to get the right combination of pedal and amp distortion.

The Importance of EQ

Notice that I mention setting EQ on the amp, guitar, and overdrive pedal. Setting EQ is extremely important because it can be the difference-maker in your overall tone. There’s no “ideal” EQ setting. But for me as a rule of thumb, I want to get a rich, slightly bright tone that sits well in the mix and isn’t so warm compared to the other instruments so it won’t get washed out when we’re all playing together.

Also, for live gigs, I usually don’t touch my amp or pedal EQ once I get them set up. I use my guitar’s tone knob to adjust how warm or bright my sound to be.

Amp/Pedal Combinations

All that said, if you’ve followed the steps for setting up an interactive overdrive, and it still doesn’t sound right no matter what you do, then the pedal sucks. Just kidding. 🙂 Truth be told, I’ve found some overdrives work better with different amps. If you have another amp, then try the pedal out in front of it.

For instance, Paul Cochrane of “Tim” and “Timmy” pedal fame recommends not using the pedal in front of a Fender Blackface amp. I don’t have a blackface amp, so I had to take him at his word, but the Timmy works great in front of all my amps. For me, I will not use my venerable Ibanez TS-808 TubeScreamer in front of my vintage Marshall-style amps. It just doesn’t sound good to me, no matter how I set it up.

I think it’s because the TS produces a big midrange bump when engaged, and my amps are voiced bright, so it ends up sounding piercing like little ice picks on my eardrums. Even EQ adjustments don’t work for me. But in front of my Fender Hot Rod, the TS truly screams! My Hot Rod has the classic Fender “scooped” tone, so the predominant midrange of the TS fills in the mids.

WHERE You Play Matters

Seems obvious right? Well, it’s not. In fact, what might sound great in your bedroom or living room may sound like crap on stage. That smooth, round bottom end that sounds so luscious in your headphones may just get you lost in the mix when you play with a band.

A few years ago, I went to see Joe Satriani play the Hendrix Experience concert. When Joe finally took to the stage, he sounded HORRIBLE! Way too much bottom end and way too much compression. He had to crank his guitar to be heard and the sound was just deafening. The FOH guys finally got his tone dialed in and Joe had to make some changes – I’m assuming, EQ changes – to his pedals. After that, they were able to bring volume down to comfortable levels.

In my own experience, I normally set my EQ a little brighter than when I’m at home. When I’m playing on stage and my amp is pushing some serious air, being a tad brighter helps cut through everything. But I’m careful about going too bright because that could get really harsh.

What About Stacking Overdrives?

That gets a bit more complicated, but I’d follow the basic procedures above, treating the trailing pedal as the amp. In this case, I’d tend to set up the amp as clean and have the trailing pedal always on. There lots of ways to approach this as well. I know one guitarist that uses three at once to get his “sound.” More power to him! 🙂

But truth be told, I hate to dance on my board, so even though I will use a couple of overdrives, I only use one at a time depending on the kind of voicing I want. I also, don’t like complicate my sound finding the right balance of multiple overdrives. I just want to play. Granted, I could do a lot of pre-gig work to get that, but for me, employing the KISS theory works best.

Many people like to stack, and that’s great. Stevie Ray Vaughan used to use two TubeScreamers stacked together; one as an overdrive and one as a booster.

Wah-wah and Overdrive

If you don’t use a wah-wah pedal, then you can ignore this section. But I thought it would be important to add this to the mix, mainly because I’ve found that certain overdrives work better depending on where the wah-wah pedal is placed. Admittedly, my personal preference is to place the wah pedal after my overdrives. But there are a few boutique overdrive pedals that I have that work much better when the wah pedal is in front of them. Not sure why this is. Luckily, I only have a couple of pedals that act this way, so I know not to use a wah pedal with them if I have it set up after my overdrives.

Exploration

To close this out, I have to admit that I’m a bit of an overdrive junkie. I may not buy every single one that piques my interest, but I do check out new overdrives when I run across them. The great thing about overdrives is that they really are all different, even the knock-offs, so I’ll continue to explore overdrives. I never know what I might find. 🙂

Read Full Post »

5 Tone Bones - Gear has stellar performance, value, and quality. This is definitely top of the class, best of breed, and it's a no-brainer to add this to your gear lineup!

Jensen Jet Nighthawk (P-A-C12-75NH)

Summary: As described by Jensen, the Nighthawk features fat lows, firm mids, smooth highs, and smooth overdrive. My experience in a band setting is fairly similar, but I would characterize the lows as more “full” rather than “fat,” which seems to imply almost overbearing; and the lows are not at all overbearing. Played with an American Strat Deluxe with Kinman HX pickups and a ’59 Les Paul replica with Wolfetone Dr. Vintage pickups, through a DV Mark Little 40, this “new” Jet series speaker creates super-rich tones with a wide frequency-range of lows that provide a gorgeous texture without sounding boomy.

Pros: This baby pushes air! My little Aracom custom 1 X 12 cab hooked up to my DV Mark Little 40 completely stomped the rest of the band, and I had to really be aware of my volume. Loved playing my Strat through this speaker as it provided a nice bottom-end that gave incredible texture to the single coil sound. With my Les Paul, which has a real high-mid tone, the added bottom-end help balanced out its tone as well.

Cons: My band mates would probably complain that I’m too loud. 🙂 But from my perspective, that’s a good problem to have!

Price: ~ $109 Street

Features:

  • Rated Power ~ 75W
  • Sensitivity (@ 1W,1m) ~ 98.8 dB
  • Impedance (as tested) ~ 8 Ohm
  • Magnet ~ Ferrite
  • Voice Coil Winding ~ Aluminum
  • Voice Coil Former ~ Fiberglass
  • Cone Material ~ Paper
  • Surround Material ~ Integrated Paper
  • Dust Dome Material ~ Non-treated Cloth
  • Basket Material ~ Pressed Sheet Steel

nh-frc

Tone Bone Rating: 5.00 ~ Every time I try a new Jensen Jet speaker, I fall in love yet again! There hasn’t yet been a Jensen Jet I haven’t absolutely loved, and I will freely admit that all my cabs now sport some form of Jensen Jet speaker.

Yeah, yeah, yeah… I know… This speaker came out in July 2015 and I’m only now getting around to writing a review. But if you’ve followed this blog for awhile, most of my writing about gear has been within the context of being in a band or recording. I haven’t been recording at all in the last year, and it wasn’t until recently that I was in a band. But with joining a new band, I have new inspiration, so I’ll probably be more active here in the months to come. Okay… now on to the review!

Don’t be fooled by the demos…

When I wrote my original announcement of the speaker, I included the sound clips that Jensen provides. I’ll just say it: While the playing was good, the sound was not at all representative of what this speaker is capable, especially with the Jazz clip. Jensen bills this speaker as a “warm” speaker, but that Jazz clip sounded like someone threw a thick, wool blanked over it. I will emphatically state that this was NOT my experience with this speaker.

A lot of factors go into dialing in a sound. Who knows how they set up the chain for the Jensen demos. As for me, I used my DV Mark Little 40 set up in a slightly “scooped” EQ and from the first chord I hit, I was in love with tones this speaker produces. It just goes to show that recorded demos don’t necessarily give you a good picture of a device’s capabilities, and can sometimes be detrimental if you don’t do ’em right.

Since I had no other reference to go on with the speaker other than Jensen’s demos, I didn’t go into rehearsal with my expectations. But that all changed once I started playing.

How it sounds

Even though the speaker is billed as “warm,” I found that using a scooped EQ configuration on my amp produced the best sound. The most apt description I can give for the speaker is that it has balls. Even clean, the tone was rich and full, and with its sensitivity and power rating, I had no problem cutting through the sound of the band, and in no way did it sound muddy. I think this may be due to the pronounced high-mid to high hump in the frequency response chart. This makes me think that setting my amp to a scooped tone probably served to emphasize the frequency response of the speaker. And playing clean lines up and down the neck, well, the sound was inspiring. So subtly complex, like a vintage fine wine.

As far as overdrive sounds were concerned… Wow! Smooth as silk! Whether I was overdriving from my amp, or using my EWS Little Brute Drive distortion pedal, there was absolutely nothing harsh about the overdrive of this speaker. Admittedly, I was little concerned with using the LBD with the speaker as it emphasizes the bottom-end. But used with my Strat, the sound was absolutely heavenly, and I didn’t lose the highs as I originally suspected might happen. With my Les Paul and using only amp overdrive, the tone was nice and crunchy for rhythm, and pushed into full overdrive, I just experienced simply heavenly tones. With a warm speaker, I was expecting a little less note separation, but that was not at all an issue with this speaker, and I didn’t have to adjust my EQ on either my guitar or amp unless I wanted to do it for effect. For instance, I like to do “woman tone” leads for some songs (turning the EQ all the way down on my neck pickup), and the speaker didn’t muddy up at all.

Now all that said, a comment our front man said after a song was that my sound was a bit too metal – as I said, this speaker has BALLS. And that became apparent as I experimented with pushing the speaker to see what it would be like at band volume and a lot of drive. For sure, it really wasn’t appropriate for the song, but it sure did RAWK! We all laughed at the comment, and I said that this speaker has a pretty full bottom end, so I backed off on the overdrive and all was well. After that exchange, our bassist asked me how I liked the speaker, and I replied, “I’m smooth as silk today, baby. It’s a keeper!”

Overall Impression

I have a tough decision ahead of me. I absolutely adore the Jensen Jet Falcon, which is great to cover a wide variety of styles. But the Nighthawk is simply so kick-ass that I don’t think I’ll be taking it out of my cab any time soon. It can rock and it can also play some very deep, clean tones.

A big test for me about how good some gear might be is its ability to get me into what I call the “inspiration zone.” And the sound that comes out of this speaker gets me there – and quickly. It certainly is worth checking out!

Read Full Post »

4.75 Tone Bones - Almost perfect but not quite

bohemian-guitars-21787167

Bohemian Guitars BOHO Series Motor Oil

Summary: Inexpensive but incredibly playable and most importantly, very nice sounding, the BOHO Motor Oil really took me by surprise. Yeah, it seems a bit gimmicky, but these guitars are inspired by the founder’s South African roots where people put instruments together from whatever they could find.

Pros: Super-easy and comfortable to play. Pickups are voiced such that there’s a clear distinction between the positions. Very response to volume knob variation.

Cons: These are nits at most: The tuners need to be tightened a bit, as the strings can go out of tune fairly easy. Tone knob almost acts like a volume knob, but it’s serviceable.

Price: $299.00 Direct

Features:

  • Model: Motor Oil!
  • Body: Recycled metal hollow body w/ removable back panel. Basswood frame for increased amplification and structural integrity
  • Neck Wood: Maple
  • Neck type: Bohemian Through-Body
  • Fretboard: Rosewood
  • Headstock: Red
  • Finish: Golden Glaze
  • Frets: 21
  • Nut Width: 1 3/4″
  • Width at 12th Fret: 2 1/8″
  • Width at 21st Fret: 2 3/8″
  • Neck Thickness: 7/8″
  • Scale Length: 25 1/2″
  • Hardware: Chrome
  • Tuners: 3R 3L screw in w/ removable keys
  • Bridge/Tailpiece: Tune-o-Matic
  • Pickups: Humbucker, Humbucker
  • Electronics: Volume, Tone
  • Switch: 3-way toggle
  • Self-standing: This model has a built in stand made from recycled rubber.
  • Inspired by South Africa. Designed in Atlanta. Produced in China.

Tone Bone Rating: 4.75 ~ The best word to describe this guitar is FUN. It plays as fun as it looks!

I’ll admit it right out of the gate: I really tried NOT to like this guitar. The moment I took it out of the box, my first reaction was literally, “Oh shit! HAHAHAHAHA!” and I chuckled about it for several minutes. In fact, I let the guitar stand in my living room for a few days before I even decided to play it because I didn’t think this was a very “serious” guitar. I imagined myself in a clown suit playing it. But since I asked for the review unit, my sense of obligation overcame my initial amused disdain for it. So I took it to my man-cave, plugged it into my amp, tuned up the guitar, then started to play. And play. And play.

A couple of hours passed by with me just tooling with the guitar, and I finally had to stop when my wife opened the kitchen door glaring at me because I hadn’t gotten to my honey-do projects for the day.

Did I really lose track of time? I asked myself, That ONLY happens when I’m getting lost in the sound and what I’m playing is pleasing to me. When something gets me in the “zone,” it’s special, and all my initial thoughts and bias about its appearance completely disappeared.

When I put the BOHO down, I resolved to do a sound test with it as soon as I could. I had a gig that night, so I couldn’t get to it until the next day, but I looked forward to playing that guitar throughout my gig.

Even still, this guitar reeks of “gimmick” when you look at it. But how it plays and sounds completely overshadows any gimmickry that its appearance may imply. It totally took me by surprise, and I have to say that hands-down I love it! And the fact that it’s made in China is actually a good thing. Chinese guitar construction has come a long, long way over the years, and labor is still cheap, which means these guitars are affordable, so you shouldn’t let price-bias get in your way.

Fit and Finish

I could see nothing wrong with the guitar’s appearance. Other people have reported dents in the past, but my review unit had none. Note that those reports were from earlier models, and I don’t think they had the bracing that the new models have that make them tougher. The only nit I really had was that bending the first string at around the 12th or 13th fret while really digging in would fret out the string. But I attributed that more to a setup problem, and it’s quite possible that the bridge settled a bit during shipping. Raising the bridge a millimeter or two would solve that issue. It certainly wasn’t a neck angle issue. Everything appeared to line up just fine.

As far as overall construction is concerned, amazingly enough, the guitar’s pretty solid-feeling. I was thinking that it might be a bit flimsy; after all, its body is a freakin’ gas can! But the internal bracing provides plenty of structural integrity, so fragility isn’t an issue at all.

But other than my little nit, the guitar actually looks pretty cool, and over time, as I played it, it grew on me. That had more to do with how it plays and sounds than its appearance.

Playability

Amazingly enough, moving around the neck is smooth as silk. I love that it has a rosewood fret board because it provides a tactile feel that makes it feel familiar (most of my many guitars have rosewood fret boards). I personally prefer fatter fret wire, but that’s just personal preference, and doesn’t take away from how well the guitar feels and plays. And surprisingly enough, even with my belly, the guitar’s very comfortable to play despite the obviously fatter body from the can.

How It Sounds

Okay, so this is where the rubber hits the road, and where, most importantly, the guitar impacted me the most. Once I got past the guitar’s appearance, it was its voice that really struck me. While the folks at Bohemian Guitars tout this as the “rock” model, and it certainly has a great voicing for rock, I actually loved its voicing clean or just slightly dirty. For comparison, the voicing has elements of a later model Les Paul with sort of deep voice, but also has the “woody” elements of a semi-hollow body like a 335. It’s a cool voice. I would’ve liked to have a better EQ response with the tone knob because changes in the tone knob affected volume, but I found a good spot that worked for all three pickups and kept it there.

The first three clips you’ll hear are the same phrase played through each of the pickup positions, starting with neck pickup and moving to the bridge. With the first two, I just made up stuff off the top of my head, but with the third clip, I used the main riff from Oasis’ Wonderwall. No matter what I’m playing, the one thing I always look for is note separation, especially when played dirty. I didn’t play any lead lines because frankly, 97% of the time I’m playing rhythm. So it’s important to get a sense of how well the guitar articulates. The amp I used for this was my trusty Aracom VRX18 with EL84’s, played in the drive channel. The amp was set to the very edge of breakup so I could get it to overdrive with volume knob changes and attack.

All clips were recorded raw with the exception of the last clip where I added some hall reverb.

Clean, all three pickups

Dirty, all three pickups

Edge of breakup, all three pickups

Jazzy Blues w/reverb, middle pickup

Admittedly, the clean and edgy tones were the ones that got me to lose myself for those couple of hours when I first played the guitar. And to be completely honest, I love the sound this guitar produces clean and at the edge of breakup best. This probably has to do with my Les Paul bias with respect to a “rock” sound. It’s not that I don’t like the overdriven sound of the guitar, it’s just that I have a preference for the sound I want to produce when playing with overdrive.

Overall Impression

Once I got over my initial doubts about the guitar, I discovered a very nice-playing and nice-sounding guitar under the covers. And at $299, this an incredibly approachable guitar that won’t break the bank in the process. Would I gig with it? To be honest, I’m not sure. But I have no doubts with its solid construction that it would be able to stand the rigors of gigs. But for its gorgeous clean tones, I’d certainly use it in the studio, especially for the new reggae-style tunes I’m working on.

And truth be told, its appearance has actually grown on me. I still don’t know if I’d gig with it regularly, but that has nothing to do with how it looks. With a gigging guitar, I typically look for versatility. I’d have to bring it to band rehearsal to see how it would perform. But other than that, I love this guitar. For what it is, it’s the ultimate in “cool.”

Read Full Post »

5 Tone Bones - Gear has stellar performance, value, and quality. This is definitely top of the class, best of breed, and it's a no-brainer to add this to your gear lineup!

Hughes & Kettner TubeMeister 18 Head

Summary: This amp is truly a tone chameleon, capable of delivering vintage to modern tones in one 18 Watt package. I daresay that it is pretty much the most versatile amp I’ve ever owned; not only from a tone standpoint, but also from a power standpoint. 18 Watts too loud in your space? Bring it down to 5W or 1W or even 0W! The on-board RedBox DI is absolutely killer, and provides for truly silent recording, which is a huge for late-night recording when the kids are asleep (or roommates, etc.).  Super-responsive EQ makes for tons of tone shaping possibilities.

Pros:Where do I begin? This amp has it all for me; especially in the recording department.

Cons: This is a very minor nit, but even with a Strat, the lead channel can really compress at high gain settings.

Price: $599 Street ($50 for the optional footswitch)

Features:

  • Channels: Clean, Lead + Lead Boost
  • Power Soak: 5W, 1W, Silent
  • Preamp: 2 X 12AX7
  • Power Amp: 2 X EL84
  • Effects Loop (Serial)
  • Speaker Output: 8 & 16 Ohm (will automatically detect – no switch)
  • Tube Safety Control (TSC) – keeps power tubes biased properly for optimal performance.
  • Padded, protective cover included
  • Optional channel switching footswitch.

Tone Bone Rating: 5.00 ~ I have to admit, I really lucked out with this amp. I bought it used from a good buddy who had only gigged with it once, and to be honest, didn’t know too much about it. But after I researched it, what originally attracted me to the amp was the on-board RedBox DI. But after playing with it for several hours since I picked it up, I simply love all the tones I can get from this amp – and I’ve only played one guitar through it! It’s a winner!

I’m such a gear slut. When I got this amp, my buddy, who’s also a fellow gear slut chuckled and said, “As if you need another amp…” I also laughed, and almost got buyer’s remorse. BUT what I didn’t have was an amp that had an on-board DI. But the RedBox is a special DI in that it has speaker simulation, which means you’re going to get the reactance of an amp connected to a speaker. It’s one thing to DI into a DAW, but it sounds like an amp plugged directly into a speaker. Add speaker simulation and there’s something special that happens when you add reactance into the mix. You get the dynamics you expect when plugged into a cabinet.

Fit and Finish

This amp is built like a tank. I’m sure H&K had the gigging musician in mind when they built the amp because it’s very solid. The only nit I’d have with respect to it’s physical appearance is that the level dots on the knobs can be a bit difficult to see from certain angles because of the chrome finish. It’s a small nit, and when I gig with the amp, I’ll probably either paint dark lines or stick some thin pieces of colored tape to the top of the knobs so I know where I’m setting things.

Also, when switched on, that blue LED glow is pretty cool. To be honest, I don’t really care about how the thing looks and focus much more on the sounds it can produce. But hey! If it sounds good and looks great in the process, I’m not going to complain.

How It Sounds

To start off, whether plugged into a cab or outputting directly from the DI into an audio interface, this amp is dead quiet when idle, except at high gain settings where the power amp will hum just a tiny bit. But that humming also has a lot to do with my Strat’s single coils. Haven’t tried it with any of my Les Pauls just yet, and I’m anticipating that they’d be quieter. But any amp fully cranked is going to make some noise.

Now to be completely honest, none of the clips I’m supplying here are with the amp hooked up to a cabinet and me miking the cab. My focus was on using the DI to capture my guitar sounds to see if I could get a usable recording that I could then tweak in production. Circling back a little with the DI, one thing that having a speaker simulation is that you get the subtle overtones and dynamics in the signal that you wouldn’t get with a direct signal. It’s typically a little dead when using a regular DI with no speaker simulation, thus no reactance. Truth be told, it’s not perfect, and it doesn’t sound nearly as good as the amp plugged into a cabinet. But it’s close. Real close, and though it doesn’t sound as good as a speaker moving air, it doesn’t suck tone. Dynamics are all retained. My thought behind getting this amp was to get a usable signal that I could then process in Logic and add the texturing there. So without further ado, let’s take a look (BTW, for these clips, I used my Strat plugged directly into the amp, with an XLR going direct to my MBox 2):

Raw signal, clean

My first test was to record a simple clean clip raw to see how it sounded. This clip has absolutely no plug-ins employed in neither the guitar tracks nor the output track.

When I finished the “rhythm” track for this, I immediately smiled. Not only did I have a usable signal, it sounded like my amp was plugged into a cabinet because the dynamics that I was expecting were all there, but with the added plus of no ambient room noise.

Clean, slightly processed

Since I had a usable signal, I wanted to fatten it up a bit and add some reverb to give the sound more space. Here’s the same clip as above, but slight processed (Note: I didn’t do any EQ on the either track).

After doing just those simple tweaks, I knew I had a winner with respect to a recording amp.

Dirty

I wasn’t going to originally include this clip because if there’s one nit I had with the amp while recording this last night, was that at real cranked up settings, the signal compresses – a lot. I guess I’m used to using vintage-style amps that never get that far. But with this amp, I have to be careful about cranking the amp too high. It’s a little hard to hear in the clip itself, but while playing, I noticed a reduction in note separation. But granted, I had the Master wide open, and the gain knob at 3pm. I’ve learned to set the Gain to around 10am, and I still get plenty of sustain, but much less compression.

Sustain test

Finally, I wanted to experience that noted H & K tube sag, and see how well the amp would sustain my guitar signal. In a nutshell, it sustains incredibly well.

The most impressive thing about this clip was at the end where the amp is picking up the overtones of the guitar. OMG! I couldn’t believe that when I was playing last night!

Final Impression

I don’t know what it is, but I’m running across a lot of game-changers for me. While I love my vintage-style amps, and will continue to gig with them, I have a feeling that I’ll be getting a of mileage from the TubeMeister 18. As a bonus, check out this video review from Guitar World. Paul’s a killer player, and he really brings out the gorgeous tones the TubeMeister 18 can produce. There are actually two videos, and the second video where he starts playing the lead channel, had me swooning over the gorgeous overdrive this amp can produce.


Read Full Post »

4.75 Tone Bones - Almost perfect but not quite

play_electric

TC-Helicon Play Electric

Summary: Sporting the fantastic TC Helicon vocal engine and upgraded guitar pedal effects, including several TonePrint patches – Corona Chorus, Hall of Fame Reverb, Flashback Delay – plus a very nice compressor. Play Electric adds amp emulation from its big brother, the Voicelive 3, and with the right tweaks, it’s entirely possible to plug this right into a PA and leave the amp at home.

Cons: The only little nit that I have is that the loop length is extremely short – around 15 seconds. That’s enough to capture a few bars to solo over, but there are times when you want to loop an entire verse or chorus. For that, you’ll have to use another looper. A bit of a bummer, but not enough to dismiss the power behind this unit.

Price: $349.00 Street

Features (from web site):

  • Professional Vocal Effects and Tone with natural sounding Vocal Harmonies guided by your guitar  and/or Room Sense which captures the ambient sound and can be used with piano.
  • Guitar FX styles from TC Electronic’s award-winning range of TonePrint pedals
  • Powerful amp emulations from VoiceLive 3 with a dedicated guitar output
  • User-friendly design with per-preset Vocal and Guitar FX combinations for easy performance control

Tone Bone Rating: 4.75 ~ If it weren’t for the short loop length, I’d be giving this unit a 5. I got a Switch-3 switch box to control the looping, and if you’re going to use the looper, this is a must-have.

I’ve had this unit a few months, but actually didn’t start using it until a couple of weeks ago when I had holiday gigs at various venues where space was at a premium, and lugging my pedal board along with my PA was impractical. I wish I had started using it sooner… the on-board modulation effects combined with amp simulation provide a super-rich tone; equivalent to the quality of tone that I’ve come to expect. But I’m getting a little ahead of myself.

The first holiday gig I had was for the staff party at an assisted living facility. To get to the place I was to play, I’d have to park my car in a loading zone then carry my stuff through a couple of halls. Now normally, my load out would take two trips, but this wasn’t really an option. Conceivably, I could take my entire rig (pedalboard, gig bag, cord bag, and SoloAmp PA) in one trip, but the stuff is a bit unwieldy, and I’ve dropped my pedal board, actually ruining a couple of pedals once. So a single trip was in order.

While I was trying to figure out how to configure my rig, I remembered that I had the Play Electric unit that had everything that I needed on board. So the morning of the gig, I did a quick tweak of the guitar settings (setting them to global so they’d be the same for every vocal patch, which is a godsend of a feature, by the way), packed up my cord bag with the cords I needed plus the Play Electric, and set off to my gig.

I didn’t use the looping feature at that gig because after seeing another dude play with a VoiceLive 2 and the Switch-3 switching unit, I knew that was the way to go, and besides, I didn’t have the Switch-3 yet. But that was okay. It was only a two-hour gig, and I could do all my songs – even the ones where I normally loop – without a looper.

Setup was an absolutely breeze. I had the VoiceLive 2, so setting up wasn’t anything new. Once I was all set up, I remembered the RoomSense feature, which is an on-board mic that picks up the ambient sound in a room, and can be used to harmonize for instruments that don’t plug in; like a piano for instance…. The facility where I played had a beautiful Kawai baby grand, so I upped the sensitivity of the RoomSense mic, and tested it out. OMG!!!!! I wish I had used that with my VoiceLive 2 when I had it. I could’ve been doing harmony while playing piano all this time! Oh well… lesson learned, and where there was a piano at my holiday gigs, which was everywhere except for two places, I used the RoomSense to harmonize while playing piano.

Note that since the unit uses the same vocal processing algorithms found in all the high-end TC Helicon vocal processors, I won’t be covering harmony here, just the guitar stuff.

Packed with Features

I thought the VoiceLive 2 had tons of stuff packed into it, but the Play Electric has so much more. Here are the amp models that are offered in the unit:

Clean Brit, Cali Clean, UK Clean, Deep Clean, Bright Switch, Warm, Little Thing, Chicken Picker, Brit OD, AC Crunch, Chunky Brit, Lil Champion, Chime Drive, 2×12 Combo, 4×12 Crunch, Swamptone, Nasaltone, Brown, Scooped, Metallic, TC Electronic Dark Matter Pedal, OD Pedal, Dark OD Pedal, Distortion Pedal, Acoustic (Flat), Acoustic (Shaped/BodyRez)

On top of that, you have full EQ control in the unit to adjust the EQ settings for what every guitar you’re playing. One nice feature of the EQ is that you can “move” the midpoint frequency of the mids. This is something that you typically find on good PA boards, but I can see the sense in including a feature like that with the Play Electric. You could move it higher for a naturally warm-sounding guitar, or lower to take the edge off a bright guitar, then adjust the high, mid and low around the midpoint. Very cool feature.

On top of that, the same algorithms that power the TonePrint pedals are also in the unit. I use two of the pedals on my electric board: the Corona Chorus and Hall of Fame reverb. These are mainstays on my pedal board, and to have those pedals in the Play Electric is awesome. The delay and compression models are also quite nice. I totally dig the compressor, and even though it’s fairly simplistic, it’s adjustable enough to achieve a very rich tone.

How It Sounds

Sorry, I don’t have any sound clips to share at this time, but after using it several times, I can confidently say that both the vocal and guitar tones are awesome. But as with anything, it takes spending a bit of time dialing in the settings. Luckily this is not at all difficult with the Play Electric. The brightly lit LCD screen is super-easy to read, and frankly, you can adjust practically everything without having to refer to the manual (though admittedly, I had to refer to the manual to adjust amp EQ settings).

As far as guitar tone is concerned, though I probably should’ve tested this with an electric guitar, the plain fact of the matter is that I would use this almost exclusively in my acoustic gigs (I’m actually in between bands right now). And for that, this unit produces incredible sound; so incredible, in fact, that I will be leaving my pedal board at home going forward. Here’s a little more discussion on the pedal models:

Though the unit includes TonePrint models, it’s not exclusively limited to those. Each model includes several other non-TonePrint models that you can use (I believe these are the same found on the VoiceLive 2), which have been traditionally pretty high-quality. Personally, I didn’t use them when I had the VoiceLive 2 because I had dedicated pedals that were much better than the on-board models. But with the TonePrint models, as these are my pedals of choice for modulation effects (specifically, chorus and reverb), using them is another no-brainer.

Corona Chorus

This is not nearly as adjustable as the standalone pedal; actually none of the models are, but it’s very easy to dial in the right level and speed to get a subtle (which I prefer) to a super-wet, drippy chorus tone.

Hall of Fame Reverb

When I got this pedal a couple of years back, it soon became my go-to reverb. The spring reverb is magnificent, but it’s the plate and hall reverbs where this pedal shines. I use the hall reverb to add a subtle expanse to my guitar tone without it sounding like I’m in a simulated all. It’s just a touch to “grease” as Doug Doppler says.

Delay

I don’t know if the Flashback model is used here, but the delay is quite nice on this unit. Again, I use it very subtly to provide just a touch of slapback, with a low mix level.

Compressor

This is actually my favorite “pedal” in the unit. There are five presets available that provide either more attack, sustain, pop or pump, and you can adjust the amount and makeup gain as necessary. I use the Subtle Sustain setting, and it works great with my acoustic.

Looping

As I mentioned, my only nit about the Play Electric is the short loop length, but after playing through several of the songs I play with looping, I found that for the most part, I can live with the short loop length because the sound that the Play Electric produces completely meets my needs; moreover, the prospect of carrying one less bag makes using this an absolute no-brainer.

Wrapping It Up

Getting to the point, I dig Play Electric. I wish it had longer looping, but to get that, plus a finer control over the guitar and vocal settings, I’d have to go to the VoiceLive 3 which is more than twice the price of this unit. Could it be worth it? Possibly… probably… but it’s not expense that I can make right now (especially since I’m saving up for a Gretsch Brian Setzer) 🙂 But for what the Play Electric provides besides looping, it’s a unit that will serve me well for a long time.

Read Full Post »

Older Posts »