Feeds:
Posts
Comments

Posts Tagged ‘aracom’

Aracom Dual Rox DRX Attenuator

Aracom Dual Rox DRX Attenuator

For me, an attenuator was a key component in my live signal chain for many years. As I was playing live mostly in a church setting, in order to get my amp to “growl” levels, I had no other choice but to use output attenuation to control my volume. And for this, I used several attenuators such as the Dr. Z AirBrake, then moved onto a couple of different models from Aracom (which, to me, is the gold standard in transparency). I currently own the Aracom DRX, and I love it. With its dual levels of attenuation, it gives me the ability to use my two-channel amp and set different attenuation levels for it. Very cool.

But since I broke up the church band and joined a classic rock cover band, I haven’t used the DRX – at all. The reason is that most of the songs that my band plays don’t require a lot of distortion; and not that my church stuff did, but output volume is so much less of an issue now than it was with my church band as we play venues where a higher volume is expected.

Plus, once I got the EHX Soul Food overdrive pedal, a lot of things changed for me; when I need overdrive, I just click that pedal on, and I’ve got that great, creamy-smooth overdrive sound that the Soul Food produces. I still set my amp up at the edge of break-up, but most of my distortion comes from my pre-amp tubes – and it’s not that much, as I get the overdrive I need from my pedal. I just don’t have a pressing need to push my power tubes into saturation. That might change, but I’m pretty satisfied with my sound right now.

All that said, I still use the attenuator in my home studio. I couldn’t record my tube amps without one. But even in that case, I’m actually recording at a bit higher of a volume than I have in the past because I’ve realized that there’s a lot to be said when a speaker is pushing air. I use a Sennheiser e609 to close-mic my cab, then I set a ribbon mic about 3 feet away to capture the sound at a distance. With my particular setup, close-miking doesn’t capture the rich tones that issue from my cab. What I’ve found in a live situation is that my speaker produces some wonderful lows that don’t seem to get captured close-in. And that seems to only happen when I play the amp at higher than bedroom levels.

So… To attenuator or not to attenuate? Well… I guess my answer is: It depends…


Read Full Post »

I’ve been studying different styles of modern reggae for the last several months. I’ve always liked reggae but never got into it. But as my older kids listen to a lot of it, it was inevitable that I’d catch the bug.

Most of my familiarity with reggae is the old school stuff from Marley and Tosh and others. But this new stuff, has taken reggae and expanded it, crossing borders between Pop, Hip-Hop and R & B. Also, while the basic rhythms are retained in the newer styles, melodies have also become very rhythm-centric. It’s pretty amazing, and some of it is extremely musically complex and sophisticated.

I’ve written reggae songs in the past, but they followed the old-school patterns, and I’ve been itching to write more modern stuff. But I was admittedly at an impasse. Well, the other day, I came up with a riff that I laid down, but couldn’t find the words. So I thought I’d practice a bit and see if I could convert an existing tune into a reggae version. For some reason, “Baby Got Back” came to mind. Here it is:

When I told my son what I was intending to do, he laughed out loud, and said, “Well Dad… it could be cool if you could pull it off.” I think I did. More importantly, I wanted to give justice to the original. It’s such a fun tune that I wanted to capture that fun in this one.

As far as equipment was concerned, here’s what I used:

Amp: Aracom VRX18 clean channel

Attenuator: Aracom DRX (volume was literally conversation level)

Guitar: Slash L Guitars “Katie May” (Both rhythm tracks were recorded with the neck pickup, with the coils split; the lead was recorded with either the neck or the bridge pickup).

Pedal: EHX Soul Food – All overdrive parts. I kept the amp absolutely clean.

Read Full Post »

DualRoxI’ve been using an Aracom DRX attenuator in the studio for the past couple of weeks and I have been absolutely blown away by its ability to tame my volume just as well as my now-retired PRX150-Pro. But this past Friday, Jeff delivered my own DRX that I had him build based upon my tests, and I just had to gig with it to try it out in a live-audience situation.

I do have to admit that the DRX is a little less convenient than the PRX150-Pro in that I have to hook up a couple of more things: The foot switch and power supply (for the footswitch). But that inconvenience becomes negligible when the DRX is in action!

First of all, the boost feature is an absolute god-send! With all other attenuators – and this includes my venerable PRX150-Pro – once you hit the volume limit, that’s it. You can’t go louder. But with the DRX, that’s no longer an issue. It was great to use this feature to boost my volume when I was doing leads and not have to worry if I had hit the limit (or set up my volume so that I stayed under the limit). With the boost feature, which is essentially an attenuation reducer, I can add a few or maybe even several dB of volume with the flick of a switch. It’s absolutely amazing!

But it doesn’t stop there. The Variable Dynamic Control, which varies the reactance between the attenuator and speaker, helps dial in my tone so I have the right amount of highs. While not an EQ, the VDC adjusts the reactance and acts like a very subtle high-cut filter. Fully right is full reactance, and as you move through the next four positions, the reactance is slightly reduced, resulting in more highs being cut. For my particular setup of an R8 Les Paul through my Aracom VRX18, I felt that the sound was just a tad bright, so I went down one position on the VDC, and my world was absolutely right. My tone was still bright and had plenty of bite, but not so bright that it was like icepicks in my ears.

For purely clean work, I completely defeated the attenuation, which was possible from the front panel. On previous versions, the bypass was on the back, and in tight spaces, wasn’t practical to reach around. But with it on the front panel, defeating the attenuation is a simple matter of turning a dial.

All in all, everything about this attenuator is a huge improvement over earlier generations of attenuators; Aracom and others. It comes at a premium, but we spend thousands upon thousand of dollars on guitars, amps and pedals, so I see no problem justifying the cost of this unit. It makes it possible for me to play an overdriven amp in ANY venue. Yeah, yeah, you can argue all you want that you can do the same with a clean amp and overdrive pedals. But diode or a even tube overdrive pedal will never be the same as the overdrive from a cranked amp.

To say I’m happy with this latest acquisition is an understatement. For the last few years, I played the best attenuator on the market. But it pales in comparison to what the DRX brings to the table. The funny thing though is that unlike other gear that makes a sound, this doesn’t produce any sound, so it’s difficult to put into words what it actually can do beyond helping me control my volume. But it controls volume better than anything else on the market, and provides versatility that none other can. And as far as “transparency” goes, well, arguments abound, but with the Aracom attenuation technology, you can rest assured that the tone and the dynamics that you expect from your gear won’t be lost. I can’t say that about any other attenuator I’ve tested.

This is the real deal, folks, and this is the future of attenuation!

For more information, check out the DRX product page!

Read Full Post »

SONY DSC
Aracom PLX100

Summary: Based upon the PLX amp “platform” that Jeff Aragaki has created for creating customer-specific amps, this 100-watt beast is actually 3 classic Marshall amps in 1: Plexi 100 SuperLead (JMP), Plexi PA, and JCM800 (high gain).

Features

  • Three channels (Plexi SuperLead, Plexi PA, JCM800)
  • “Bite” Switch (mild mid boost)
  • Master Volume Control with Bypass Switch
  • Presence, Treble, Middle, B ass Tone Controls
  • Solid State/Tube Rectifier Simulation Switch
  • Channel Disable Switch
  • Bias Test Points with user accessible bias pot
  • Handwired turret board construction
  • “M” style large box head cabinet

Price: ~$2900

Tone Bone Score: 5.0 ~ Talk about high-gain versatility. This is no gimmick. Each different channel has voicing that you’d expect out of that particular model. The SuperLead is classic, bright Plexi, while the JCM800 has a darker, much more aggressive tone, and the SuperPA is all about clean headroom. While the amp in an of itself is special; the PLX platform is what make all this possible. If I’ve said it once, I’ll say it to the grave: Jeff Aragaki is genius!

About three years ago, Jeff Aragaki and I were talking about a new amp design. I told him that I would love to have a high-gain amp either in a 50 or 100 Watt version, but gave me the flexibility to voice it in various ways to fit the particular sound I wanted. We affectionately called this a “FlexPlex” because for me in particular, I wanted that Plexi sound, but wanted to be able to tweak it. Jeff actually built it, and I saw the prototype for it a couple of weeks ago.

But in the process of building the FlexPlex, you might say he “stumbled” upon a completely new way to build his amps; and that was basing his builds upon a platform. This wasn’t trivial, and no, I’m not just bandying about some buzzword. The platform that Jeff discovered has allowed him to create all sorts of different amps; starting with a common construct. I’m not sure about all the details, but the proof is in the pudding. Here Jeff’s words that describe this particular amp:

“The ARACOM PLX100 amplifier is a platform that allows us to build customer specific amplifiers with the features and specifications they desire.   For this custom build, our customer wanted a 100 watt amplifier with the vintage Marshall Super PA look.   The Super PA head cabinet has a “wide mouth” front panel opening, allowing access to four separate P.A. channels.    The model designation for this custom ARACOM amplifier is” Super H.T”.,  H.T. representing the initials of our customer.  However, instead of having 4 identical channels like a standard Super PA amplifier, the Super H.T. has 3 different channels, allowing for a highly versatile amplifier. 

“The JMP channel offers clean and overdriven tones as expected with a Plexi SuperLead amplifier.  It has two separate Bright switches that allow the channel to go from a Plexi Normal (Dark) channel tone to Plexi Bright channel tone, or something in between.   The Super PA channel provides slightly less gain than the JMP channel, with a fuller bass response.   The JCM channel is the high gain channel, designated for overdriven/distorted tones.   The JCM’s Bright switch allows for the standard JCM800 bright tone or a slightly darker tone.   The Master Volume control with a true bypass switch, allows for cranked up tone at lower volume levels.   The rear panel Bias Test points, allows for quick and easy tube biasing.”

Fit and Finish

It sure looks like a Marshall… 🙂 But in all seriousness, it’s an Aracom Amp, and that means quality. Jeff doesn’t skimp on components, and he takes a lot of pride in making sure everything that leaves his shop looks absolutely professional, and the PLX100 is no exception. The tolex is perfect, and all the knobs are snug and turn smoothly. And since this amp was going overseas, you can bet that Jeff made sure that everything was sturdy to eliminate or severely reduce the risk of breakage.

Ease of Use

I normally don’t have this section in my reviews, but I thought it necessary in this case. While I absolutely love the amp, with all the switches and the push-pull knobs, I have to admit that I’d have to take a lot of time getting familiar with it. I don’t call that really a negative mark on the amp. For goodness’ sake! How else do you pack in all those features? But despite that, the knob and switch layout is pretty clear. It would take me awhile to find the sweet spot in each channel for all the guitars I’d play through it. But that’s the beauty of discovery and experimentation, wouldn’t you say?

How It Sounds

This amp sounds amazing! Jeff explained each channel as I would have, so I’ll just reiterate and say that his descriptions of each channel reflect my own experience with it. When I was in his shop testing the amp, we must’ve played around with it for at least an hour as he twiddled knobs and flipped switches to demonstrate the amazing number of voices that could come from this amp. The permutations of settings make this amp able to tackle practically any style of music. Oh! We did all the testing through a huge 4 X 12 at gig volumes, so it was LOUD! 🙂 I played a Les Paul, a Gene Baker prototype (it was a hybrid that is VERY cool), and a Strat through the amp, and each guitar sounded killer through it. My favorite channel by far was the SuperLead channel, which had lots of gain on tap, but wasn’t at all over the top. Next was the JCM channel – especially its dark mode which produced thumping overdrive. I wasn’t too wild about the SuperPA with a Les Paul, but with single coils, that channel was absolutely SWEET! It would be a perfect channel to use with overdrive pedals because of its clean headroom.

Overall Impression

What strikes me the most about the PLX100 is that you literally have three amps in one. If you had all three, you’d probably be close to $10,000. That this amp is only $2900 is pretty amazing to me. But that’s Jeff. He doesn’t make a huge profit on the gear he builds – that’s a personal choice. He just wants to build great amps. This is like my friend Perry Riggs of Slash L Guitars. He makes absolutely awesome guitars but sells them at a price-point that’s rather incredible. Both of these gentlemen are true artisans of their trade, and I’m glad there are folks like this.

With respect to the PLX100, I sure wish I played in venues where I really open up an amp like this and really do it justice. For my particular uses, this is way too much amp. But if I ever get the chance to regularly play large venues, you can bet that I’ll be calling Jeff Aragaki to build me an amp on the PLX100 platform. Or… maybe he has a 50 Watt version. 🙂

For more information, visit the Aracom PLX100 product page!

Read Full Post »

5 Tone Bones - Gear has stellar performance, value, and quality. This is definitely top of the class, best of breed, and it's a no-brainer to add this to your gear lineup!

DualRox

Aracom DRX Power Attenuator

Summary: Truly an evolution of the attenuator, Jeff Aragaki has once again upped the ante with the DRX attenuator. This dual-level attenuator not only will tame your volume, but it will give you the ability to use two different volume levels; and with the optional foot switches, will give you flexibility not offered by any other attenuator on the market. Furthermore, the adjustable reactance allows you to tame your tone on top of controlling your volume.

Pros: The Aracom attenuation technology is the most transparent that I’ve tested – and I’ve tested and used several over the years. Nothing comes close. But the dual-level attenuation (normal and boost modes) blows away the competition in my book. Then add variable reactance to the mix, and there’s nothing that can even touch what this attenuator can do.

Cons: Is a little on the pricey side, but the capabilities are worth it to me. I’m having one built.

Price: Starts at $850.00 direct

Features:

  • Dual-level attenuation
  • True bypass, minimum attenuation, variable (which goes all the way to load)
  • 5-position Variable Dynamic Control – varies the reactance between the attenuator and speaker, acting like a high-cut filter.
  • 3 optional foot switches (boost only, boost + channel switch, boost + A/B)
  • Weighs only 7 lbs.
  • Line out with level control
  • Will handle 4, 8 and 16 ohm

Tone Bone Rating: 5.00 ~ A few years ago, when Jeff first showed me his prototype attenuator mounted on a pine board, I never thought that

Jeff Aragaki is a genius. I knew it from the first moment I met him. I started out by first being blown away by his “more Marshall than Marshall” amps and now the proud owner of three of them to witnessing his attenuator technology go from a project box, demonstrating to me a way to throttle output volume that was unlike anything at the time (and still no one has been able to duplicate what he has done), to now three iterations of attenuators (Pro, DAG, and now the DRX). The DRX is by far his most incredible riff on his unique attenuation technology. And no, if you think you know how it works, you’d be wrong. I’m no expert, but I’m familiar with the basics of traditional attenuation (read: everyone else’s attenuators), and the Aracom technology is like nothing on the market.

As I mentioned above, the DRX (short for DualRox) attenuator takes that technology to a new level by offering two modes of operation: Normal and Boost; at least if you’re just using boost mode (Type A foot switch). It opens up more possibilities with the Type B and Type C foot switches which provide the capability to switch channels (Type B), or use an A/B (Type C), perfect for two-channel amps that don’t have channel switching. These features alone had me completely sold on the unit, and I had only originally tested it with the Type A foot switch! My test unit which Jeff lent to me for review included the Type B boost and channel switch (which I’ll demonstrate in a clip below). But irrespective of the type of switching, being able to boost my volume under attenuation just blew me away!!! Here’s a clip that demonstrates only switching between normal and boost modes:

From a performance standpoint however, having both the dual attenuation levels, plus the ability to switch channels is absolutely HUGE! For instance, I can go from clean to full-on overdrive with the click of the foot switch; much like engaging an overdrive pedal. But there’s no pedal involved. Without an attenuator, going from clean to dirty on the amp usually involves a huge jump in volume. But with the dual-level attenuation, I can set my cranked up volume to just a bit over the clean volume. Again, this is just having an overdrive pedal, but this time, it’s only my amp, so I don’t have to worry about dialing in another device’s EQ to get the right tone. Check this clip out:

I used my Aracom VRX22 for that, which is another Plexi clone but with 6V6 tubes. This amp is notable for its haunting clean tone, and monster overdrive, which comes from 1950’s NOS 6V6’s that I have biased a little hot. I also had it customized with channel switching, so it fit the bill for testing out the Type B foot switch. I just can’t wait to gig with this come Sunday! It’s gonna be fun!

But it doesn’t stop there. In addition to the dual modes is a feature that no one else has, and that’s the Variable Dynamic Control. While it acts essentially as a subtle high-cut filter, it’s not an EQ. Instead, it changes the reactance between the attenuator and speaker. Fully right is full reactance, and as you move left to the leftmost position (there are 5 positions), the reactance is reduced, producing the effect of rolling off the highs. But it’s very subtle, and you can really only tell a difference between the most extreme settings. This is an incredible feature in that it allows you to dial in your tone; especially your cranked tone. For instance, my Aracom VRX18 (18-watt Plexi clone) produces lots of highs when cranked. They’re not entirely undesirable, but they do get piercing, especially at gig levels. So by slightly reducing the reactance between the attenuator and speaker, I can get rid of the super-super highs while retaining my fundamental tone. In a word: Killer. Here’s a clip that demonstrates the Variable Dynamic Control:

As I said, it’s subtle. The fundamental tone doesn’t change much, but going from extreme to extreme, you can tell when the highs roll off a bit.

For those who are familiar with the previous Aracom attenuators, one feature that set them apart was the ability to mix and match amps and cabs with different impedance settings. For instance, you could match an 8 ohm amp output with a 4 ohm cab. But that came at the price of a huge transformer that made those units weight 18 lbs. The DRX requires that both amp and cab impedance settings match. But that’s not really a loss at least for me because all my amplifiers have multiple output impedance jacks, so it’s really not a big deal. And for what I get in return from the DRX, that loss of flexibility is not a very high price to pay.

Overall Impression

When I first tested the prototype of this unit a couple of years ago, I actually thought that Jeff had changed the circuit technology. But in fact, he didn’t, which is a good thing because when you have this unit, you’re assured of getting the most advanced attenuation technology on the planet. Yeah, I’m raving about it because for the past few years, this technology has afforded me the flexibility to play in ANY venue, large and small, indoor or outdoor, and not ever have to sacrifice my tone; something I can’t say of other attenuators I’ve used and tested. I can crank up my amp as much as I need, confident that my tone hasn’t changed, but never having to worry about pissing someone off about my volume.

But on top of that, with the ability to have two levels of attenuation, plus the ability to dial in my highs, I couldn’t be happier, and I can hardly wait for Jeff to finish constructing my unit.

And yeah, as I mentioned above, it’s a bit on the pricey side. But how much is great tone worth? I’ve spent countless hours and thousands upon thousands of dollars on guitars, amps and pedals over the years – especially the last few years – and with each one, I justified my expense. The DRX is a tool that will let me ensure that I keep the tone that I’ve worked so hard to achieve. It may not make sense for the solo bedroom player, but for working musicians like myself, the DRX is an investment in my tone that I’m willing to make.

For more information, go to the Aracom DRX product page!

Read Full Post »

DualRoxI’ll say this first: The Aracom DRX power attenuator is everything a power attenuator should be!

Biased? Perhaps. After all I’ve made no secret about owning and preferring Aracom equipment, and Jeff Aragaki is a good friend of mine. But irrespective of my ownership of Aracom products and my relationship with Jeff, if you’ve followed this blog with any regularity at all, I don’t say things like that lightly. There’s too much competition in the marketplace to crown a “best” or make a claim like I just did without experience. Luckily, experience is on my side, and having kept tabs on the various attenuators that have hit the market over the years – especially the last few years – I can confidently say that no other attenuator on the market does what the DRX can do.

I was going to save this for the end, but yes, it’s bye-bye PRX150, once Jeff finishes construction of a DRX for me. But I will say this: For basic attenuation requirements, the PRX line of attenuators are fantastic. My PRX150 has been a stand-by on stage and in the studio for years, and has served me quite well. The totally transparent passive attenuation technology combined with the Aracom input/output impedance matching that Jeff invented has no match on the market. And if what you’re looking for is straight-up attenuation, you can’t ever go wrong with a PRX attenuator.

Every year, I write an article on game-changers for me. The PRX150-Pro has always made the list because I just can’t do without attenuation and get the high-gain sounds I need at a reasonable volume. But the DRX will unfortunately AND fortunately supplant it on the list.

So, with the preamble out of the way, let’s get down to brass tacks…

In evolutionary science, there’s a term called “disruptive selection” (aka diversifying selection) wherein extreme traits are selected over intermediate traits within a given population. A good example of this is the evolution of the peppered moth in England (yeah, I was a biology major at university and genetics and evolution were part of the curricula). In this study, the light-colored peppered moth population was severely decreased due to predation; in large part because of the environmental changes brought on by soot covering the foliage, thus making the moths stand out. On the other hand, dark-colored moths increased in population because they could conceal themselves much better against the darker foliage. Darwin also observed this on the Galapagos islands with the finch population (this is a cardinal case, as it is known, and it is mentioned in the article to which I provided a link).

So what does disruptive selection have to do with the DRX? Well, first we have to start with the PRX. Jeff’s attenuation circuit technology, while functioning in basically the same manner as other attenuators; that is, attenuating output power was actually a disruptive event in attenuator technology when it first arrived on the scene. Every other manufacturer at the time was basically using a variation on the same attenuation technology which, while effective, were tone sucks. So to get their transparency, they had to add EQ circuits to compensate for the high-end frequency loss inherent to the traditional attenuator design. Jeff, on the other hand, figured out circuitry that retained transparency and dynamics without the need for an EQ circuit. It truly was a game-changer, and sparked some heated debate on the forums. But with time, things settled down, people picked their attenuators, and the discussion moved on. Enter the DRX (I really wanted to say “Dragon”).

I had worked with a prototype of this a couple of years ago. It was on a pine board. 🙂 And even at the time I told Jeff that this was going to change everything in the attenuator market once he came out with the real deal, and now that I’ve had a chance to finally play with it, I wasn’t wrong. This attenuator changes everything for me!

I finally got to try out the DRX at Jeff’s workshop over the weekend. I was taking my PRX150 in for a bit of servicing because after hundreds of hours of use, I started noticing some weirdness in it that I wanted to have him check out. Also, Jeff wanted me to test a VERY special, new 100-watt amp that he was shipping to Australia before he packed it up. This amp will be his flagship 100-watt Marshall-style amp. I say “Marshall-style” because it has circuitry in it that will give it voicing for three different Marshal amps: Plexi 100, Plexi PA, and JCM800 – all in one amp! It’s absolutely killer, and I will be writing a review of it in the coming weeks.

After I played with the amp for quite awhile, Jeff hooked up the DRX to show that to me as well, then spent several minutes explaining its operation to me. As I listened to him, I started chomping at the bit to test it because it had everything that I had wanted in the PRX150! I also knew that based upon my experience and knowledge of other attenuators on the market, the DRX would be an ass-kicker.

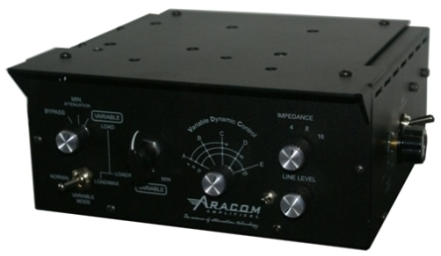
I won’t bore you with technical details, as this is an “impressions” article, so you can read about the features here. But I will highlight the three most major features that get me so excited about this attenuator:

Dual-level attenuation. For clarity, Jeff has this labeled “boost” on the attenuator. But it’s not a boost in the traditional sense in that it doesn’t add input gain to your signal, which would result in a bit more compression from the power tubes. This is actually an attenuation reducer. In that sense, it is a boost as output power increases and you get more volume. But unlike input boost, no compression takes place, thus your tone stays the same. This is an absolutely HUGE feature for me, especially when I’m playing in overdrive and need to get into a lead break. If I’m already slamming my amp with input gain and my tubes are pretty well saturated, adding more input gain to do my leads doesn’t change my volume much. But with a “boost” mode on the attenuator, I can reduce the attenuation to increase the output power at the back-end of my amp and will get the volume boost that I need. Then switching back to “normal” mode, I can easily go back to rhythm volume.

This is the very first feature I tested on the DRX, and that feature alone sold me on it, and I asked Jeff if he’d build me one. This is something that I’ve wanted on my PRX150. The secret behind this feature is the foot switch; actually foot switches available for the DRX. I won’t go into detail about them here – because I only know about what mine does – so you can read about what each different type does here. I have a “Type B” foot switch which allows me to not only switch back and forth between normal and boost modes on the attenuator, but also allows me to switch channels on my two-channel amps. I could actually use this on my DV Mark Little 40. While it’s not a two-channel amp, the foot switch provides 6dB of gain boost. So I could have the amp set up in normal mode at just the edge of breakup, then when I engage the “boost” on the attenuator, I’ll simultaneously add the 6dB boost on the amp to take it over the edge.  OMG! Looks like I’ll have to test this. 🙂

You might be thinking “so what” about the foot switches. Well these are what set the DRX apart from the competition. Actually, you could do without a foot switch and in that case you’d have to switch between normal and boost by hand; still much more than what the competition offers. But combined with one of the Aracom foot switches, it suddenly opens up a bunch of possibilities, and further distances the DRX from the pack.

Variable Dynamic Control. As if Jeff’s attenuator technology and dual-level modes weren’t enough, Jeff added another feature to the attenuator that to me, simply decimates the competition. VDC is a subtle feature (actually less subtle if you switch back and forth between extremes) that adjusts the reactance between the DRX and the speaker. The result is a smoothing out of the high-frequencies as you change the reactance. This is NOT an EQ, but it does act like a very subtle high-cut filter. For instance, when my Plexi-style amps are cranked, they produce a ton of bright tone (and no, I’m not talking about those undesirable high-end transients that some in the past have imagined hearing – I think it’s their tinnitus. 🙂 ). With the VDC, I can roll off a bit of that so my tone isn’t quite as piercing. In my test of the DRX, we had the 100-watter cranked in the Plexi channel with minimal attenuation (oh yes… it was LOUD). With Jeff moving from extreme to extreme, the sound went from piercing (no roll-off), to much smoother. The sweet spot for me was a couple of clicks down on that amp.

Why is this an important feature? One of the complaints that people had about the PRX line when it first came out was that when they cranked their amps, they’d hear these high-end transients or their sound was piercing. I don’t think they ever totally cranked their amps up before. A cranked tube amp takes a little getting used to because it transforms at higher-gain, with many amps seemingly producing more highs when cranked (or they’re just not as apparent when slightly overdriven). For some like me, I love those high-frequencies. But for others, they’re undesirable. So now, those complainers have nothing to complain about. If they don’t like all the highs their amp is producing, they now have a way to dial them down; without adjusting the EQ on their amp! How f-in’ cool is THAT?!!!

It only weighs 7 lbs!!! As much as I love my PRX, it weighs 18 lbs, and is about the height of an amp head. The DRX, on the other hand weighs less than half that, and has a lower vertical form factor than the PRX, making it much more easily transportable. For as much I gig, the less weight I have to lug, the better.

I could go on and on and on, and it looks like I’ve done a good job of that already. 🙂 But the DRX represents yet another turning point for me. I will be releasing gig reports and a studio test (with clips) in the near future. Jeff graciously lent me his first production model while my DRX is being built. Stay tuned!

For more information, check out the DRX product page!

Read Full Post »

Matches Made In Heaven

Katie May and the Aracom VRX18

Katie May and the Aracom VRX18

I was talking to Jeff Aragaki yesterday evening about his absolutely magical Aracom VRX18 Plexi clone and how Katie May sounded so perfect with that amp. I used that combination in my latest song, “The Lothario” and was completely amazed at how well they fit together.

I told Jeff that I hadn’t played the VRX18 in awhile, and hadn’t gigged with it for a long time since my DV Mark Little 40 does the job for playing out. But for studio work, the VRX18 and her more aggressive sister, the VRX22 (I had Jeff voice her a bit more aggressive), have been studio stand-bys for me for a long time. In any case, I was looking for a particular sound with that song, and thought that the VRX18, with her creamy-smooth overdrive and gorgeous sag would do the trick perfectly. I wasn’t wrong.

Katie May took to her like white on rice. Here I was thinking that Katie May was best played clean, and had shared that with Perry Riggs, Katie May’s builder. But what issued from the amp stopped me dead in my tracks. It was clear that I just hadn’t matched her up with an amp that would allow her to fully express herself. The Lollar Imperials with their lower output drive the VRX18 perfectly, producing a buttery/creamy-smooth overdrive tone. I was up till the wee hours of the morning yesterday just playing around after I had already finished mixing down the song. And come to think of it, Katie May has never disappointed me when played with my DV Mark Little 40, but she sounds absolutely incredible with a vintage Marshall-style amp.

Tonight, I was looking for a song I had recorded a couple of years ago to see if I could add an overdriven guitar to it, as a professional reviewer had given me feedback that it would be nice to make it have a bit of an edge. But in my search, I came across something I put together for practice (I’m not too good at playing without some sort of backing track to give me a reference) a few weeks ago, and immediately started tooling around with it. After about a half-hour of messing around, I decided to lay down a track to demonstrate just how good Katie May sounds with the VRX18. Give it a listen:

As you can see in the picture above, Katie May was plugged directly into the VRX18. No effects were used. In the recording though, I added some reverb and a little delay to add some ambiance to the guitar; just as with “The Lothario,” I didn’t EQ the guitar at all. Also note that I did the guitar part in a single take, and went from clean to dirty by simply turning up the volume knob on the guitar. Katie May went from this hollow body clean tone to a rock machine with a simple twist of a knob.  Of course, that’s also a testament to how responsive the VRX18 is. On the amp, I had the Master pegged, and the volume at about 2pm. That gives me plenty of overdrive with the guitar’s volume all the way up, but will also clean up real nice by turning the volume down.

I just gave the track another listen-to and thought back to when I was up on something like the 20th fret to hit that high-high note. One thing that I love about playing Katie May is that the butt of the neck doesn’t get in my way. I don’t have very long fingers, so playing way up on the fretboard has always been an issue playing other guitars. But not with Katie May. I can get to those notes now – and she has 24 frets – all playable! But note one VERY important thing: On other guitars where I’ve been able to reach the really high frets, though most have been playable, they haven’t had the sustain that Katie May has. I believe this has to do with the neck-through construction. Since there’s no break in the neck, the sound waves are allowed to reverberate continuously throughout the neck and create much more sustain than bolt-on, or even set necks. Even my Les Paul, which is a sustain machine doesn’t sustain nearly as much way up high as Katie May does.

In any case, this marriage gives me the same kind of feeling I get when I play my Les Paul R8 through my Aracoms and DV Mark Little 40. “Amber” loves to scream through those amps, though I have to admit, I love her best with the Little 40. They pair so well together that I forget about twiddling knobs to dial in the right tone. I set it my amp in the sweet spot and play. Those kinds of things are to me at least, matches made in heaven.

Read Full Post »

vrxAt my church gig yesterday, I chose a set that guaranteed that I’d get to play LOTS of guitar. Normally, I have to split my time between piano and guitar, especially when we don’t have a drummer or bass. Thus, for the past few weeks, since either our drummer or bassist has been out of town, I’ve only been bringing an acoustic guitar, and playing it for only a couple of tunes.

However, yesterday was different. Not only did we have a bassist, we had a guest drummer, which meant that I could stay on guitar most of the time since we also had another rhythm guitar.

I debated with myself on what amp/guitar combo I’d bring. Normally it would be my DV Mark Little 40 which is VERY versatile, but after looking at the set list, I figured I needed a bright, vintage Marshall sound. So I took my trusty Aracom VRX22 off the shelf, packed up my rig in my car, and set off to church.

Once I had everything set up, I strummed a power chord and was greeted with a sound that only a Les Paul Standard and a Marshall amp (or Marshall-style in my case), can make. There’s a high-Mid emphasis with a gorgeous, open overdrive. It’s a sound I’ve come to love over the years, and it immediately tells me it’s “rock and roll.”

My particular VRX22 has been modded a bit by Jeff Aragaki with a channel switch, and he also slightly upped the voltage to my vintage circa-1959 6V6’s, plus adjusted the drive channel to have a bit more output. So when I crank the amp, it sounds A LOT bigger than its 22 Watts would lead to you to believe. 🙂

But thinking back on the set, no other amp would’ve done – even my DV Mark Little 40. The music demanded a Marshall-esque sound. While my DV Mark can get close, there’s a certain inexplicable quality that I was after that would be difficult to capture with another amp.

That said, when I’m doing a mixed-bag set, I go for versatility, and the DV Mark is perfectly suited for that. But for a specific sound, I’ll go to the source: Either a Fender or a Marshall. Sometimes nothing else will do…

Read Full Post »

Reintroducing Aracom VRX22

I make no secret about the fact that I play Aracom Amps. I’ve played TONS of different amps, and though many tickle my fancy, I’d consider buying a very select few; actually there are only two other amps that I want besides another Aracom, and that is an original Fender ProSonic and a DV Mark Little 40.

At this point in time, I have three Aracom amps: The PLX18-BB w/Trem, VRX18, and the VRX22. The PLX18 is Jeff Aragaki’s rendition of the venerable 18 Watt Marshall Plexi “Blues Breaker.” The VRX18 is a souped up version of the PLX18, with more modern circuitry, and it sports an extra gain stage so that its second channel is more aggressive. The VRX22 is the 6V6 version of the VRX18, though its second channel is even more aggressive than the VRX18. I use all three amps in both studio and stage, and I love ’em all. Each has a different character. But my VRX22 is hands-down my rock machine.

A couple of months ago, I tripped over a guitar cable that I had plugged into the VRX22, broke the darn tip off in the jack! Yikes! I tried taking it out myself, but Jeff used a fully-enclosed jack, and I didn’t have the right tools to dig it out, so I knew that I had to take it to Jeff. Turns out that he had to replace the entire jack altogether. Oh well, clumsy me…

While he had the amp, I asked him if he could adjust the second channel a bit. The last time I had him work on it, I asked to get a bit more gain out of the drive channel. Plus at the time, I had gotten a pair of nice 1959 RCA 6V6’s and had Jeff install them and he biased them a bit hot. The problem with my requests was that the distortion of the second channel was a little harsh, plus with that extra gain, I couldn’t get a clean tone out of the channel unless I turned the volume way down. So this time, I asked him to take the gain down a few notches. He also lowered the bias of the power tubes.

When he was done, he called me up, and told me what he did, and in his very understated manner, told me that the amp was sounding pretty good. When Jeff says something like that, I know he’s worked some magic on my equipment. This time was no exception.

I got the amp back this past Saturday, and finally got to play it for the first time in a couple of months last night. I was in the process of re-recording guitar parts on a song I wrote a few years ago, and was actually using the VRX18. But I wasn’t getting a tone that I wanted, as I needed more “oomph.” The VRX18 is pretty bright, and it has some great distortion, but I needed a “bigger” sound.

So I plugged in the VRX22, and was absolutely shocked at how it sounded. The aggressiveness was still there in the second channel, but it was much more tame and smooth. But overall, the tone was incredibly FAT! OMG!!! Jeff did something that completely transformed the amp, and I practically had a religious experience. It sounded so much bigger than it had previously; almost scooped, but not in a high-gain metal way. Could it be that the power tubes were working optimally? Who knows? All I do know is that the VRX22 was totally inspiring me!

I kind of got lost just noodling around, but I finally got down to the business of re-recording the guitar parts. At first, I was using my Les Paul ’58 Reissue, but that was just too fat. So I went with my Strat. After evaluating my takes, while I dug the Strat rhythm part, I wasn’t fully buying into the lead tone. So I went back to my R8. Then I realized that I had originally recorded the R8 on a predefined Logic track that had a lot of compression and rolled off the high EQ. So I created a raw track with no compression and EQ (though I did add a bit of compression – like 2.7 to 1 during mixdown). That made all the difference in the world as the those high-freq artifacts that I love were back. I still had to record the R8 doing rhythm part using the bridge pickup, but it definitely had the “oomph” for which I was looking.

So, here’s the song:

I replaced the right channel rhythm and the lead part with the R8. The left rhythm part is my Strat in the neck pickup plugged straight into the VRX22. Note that I didn’t use any effects save a touch of compression and some reverb in the channel strip. So the guitar sounds you hear are just the guitar plugged into the amp; no EQ. The natural fatness is amazing! 🙂 Also, the amp was plugged into my Aracom PRX150-Pro attenuator, and recorded at loud conversation levels, so there’s no speaker breakup adding to the tone. It’s all the amp.

While Jeff Aragaki and Aracom are best known for the PRX150 attenuator line, more people are discovering just how gifted Jeff is with amps. The man’s a genius, and yet so very humble. I really am very lucky to have Jeff as a friend.

For more information on Aracom Amps, drop by Jeff’s web site.

Read Full Post »

Aracom Amps VRX18 Tweed ComboSummary: No… Surprisingly enough, I didn’t buy this one, as I already have the VRX18 head. But my good friend and bandmate just bought this, and I tested it out for him so he could listen while he was making his decision. Anyway, this is classic Marshall 18 Watt Plexi tone, but with Jeff Aragaki’s tweaks and modifications. It’s such a sweet-sounding amp, clean or dirty.

Pros: Handmade, and hand-wired on turret board. The VRX18 brings out the best of what I love about EL84-powered amps, and combined with the custom Weber speaker that’s in the cabinet to balance out the natural highs of the amp, this amp is capable of producing some of the most gorgeous clean tones I’ve heard, plus some incredible vintage overdrive.

Cons: None.

Features

– Channel 1: Volume and Tone Controls
– Channel 2: Volume and Tone Controls
– Master Volume Control (PPIMV)
– On/Off Switch
– Indicator Lamp
– (2) EL84 Power Tubes
– (2) 12AX7 & (1) 12AT7 Preamp Tubes
– Cathode Biased Power Tubes
– S.S. Rectifier with “sag” circuit
– Custom Heavy Duty Aluminum Chassis
– ARACOM Power Transformer: hand-wound and interleaved
– ARACOM Output Transformer: hand-wound, interleaved on a paper bobbin
– 4, 8, 16 ohm Speaker Jacks
– Detachable Power Cord (IEC320-C13 Socket)
– External Fuse Holder
– Custom Turret Board (G-10/FR4 Flame Resistant)
– Handwired and Handcrafted in the USA.

Price: $1095 for Combo (see Pricing Schedule for complete options)

Tone Bone Score: 5.0 ~ Yeah, I’m biased towards Aracom Amps as I am a faithful customer, but this amp is yet another example and an affirmation of why I love Aracom amps so much!

As most know who read this blog with any regularity, I’m a faithful Aracom Amps customer. I play three of them: VRX22 (6V6), VRX18 (EL84), and the PLX18 (EL84); plus I have the venerable PRX150-Pro Attenuator. Can’t believe I’ve been playing Aracom equipment for almost four years now, but I can’t think of any other amp to play, except for, perhaps, the DV Mark Little 40, which I still intend to get eventually.

In any case, my bandmates have known my passion for Aracom equipment, but have purchased other amps in lieu of the fact that I’ve been raving about Aracom for years, and in lieu of them commenting on how great the Aracom tone is. It always puzzled me, but hey! To each, their own.

A few of weeks ago, my right-hand and cohort in the band Dave started looking into getting a new amp, and to my pleasant surprise started taking a look at the Aracom site and listening to the clips. He was actually considering buying a Carr Viceroy, but held back until he took some time to evaluate amps. Now he’s glad he did.

In any case, he contacted Jeff and set up a meeting to go out to Jeff’s shop, and asked if I wanted to tag along. Never one to turn down an invitation to hang out with Jeff if I can help it, I accepted and a couple of days later, we made the short trek out to Jeff’s shop.

The wonderful thing about working with a builder like Jeff is that because he’s a small operation, he can be fairly agile in the combinations of equipment that he offers. So on that day, we took a couple of hours to play through different cabinet/speaker combinations to find a combo that “fit.” After playing through the tweed cabinet with a custom Weber 1 X 12, it was clear that that combination was the best for the style that Dave plays, which is mostly clean.

Jeff told Dave that he should take the amp with him and play around with it before he made the decision, so we loaded the amp in Dave’s car. On the way home, I mentioned to Dave that he will probably not want to return the amp and left it that while we talked about other stuff.

A few hours after I had returned home, Dave called me. He wasn’t returning the amp. 🙂 I knew that would happen. That amp was magical. Earlier, I shared with Dave on the way home that he’d know if he found the right amp if he lost track of time. He did. Now he is the proud owner of the best amp he’s ever played.

Fit and Finish

I love the classic tweed finish of this amp. Jeff personally built the enclosure and covered it with tweed. It’s really beautiful to look at. He also used 1/2-inch ply to construct the cabinet, which is something I look for in cabinets. With 1/2-inch ply, I believe the wood provides a lot more resonance as opposed to cabs built with thicker boards. Compared side-by-side with my Avatar 1 X 12, which uses thicker wood, the Aracom cab sounds so much more deep and lush (I’m not knocking my Avatar – that cab is perfect for more aggressive tones).

How It Sounds

Unfortunately, I don’t have any clips to demonstrate, but Dave’s VRX18 sounds absolutely KILLER! I’ve played three of Dave’s guitars through the amp, which include a custom Carvin acoustic/electric, a custom Rick Turner Renaissance, and a Gibson ES-335. All three guitars sound absolutely gorgeous through the amp which, with the custom Weber and dynamite cabinet produce a very lush and deep clean tone, while retaining great note separation and definition. Note separation and definition are especially important with an amp that produces such deep cleans because it could become extremely muddy. Not so with the Aracom VRX18 combo.

It’s important to note also that in addition to such great cleans, the amp really projects the sound well, with a very three-dimensional quality about it that makes it sound as if it has a reverb tank. Jeff attributes a lot of this quality to the sag simulation circuit that he built into the amp. It provides just a touch of sustain to add depth to the sound.

Playing right next to Dave is another guitarist (another Dave) who has a Carr Mercury. Maybe the “higher end” Carr models sound better, but the Mercury’s tone pales in comparison to the VRX18. Where the VRX18 sounds three-dimensional, the Carr sounds brittle and hollow. I don’t like the tone of that amp at all, and constantly have to help the other Dave dial in his EQ to make it sound even halfway decent. Also, the reverb on that amp is horrible, and I always have him turning it WAY down. Amazing that that amp costs more than twice as much as the VRX18. Anyway, I don’t want to make this a Carr amp smack-down. Suffice it to say that the Aracom VRX18 simply outperforms the Carr hands-down.

Overall Impression

Jeff Aragaki makes killer amps. He’s not building near the amount of amps at this point in time as he has in the past because his attenuator business is so good. But when he does get amp orders, he takes extra-special care that it’s right; and that’s exactly what he did with this particular amp. In fact, this particular model of the VRX18 is much more simple than his other models in that it doesn’t have the 1/2 power switch, nor does it have a tube rectifier. But it sounds incredible as it is. And as I mentioned above, this amp is yet another example of why I will remain a faithful Aracom customer!

For more information, go to the Aracom Amps web site!

Read Full Post »

Older Posts »