Last night I was fiddling about with the different IRs I purchased from OwnHammer yesterday running different amp models in GarageBand through various IRs. What I came to realize is that while the amp models are okay and actually very nice for clean tones, their overdrive tones actually suck pretty bad with the IRs, and I wanted to do some recording this evening.
So this morning, I got a wild hair and hooked up one of my amps – an Aracom VRX18 which is based on the classic Plexi 18 circuit – and ran it through my Aracom DRX attenuator which can act as a load box, then ran a line out into my audio interface.
Then I opened up GarageBand, added a generic audio track, chose an IR and even though there was a lot of line noise (I was able to filter out a lot of it eventually), what I heard in my headphones was my amp – the way it should sound!
So like I said in the title, IRs are game changers for recording! Check out a comparison:
The first track uses a GarageBand British amp model going into a GarageBand British 1 X 12. The clean tone really isn’t all that bad if a little bright (which could be EQ’d), but I wanted to capture the raw, dry tone. The second track is my Aracom VRX18 amp into an OwnHammer IR. Damn! The difference is literally night and day; especially with the overdrive tones!
That’s it! I’m going to be using this technique for recording from now on!
PSA ~ If you’re on a Mac and have upgraded to OSX Catalina, the Lernvall Audio Convolver discussed here will not work! With Catalina, Apple decided to stop supporting 32-bit software. Some things will still work, but many plug-ins like LA Convolver will no longer work. I found this out the hard way…
But luckily, there is a solution called Pulse from Lancaster Audio. And guess what? It’s also FREE!!! Check it out here.
If you’re doing home recording, like me, you don’t have a lot of money to spend on expensive recording equipment or even just gear like amps and cabinets and especially, microphones. You need to find economical ways to lay down your sound. Well, I recently discovered Impulse Responses, which are digital profiles of real cabinets that you can use with GarageBand, either using the amp models or, using your own amp running into a load box (if it’s a tube amp) and using the IR as your virtual cabinet.
But to use them in GarageBand, I had to do a little digging. There were tutorials out there, but some skipped over some important information or the posts were so old that they were literally missing content. So I had to figure out a lot of stuff on my own, and once I did, I decided to do a tutorial myself.
First, you need a convolver plugin
Update: While the discussion below revolves around the LA Convolver, the same procedures apply if you’re going to be using the Lancaster Audio plugin.
A convolver is software that convolves an audio stream with an impulse response. To put it simply, this plugin allows you to load IRs for use in GarageBand. There’s no real magic here other than the great sound that the IRs provide. IRs are WAV files; though they’re actually special WAV files. If you tried to listen to them, they sound like clicks. The convolver plugin takes that WAV file and makes it usable in GarageBand as a speaker cabinet.
The one that I use – and seems to be the one that is most recommended (probably because it’s free) – is called LA Convolver by Lernvall Audio. You can download it here. It’s a ZIP file, so you’ll have to decompress it. Once you’ve done that, then you need to follow some discrete steps:
Copy or Move the LAConvolver.component file to the [Macintosh HD]/Library/Audio/Plug-Ins/Components folder.
Other tutorials said to open up GarageBand and you’ll see LAConvolver as an Audio Units plug-in. But that didn’t work for me until I restarted my Macbook. So I recommend that you restart or shut down and restart before you open up GarageBand.
If, after restarting, you still don’t see your plugins in GarageBand, then one of two things can be going on:
The restart didn’t refresh your audio unit plugins cache
Though not throwing an error, the plugin isn’t compatible with your system for some reason.
But more likely than not, it’s item 1 that’s the culprit. In that case, do the following:
Navigate to [Macintosh HD]/Library/Caches in Finder (or use Go menu).
Once there, find the following and throw into the trash:
com.apple.audiounits.cache file
[Macintosh HD]/Library/Caches/AudioUnitCache
Empty the trash
To be safe repeat this procedure in [Macintosh HD]/Users/<yourusername>/Library/Caches as well. For myself, I tend to do this when cleaning up crap on my Mac because I always forget if I installed something specifically for my username or making it available system-wide.
Once you’ve got everything cleaned up, reboot then restart GarageBand. That will trigger MacOS to rescan your Audio Unit plugins.
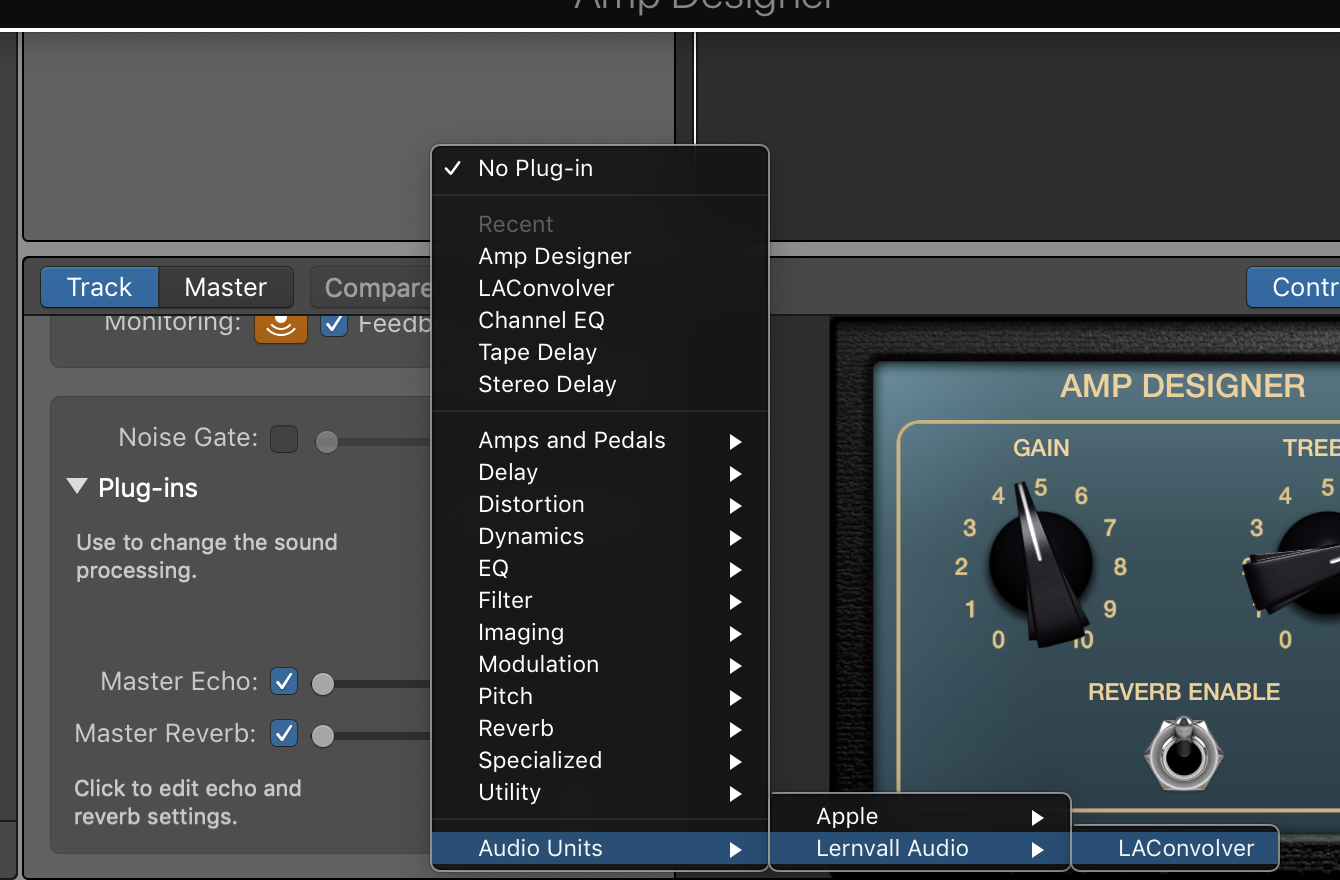
Once you open GarageBand, your convolver will be available as an Audio Units plug-in under Lernvall Audio (or Lancaster Audio if you’ve gone 64-bit) as shown below:
If you still don’t see it, then it’s possible that GarageBand was set up under your user profile on your Mac. For that, you’ll need to place the LAConvolver.component file into [Macintosh HD]/Users/<your user name>/Library/Audio/Plug-Ins/Components. This is what I had to do.
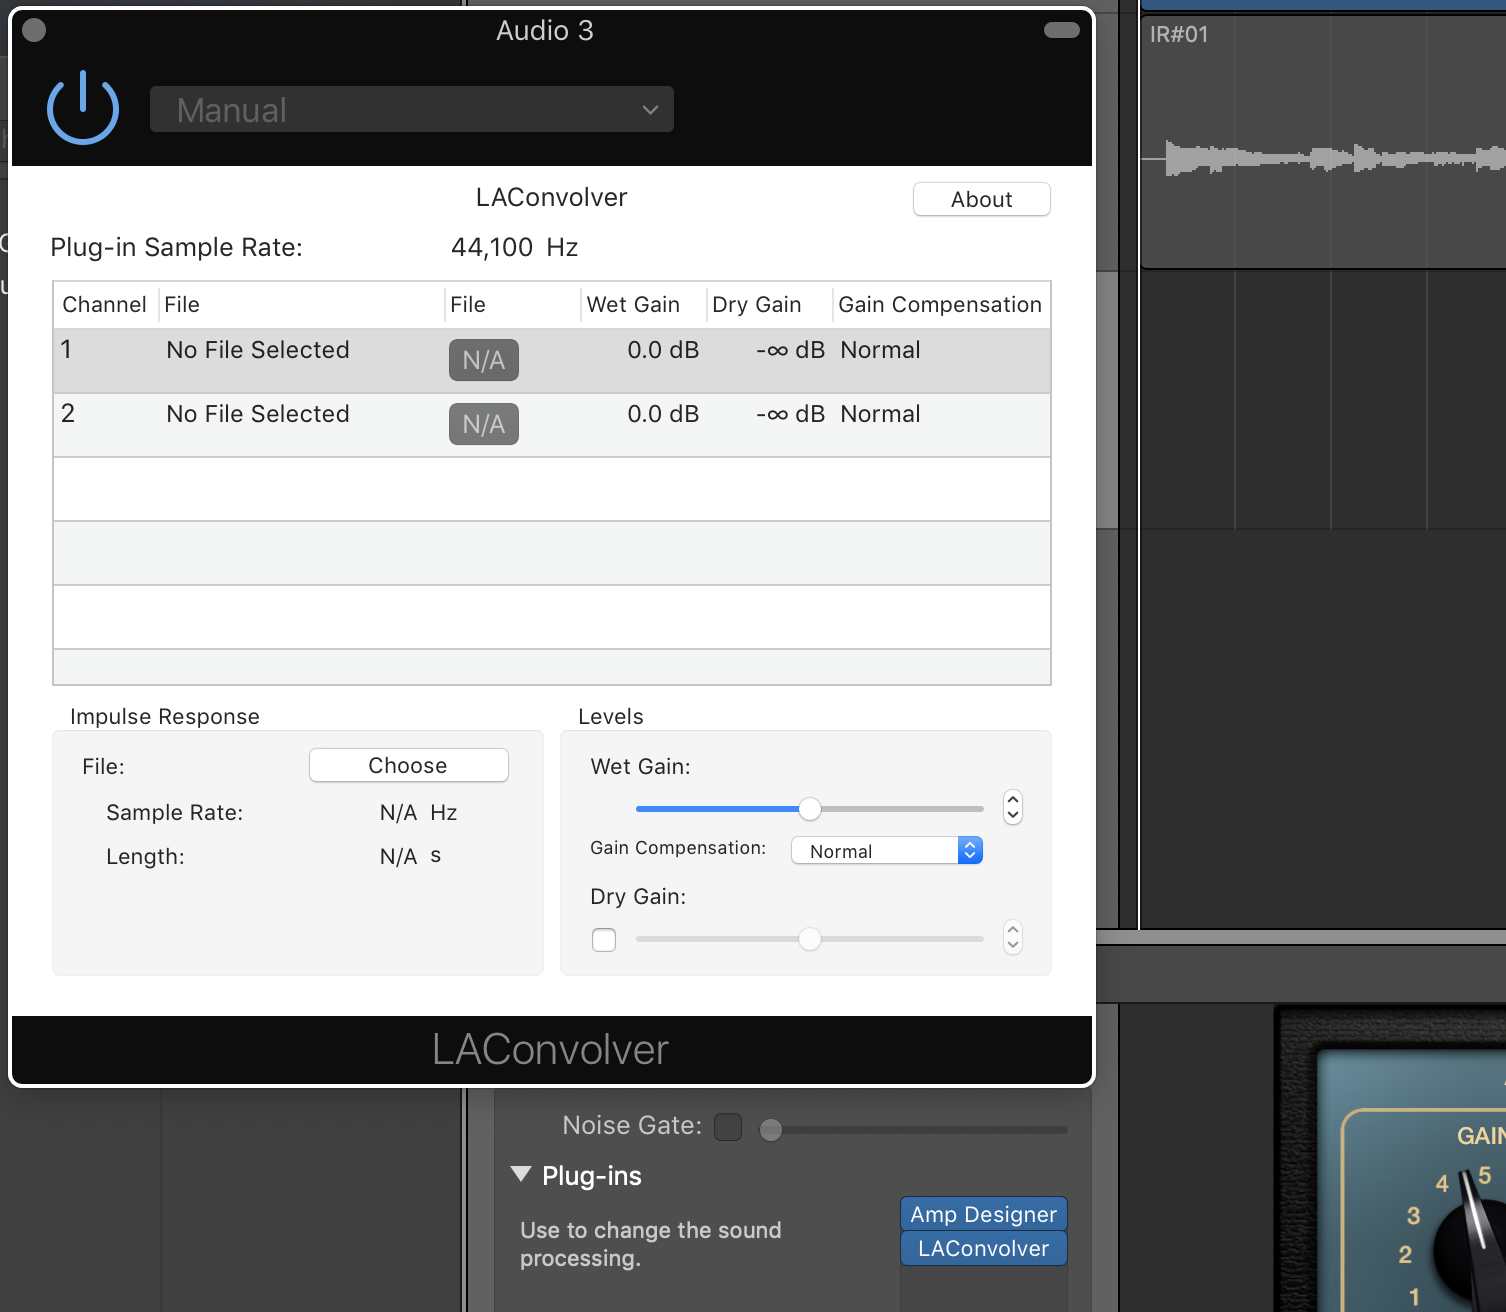
If LAConvolver was successfully added, then when you select the LA Convolver menu item, you should see the following plug-in dialog box:
We’ll get into loading IRs a little later. But first…
Next, you need to get some IRs
I’m a big fan of Pete Thorn, and he recommends using OwnHammer IRs. They have a free set that you can experiment with, but I just pulled the trigger on the Core Tone Bundle that consists of IR models of Fender, Vox, Marshall and Mesa cabinets.
Once you download your IRs (they come as Zip files from OwnHammer – not sure of other producers), I recommend that you move the Zip files to a convenient place. I put mine under a folder I created under the Music folder on my computer: [Macintosh HD]/Music/IRs:
Once you get the Zip files to a convenient location, you need to unzip them. With OwnHammer zips, they decompress to an OwnHammer folder. As you can see in the image above, I renamed the uncompressed folders to the cabinets so when I decompress another Zip file, it won’t overwrite my other IRs.
Understanding the IR Files
At least with the OwnHammer IR files, you might get confused by the sheer number of them as shown below for the Fender Deluxe Reverb (click on the image for a larger view):
The reason why there are so many is that the IR’s come in different flavors. For the files numbered 0 to 10, these represent mic placement on the cone; 0 being dead-center to 10 being at the edge. These are the predominant file types. There are also a couple of others such as “FRED” that set the mic on the edge and angle it 45-degrees, and ROOM, where the mic is set at a distance and you get some room reflection (I love this, by the way). In the image above, I’m showing the “Mics” folder which includes IR files for individual microphones, while the “Mixes” folder includes a combination of a couple of mics.
According to OwnHammer, the numbers don’t represent a specific distance from the center as the numbers increase. They’re rough positions, so if you chose “OH 112 DVRB FN-AXA 57-05.wav,” you’d choose an SM57 positioned roughly between the center cone and the edge. The graphic below illustrates this:
As you’d expect, the further away from the center a microphone is positioned, the warmer the sound gets; in other words, you lose highs.
Now it’s time to choose an IR to use in GarageBand
There are a couple of ways to set up your guitar sound. The first is to input your amp directly, using a load box whose line out runs into your audio interface. Then you can just add the LAConvolver plug-in to your track, choose the IR you want to use, and you can start recording away! (More on this below)
But if you’re like me and are often pressed for time and just want to lay something down, using the Amp Designer plug-in in combination with LAConvolver is very easy. This will give you a complete software-based signal chain. Of course, the weakness here is that you can’t use pedals, but if you just need basic sounds, this will work nicely. So here goes:
First, create a new, blank track. Select “Record using a microphone…” option. You don’t want to use the canned guitar/bass option because once you disable the cab and use the IR, I found that it messes up the signal and your track volume goes WAY down. Once you set up the amp and IR though, feel free to add other plug-ins.
Next, add the Amp Designer plug-in to the track. Choose the amp model you want to use.
Set the cabinet choice to “Direct.” This is extremely important because you want to bypass the cabinet completely and use the IR as your cabinet.
Now, add the LAConvolver plug-in by going to the Audio Units menu and selecting “LA Convolver.” Once you do this, you’ll get the LAConvolver plug-in dialog:
Next, choose your IR. Click on one of the channel rows, then click on the “Choose” button. You’ll then get a File Chooser dialog. Navigate to where you stored the uncompressed IRs and select an IR. For me, I chose the following:
You’ll see that there are IRs for Atomic, Fractal, Kemper and Line 6, plus generic Wav-200ms and Wav-500ms. Not sure what the difference is as of yet, but I just chose the Wav-200ms at 44.1 kHz, 112 DVRB, FN-AXA, Mixes, and the OH 112 DVRB FN-AXA 57-05 IR file, which uses two mics position between the center cone and edge.
Note that each IR has two channels in LA Convolver. This is actually pretty cool because you can choose an IR for one channel, and another for the other channel. But for my setup, I used the same file on each channel.
NOTE: Some people have reported that they only see one channel. I’m not sure why this is other than it might have to do with your interface. I have a 2-input interface so it’s possible that LA Convolver sees this as a stereo input and adds another channel.
In any case, once you’ve chosen your IR files, the dialog should be filled in like so:
I haven’t played much with the Wet Gain other than just testing out the output volume which could be useful if the gain is too high and starts clipping the track.
So that’s it! Record your tracks! Granted, you’ll have to do quite a bit of testing to find just the right IR. I spent about an hour trying out different ones until I found something I liked. But that’s kind of the fun of it!
If there’s anything I’ve missed, please let me know and I’ll add it!
Recording Your Tube Amp
The obvious advantage that IRs bring to the table is that you can use your tube amp and crank it to its sweet spot – and do it silently. I can’t tell you how awesome this has been for me. Absolutely awesome. It enables me to – however virtually – pair my amps with speakers/cabinets that I don’t have.
The reason I added this section below is that recording your tube amp isn’t necessarily as straight-forward as you might think. I had to do quite a bit of playing around with the equipment I have to get it right.
First of all, you need to make sure you have a load box, and preferably one that has a reactive load as opposed to just a purely resistive/dummy load. Without going into technical detail, reactive load boxes are generally accepted as the better option as they more closely mimic the impedance curve of a speaker and thus sound better than their resistive counterparts. For a deeper dive, here’s a great article on the subject.
But even then, not all reactive load boxes are the same. For instance, the video below demonstrates the tonal difference between the Two Notes Torpedo Captor versus the Julius Music Box:
The Julius Music Box tone, while not that bad, definitely has sonic content missing. It’s quite noticeable. But it’s also half the price of the Captor and three and half times cheaper than the new Torpedo Captor X.
Now most higher-end attenuators use a reactive load and many have a Line Out that converts the speaker out signal to line level. My Aracom DRX150 has this and that’s what I use. Unfortunately for me, using the Line Out straight into my audio interface creates a ton of noise, so I have to run it into a DI first, then use an XLR cable into my interface.
There are other load boxes on the market such as the Suhr Reactive Load and Suhr Reactive Load IR that has built-in IRs. These are a step up on the basic reactive load boxes.
But be forewarned. Load boxes like the ones from Two Notes and Suhr are NOT cheap, costing about $250 at a minimum.
Load box configuration
“Hybrid” Attenuator-Load Box Solutions
The load boxes I mentioned above are dedicated boxes, but there are a few VERY nice boxes out there that not only provide reactive loads, but add a power amp and other features for even more versatility.
BOSS Waza Tube Amp Expander
To me, this is the ultimate. It provides a load, but has a power stage. You can actually load IRs into the unit itself (it already has IRs, but you can use your own) as it includes cabinet emulation. It even has built-in BOSS effects! It’s not cheap at $1299, but it brings a lot to the table.
Universal Audio Ox Amp Top Box
Close on the heels of the TAE is the Ox. It basically has the same features as the TAE but doesn’t include an effects loop and, of course, doesn’t have built-in BOSS effects. It’s also $1299, so it’s a bit pricey as well. But lots of people swear by this unit.
Fryette Power Station (PS-2 and PS-100)
At $699 for the PS-2 and $899 for the PS-100, what these units bring to the table make them definitely worth consideration. But of course, features are what’s important here and if all the Power Station brought was a reactive load, then $699 (or $899) would be too high a price to pay. But both of these units not only provide a variable reactive load (it’s a full sweep, not notched like others), both have a power amp and an effects loop, plus filters and presence to dial in the natural sound of your amp. The fundamental different between the PS-2 and PS-100 is that the PS-100 is a dual-mode unit that lets you have two different attenuation settings.
Whichever load box you choose, note that these aren’t just for studio use. I often use my attenuator in my live rig when I play smaller venues or at church. It allows me to get crunchy tones at a low volume. So there’s a lot of usefulness beyond the studio!
Computer Performance
Though I spent all that time above talking about using IRs in GarageBand, you have to bear in mind that IRs are files that need to be processed; that is, they use computing power. And if you have lots of tracks and/or use lots of filters, there’s going to be latency as your computer has to work harder.
And from that perspective, I’m actually considering using IRs in an external device like a Mooer Radar. By using a dedicated device like this, I won’t tax my Macbook Pro’s CPU. And from what I understand, there’s less than 2 milliseconds of latency with the Mooer. That’s VERY good performance.
The other reason I”m considering using an external device is purely for usability purposes. It’s great to use a plugin in GarageBand, but switching files takes a lot of time. With an external device, switching IRs happens with the turn of a knob or press of a button. It makes auditioning IRs A LOT easier.
Hopefully I’ve covered enough to get you started! The one thing I can tell you about using IRs is that they’re definitely game changers!
I’m at my happiest when I’m making music; either gigging or writing and recording songs. And for recording music, I’ve been using some pretty antiquated software and hardware that has served me well these past 10 years. But I knew these past few months that I would have to eventually upgrade as the Macbook that I was using was dying a slow death and rather than get it repaired, which would cost more than what the machine is now worth, I decided to move over to my newer Macbook that I keep up to date with the latest stuff. But moving also meant that I could no longer use my trusty MBox 2 which was made for a much older version of OSX was going to be unusable.
As fate would have it, my old Macbook finally died, and to make matters worse, I had come up with a new song for which I wanted to lay down tracks so I wouldn’t forget it.
I sort of solved the problem, at least musically, by recording my guitars into GarageBand on my new Macbook using an IK Multimedia StealthPlug. And though I knew my sound quality would suffer, I knew it would have to serve while I searched out different audio interface solutions.
After spending the next few days reading reviews and coming to terms with my allowable budget for a new unit, I narrowed it down to three units: Native Instruments Komplete Audio 6, Focusrite Scarlett 6i6 (2nd Gen), and the M-Audio M-Track 2X2M. I REALLY liked the Focusrite, but it was just at the very edge of my comfort zone with respect to price and I have learned to be disciplined in that department after having wasted thousands on gear in the past. I then set my sights on the Komplete Audio 6, and that was a very cool machine. It was close to the price of the Focusrite – about 30 bucks less expensive – but far enough below my threshold that I was okay with the price, and I was all set to get it. Then I saw a video review on the M-Track 2X2M and was very impressed with its features and its price of only $149.
My needs for recording are actually pretty simple: I’m not in the business of creating production-quality recordings; I just want good enough quality to achieve reasonably-sounding demos. I need two inputs so I can record acoustic and vocal simultaneously if I want, but I also need MIDI. As long as a unit had those things, and had reasonable sound quality, I’d be fine. And after seeing that review, going for the M-Track was a pretty easy decision. It had everything that I needed plus I’ve got some M-Audio gear, and have always been satisfied with their quality. On top of that, M-Audio gear is notoriously compatible with Macs; you never need a special driver. I didn’t know if the other units required a special driver, but I knew that the M-Track would work with my Mac right out of the box. So I got the unit.
Once I hooked it up, which involved nothing more than connecting the included USB cable, I was up and running. When I opened up GarageBand, it automatically detected that I had hooked up a new audio interface and asked me if I wanted to use it. Simple as that!
As far as the unit itself, I DIG IT! It is a lesson in simplicity. There are gain control knobs for the inputs, a USB/Direct mix level knob to adjust how much you hear from your DAW and how much from your instrument and finally, a headphones volume. The big knob in the center is to control your monitor output. I record with headphones when I’m in the house, so I haven’t used that feature yet. But I will when I record amps in my home studio.
As far as sound quality is concerned. I don’t think I have sensitive enough ears to be able to tell the difference between this and a more expensive unit, but I can say that the sound quality of this unit versus my old MBox2 is drastically better. With my MBox 2, I had to do a lot of tweaking in my DAW to get decent sounds, and I always felt my raw recordings of instruments were a little dry. But the M-Track’s clarity is lightyears beyond the MBox 2. Though I couldn’t do a side-by-side comparison, after years of having to deal with the MBox 2 sound quality, just being able to get great recordings and not have to tweak them except for adding effects and adding “normal” dynamics like compression was simply a godsend!
Finally, I couldn’t detect ANY latency with this unit whatsoever. That’s always a concern with audio interfaces. But I have a late-model MacBook so it’s fast all-around. It also helps that I was using a decent DAW. What, you don’t think GarageBand is up to snuff because it comes free with OSX? If it was an older version, I’d tend to agree with you on that. But GarageBand’s audio engine is built from the same core as Logic, so it’s essentially a dummy’s version of Logic. The sound quality from that is pretty good. Here’s the new song I recorded last night that proves it.
Is it production-quality? Probably not because Logic is infinitely more tweakable than GarageBand. But for my purposes, it creates stupendous sound!
A Quick Word on GarageBand
This program has come so far since I began using it, especially in the drum loops department. For years, I pieced together drum loops to create my drum tracks. It was so obvious that I was using loops because there are only so many fills and tweaks you could make on an audio loop, thus it was very limiting. But at least with this version of GarageBand, there’s Smart Drums, and I have to say that I’m completely blown away by this. On the surface, it’s just like dropping in a regular audio loop. But what you can do with that loop is incredible! Smart Drums allows you change the complexity and attack, change the toms and cymbals, and add some background percussion as well. Then on top of that, by twiddling a virtual knob, you can adjust the loop to have fills in the loop itself!
To be honest, I discovered this feature a bit accidentally. But after I started playing with it, I was hooked! I finally could get decent drum tracks and not have to pore over an endless succession of loops to get the right mix. It made the work of getting a decent-sounding drum track incredibly fast. For instance, for “Loved” above, once I finally worked on the drum track, which I always do last because it has been such a pain in the ass, I couldn’t believe that I finished in about 15 minutes! It normally would take me an hour or more.
As far as other stuff is concerned, the one thing GarageBand has for it is incredible simplicity. But all that is relative. Coming from the Logic world, even though Logic is much more complex, GarageBand follows the same UI paradigm, so where I’d expect things to be in Logic are in similar places in GarageBand. If I start using the included Cubase LE that came with the M-Track, it will be a different story.
This actually isn’t an article on Steve Jobs specifically. But after reading a Time Magazine article on Steve this morning, it struck me just how important Apple and especially the Mac have been at least to this author.
For years, I had been doing home recording with a variety of systems; starting with dedicated recording systems such as my hand-me-down Roland 880EX. Frustrated by the unintuitiveness of that and similar units, I turned to the PC since it was a device of which I knew intimately. So I assembled my own PC with the latest hardware, super-fast graphics processor, Dolby 7.1 surround system (I was also into gaming), and got a DigiDesign MBox2 that came with ProTools. That system was incredible! Unlike other Windows-based machines I’d had in the past, this monster booted up in less then 30 seconds; graphics displayed in dizzying high-resolution with – at least to me – 30+ frames per second consistently; sound quality was mesmerizing with my surround-sound system; and even doing complex programming operations were blindingly fast. It was became practically useless to me as a recording system.
The reason for my frustration with the machine as a recording system wasn’t because of the machine itself. It was ProTools. ProTools these days seems to be the standard in professional recording. Even the base configuration with the default plug-ins provides you with a plethora of tools and recording capability. But that’s the problem. I got into PC-based recording because I was tired of sifting through the confusion of menus of a 3 X 2 LCD screen. With ProTools, I now had confusion once again – but on a larger visual scale.
Mind you, this isn’t a knock on ProTools. Almost all recording studios use it, and for good reason: It is amazingly powerful. But you really need to be a sound engineer to take advantage of all the features it has to offer. My frustration lay in that the fact that I was spending more time learning how to properly operate ProTools than doing what I needed to do most: Get my song ideas down. So I gave up home recording for awhile, and went back to writing up lyrics and chord charts and banking on my memory to regurgitate the melodies – fat chance. I knew how to use ProTools at a rudimentary level, but I was so disenchanted with the whole process that I just said, “Screw it.”
Then in 2007, I got an iMac and a Macbook Pro for work and discovered GarageBand. When I first opened it up, I thought GarageBand was just a little toy after my ordeal with ProTools. But I hooked up my MBox 2 and my Mac luckily recognized it, then started playing around. After a couple of hours, I had recorded an entire song, with all the instrumentation I wanted. Granted, the sound quality wasn’t nearly as good as what I could achieve out of ProTools. But I knew then and there that GarageBand would change my life forever!
It wasn’t supposed to be this easy. But it was. I had to practically pinch myself to prove that taking the musical ideas in my head were actually becoming reality. I was cranking out songs like nobody’s business! I finally had a way to not only put my songs down, I could create demos for my church band so they could understand my vision behind how a particular song should be performed. It also helped with this blog that I started about the same time I got my Macbook Pro. I could provide demos of the stuff I was testing.
Circling back to the crux of this entry, that kind of usability is Steve Jobs’ legacy. Call him what you will, but his keen sense of how things should work are undeniable and reflected in the products that Apple has produced during his reign. He wasn’t an inventor. He was a super-innovator. And if you look at Apple products – both hardware and software – there seems to always be this recurring theme: “We need to make people continually exclaim, ‘It’s not supposed to be this easy!'”
I’ve been an avid GarageBand user for quite some time, having shied away from moving to a more sophisticated recording solution because of how easy GarageBand makes it to record the demo songs and sound clips I produce. Geez! How easy could it get? To create a sound clip, it’s as easy as opening the app, setting the song’s tempo, choosing a drum loop to play to, creating a new track to capture my guitar, and recording.
Of course, GarageBand comes with its own shortcoming, not the least of which is the ability to change tempo mid-song, editing the timing and tempo of an audio region, and doing more sophisticated fader automation. For years, these shortcomings were okay for me. I was able to produce an entire album with GarageBand – even with its shortcomings. But admittedly, a lot of my best songs didn’t make it to the album because GarageBand couldn’t do things I needed for those songs; especially varying the tempo mid-song, which I’ve written into several of my pieces for dramatic effect.
My wife has been bugging me for a long time to record some of her favorite pieces that I’ve written for church service. One in particular is based upon the second movement in Beethoven’s Moonlight Sonata. While that song is not structurally complex, it requires three different tempo changes. Moving from 52 bps for the intro (the original tempo), to 58 bps for the verses, then 62 bps for the refrain, back down to 58 bps, then back down to 52 for the outro. I tried recording the song in GarageBand several times, but just couldn’t get it down.
Enter Logic Express 9. With its tempo and wave editing features, I can now record my songs the way they were meant to be recorded. I can’t even begin to tell you how incredible that is to me! I’ve the application less than 24 hours – and only used it for a couple of hours – but I can already tell that it’s going to be a HUGE boon to my music production. I’m really excited. I’ve already played around with the tempo changing features, but there is just so much to this application that I have yet to discover; not the least of which is the mix-down capability and throwing tracks onto different busses to apply different effects.
No, it’s not a full-blown recording solution like ProTools or it’s bigger sibling Logic Pro. But for the home studio recording enthusiast like myself, it has everything I need to create great recordings. At $199, it’s a real bargain. Besides that, if I ever need to upgrade to the Pro version, it’s a $99 upgrade. Not bad. Not bad at all.
If you’re currently using GarageBand, and want to expand your recording capabilities, I highly recommend Logic Express! I will say this: it’s not a simple slam-dunk to move from GarageBand to Logic Express. Yes, there are similarities, but the mix-down and mastering stuff that GarageBand does for you by default you now have to do yourself. However, one thing I tried was creating a project in GarageBand, applying mastering, then importing the song into Logic Express. Lo and behold, the Master got imported with all the buss settings – which you then can edit. Nice.
Summary: Modeling 12 of the most famous Fender Amps, Amplitube Fender is pretty amazing. It’s scary how close to the real thing this software gets!
Pros: Super-easy to install, and super-convenient to use in your DAW software. The package comes with TONS of presets that require very little tweaking.
Cons: This is just a little nit because it sounds so good, and I don’t want to take that away from this excellent piece of software. But it doesn’t quite respond like a real amp.
Incredible tonal flexibility: mix and match amps, cabinets, mics and more
Sound-certified and approved by the tone gurus at Fender®
5 separate modules: Tuner, configurable Stomp pedal board, Amp head, Cabinet+Mic and Rack Effects
2 fully configurable rigs with up to 32 simultaneous effects
Digital Tuner
Standalone and VST/AU/RTAS plug-in
Includes SpeedTrainer™ and RiffWorks™ T4 Recording Software
Can be expanded with any “Powered by AmpliTube” models using AmpliTube X-GEAR
Can be controlled live with StompIO™, StealthPedal™, StealthPlug (included in AmpliTube Fender® Studio edition), or any traditional MIDI controller
400 presets included with more that can be downloaded online
Powered by AmpliTube® with exclusive DSM™ (Dynamic Saturation Modeling) and VRM™ (Volumetric Response Modeling)
Tone Bone Rating: 4.75 overall, but for a recording plug-in, it gets a 5.0
Being a snobbish purist about “real” gear, 🙂 I’m not easily impressed by emulation software. But when I heard clips of the Fender Edition of Amplitube, I knew I had to check this software out. A million thanks go to the folks at IK Multimedia to letting me evaluate this software because I am definitely impressed by Amplitube Fender! It’s not everyday that you have access to 12 awesome Fender amps, and to have them literally a mouse-click away is just insane! I don’t think amp software will ever replace a real amp, but this software comes so close to sounding like the real thing that especially for recording, I’d be hard-pressed to NOT use it for recording lots of guitar parts!
I used an earlier version of AmpliTube a few years ago, and was not at all impressed by how it sounded. But being in the software development world, with time, software gets better, and I have to say that this software is absolutely incredible!
Now and then, I go off for a weekend alone, and I lug a couple of guitars, a couple of mics, an amp or two, and my MacBook, along with my MBox 2 interface to just do some writing and recording. With Amplitube Fender, I don’t need to lug my amps! I can just load my laptop and MBox an a couple of cords and a mic, and I’m home free! Hey! Not having to lug any extra gear is HUGE! I’m sold on using this software! Not only do I have my four real amps, I now have 12 other amps to choose from when I record! It’s really exciting!
How It Sounds
Imagine that! No need to write a section on fit and finish! 🙂
In a word, it sounds AWESOME! Right after I installed the software, I plugged my Strat into the DI jack of my MBox 2, opened up GarageBand, started a new project, added a new track, and selected “Amplitube Fender” from a plug-in drop down. It was literally that easy! I randomly picked a ’57 Deluxe Dual Mic, then started to strum this little ditty in Am. Before I knew it, I was adding drum and bass tracks, to record the riff.
I’ve played through a ’57 Deluxe in the past, and I was amazed at how the software emulated that warm, bright and crisp sound that that amp is known for! I kept on thinking to myself, “This couldn’t be software – it sounds to friggin’ good!” After I recorded that rhythm track, I took out the Goldtop to play a lead. I ended up playing for over an hour this evening just tooling around with different amps. In the end, I wanted to get a sample out, so I chose a ’59 Bassman with a Fender Fuzz-Wah plug-in to get some fuzz, then recorded the following sound bite:
I don’t know about you, but I really can’t tell the difference between the real thing and software. Maybe because I’m starting to lose my hearing and my ability to discern audio fidelity is kind of going south. No matter, I think this software ROCKS!
Overall Impressions
Amplitube Fender does a fantastic job of amp emulation – there’s no arguing that at all. But there’s a certain “mojo” about a real amp that just can’t be captured with software, no matter how close to the real thing that software sounds. That said, however, even one as snobbish as myself, and other gear freaks I know would be hard-pressed not to seriously consider adding this to their arsenal of recording plug-ins!
There are different schools of thought around this subject, but I thought I’d throw in some of my own thoughts, since I’ve been at it awhile. Note that I won’t be talking about techniques necessarily, though I will include some tips and tricks… So without further ado…
First, let’s establish something here: You don’t need to buy super-expensive gear to sound good, and you don’t need a lot of equipment. I’ve found that in a lot of cases, while more expensive gear will afford you convenience features, and a better sound quality, for the home studio enthusiast, a lot of times this gear is overkill. I’ll go into some details below, but in my opinion, recording technique is far more important. So with that said, let’s start talking about what I think are essential pieces of equipment:
Computer Equipment/Software
You probably already have a computer, but it should be configured to handle digital recording. While drive speed is important, it isn’t necessarily critical. My MacBook Pro’s hard drive spins at 5400 rpm, and I have no problems recording stuff. But what you do need is space. I’d recommend getting two hard drives: one for programs, and the other dedicated to saving data. It’s just a cleanliness thing. Also, get as much RAM as your machine can handle. I’ve got 4GB on my machine. That’s even more important than a hard drive. You don’t need a super-poweful machine either, but dual-core machines really work well.
Okay, Mac or PC? Go with what you’re comfortable with. There are lots of programs out there; among them is a neat little program that works great on both PC and Mac called Audacity – it’s free! Todd Rundgren recorded a lot of his latest album using Audacity, so it’s definitely doable.
What about ProTools?
I’ve got it. It’s great. But the learning curve is super steep. In fact, when I first started recording, I spent more time learning how to use the damn software than getting my ideas down and that just frustrated me to no end; so much so, that I lost my taste for recording for several months – I just didn’t want to mess around with the software! I just wanted to get my freakin’ ideas down! I’m not saying it’s bad, but it’s complicated, and you’ll have to spend a lot of time learning the ins and outs of the program. With the home studio, what you’re after is getting your ideas down with reasonable quality – and fast. That, at least, is my opinion. In light of that, I use GarageBand to get all my ideas down. It has built-in rhythm loops so I don’t have to use a click track, and there are lots of add-ons, both free and affordable, that you can use in GB. The sound quality is excellent, and it even has some mastering presets that work amazingly well!
Digital Interface
There are lots out there. I happen to use the DigiDesign MBox 2, which has two analog inputs, MIDI, and a couple of others I don’t use. Very handy little box. But there are lots of solutions out there in the $300-$400 range. Most use USB, though FireWire is probably the optimum – it also costs more.
Microphones
Now this is just my opinion, but you’ll need at least two mics: One ribbon mic, and one dynamic mic. I have a Nady RSM-200 ribbon that cost me less than $200, and it works superbly! I also swear by my trusty Sennheiser 835 stage mic, which is a workhorse similar to the Shure SM-58, but I think it’s warmer and has a much flatter EQ response than the SM-58 which can get kind of boomy.
MIDI Controller
Being also a piano player – not nearly as good on this as I am on guitar – having a keyboard to trigger MIDI and add MIDI-based instruments is another essential. You can go the small route (2 octave) or go the full-size keyboard route. I use an M-Audio full-size stage keyboard myself only because it doubles as my MIDI controller as well as my gigging keyboard. It was also cheap at $300 new. Nice.
From my standpoint, this is all you need as far as essential equipment for recording. Now let’s get into some techniques and some nice-to-haves:
Always record acoustic guitar using mics – and use two of ’em. Sounds obvious, doesn’t it? I’ve tried going direct into my computer, and the sound is horrible. But using two mics works great. I usually place my ribbon mic about six inches from the sound hole, then place my dynamic mic pointed at a 45 degree angle at about the 3rd fret to capture sounds coming off the neck. Also, to take advantage of the ribbon mic’s rear pickup, I have a board, or hard, reflective surface placed about two to three feet in front of me to reflect sound back. It gives just a sligh reverb effect that really fills out the recorded tone.
If you can swing it, get a couple of low-wattage amps. In particular, I use a Fender Champ 600, which is a 5 Watt amp with an 8″ speaker. Another one I’ve used, but don’t own is the Epiphone Valve Jr.. What a nice little amp! Since you’re recording at bedroom levels, a small amp that puts out less volume works wonders. Now here’s the trick I’ve found to recording with these small amps. You can make that sucker sound HUGE by close-mic’ing the amp. I use a dynamic mic pointed at an angle along the cone of the speaker, and place it no more than 2″ away from the grille cloth. Then I use a variety of overdrive and distortion pedals to get grind or searing distortion, then in my software boost the low frequencies. The end result is that it sounds like I’ve just recorded a full-size stack! You have to play with your settings, but it’s definitely achievable. The other nice thing about using a small amp for recording is that the naturally bright voicing really works well in a digital recording environment.
For vocals, always use a pop filter. I’m an experienced singer, and even though I have great mic technique, nothing is worse on a recording than picking up those oral transients that your mouth makes when making consonant sounds. Pop filters cost less than $20 and believe me they’re a life saver.
While we’re on the subject of vocals… Avoid using a compressor on vocals as much as possible. When you’re singing a louder phrase, move away from the mic. It’s that simple. Compression is good to a point, but there’s a lot to be said about having volume dynamics in your vocals. You get a lot more emotion coming through when you have it. If volume is pretty much the same throughout a song, it’s well… boring in my opinion, no matter how good a singer you are.
Avoid EQ as much as you can. Dial in the EQ on your instruments before you record, then only do wholesale volume adjustments later to make mix corrections. What you’re trying to do is capture the natural sound the instrument makes as closely as possible. The only exception I make to this is when I’m recording a low-wattage amp and want to boost the lows. Otherwise, I just do volume adjustments for the mix.
These are just a few things I’ve learned over the last few years of doing this. I’m sure I’ve missed some stuff, so if anyone else wants to add to this, please feel free!
As some might know, I’ve spent the last year working on my first album, “You Stir My Soul,” which is a collection of contemporary religious songs I wrote for the Catholic Mass. About three weeks ago, I finished the album and submitted it to a digital distribution company to place on iTunes. They indicated that it would take about 8-10 weeks before it was available, but last night, I noticed that it had already become available!
This is a huge milestone in my life! I don’t have any illusions that it will elevate me to superstardom. But I’ve accomplished what has been a lifelong dream for me.
Admittedly, a couple of the songs really aren’t production quality, but I learned a lot about the music production process since then. The ones that have a much clearer sound to them are the songs I recorded later in the process. Oh well, first album, lesson learned.


 There are different schools of thought around this subject, but I thought I’d throw in some of my own thoughts, since I’ve been at it awhile. Note that I won’t be talking about techniques necessarily, though I will include some tips and tricks… So without further ado…