PSA ~ If you’re on a Mac and have upgraded to OSX Catalina, the Lernvall Audio Convolver discussed here will not work! With Catalina, Apple decided to stop supporting 32-bit software. Some things will still work, but many plug-ins like LA Convolver will no longer work. I found this out the hard way…
But luckily, there is a solution called Pulse from Lancaster Audio. And guess what? It’s also FREE!!! Check it out here.
If you’re doing home recording, like me, you don’t have a lot of money to spend on expensive recording equipment or even just gear like amps and cabinets and especially, microphones. You need to find economical ways to lay down your sound. Well, I recently discovered Impulse Responses, which are digital profiles of real cabinets that you can use with GarageBand, either using the amp models or, using your own amp running into a load box (if it’s a tube amp) and using the IR as your virtual cabinet.
But to use them in GarageBand, I had to do a little digging. There were tutorials out there, but some skipped over some important information or the posts were so old that they were literally missing content. So I had to figure out a lot of stuff on my own, and once I did, I decided to do a tutorial myself.
First, you need a convolver plugin
Update: While the discussion below revolves around the LA Convolver, the same procedures apply if you’re going to be using the Lancaster Audio plugin.
A convolver is software that convolves an audio stream with an impulse response. To put it simply, this plugin allows you to load IRs for use in GarageBand. There’s no real magic here other than the great sound that the IRs provide. IRs are WAV files; though they’re actually special WAV files. If you tried to listen to them, they sound like clicks. The convolver plugin takes that WAV file and makes it usable in GarageBand as a speaker cabinet.
The one that I use – and seems to be the one that is most recommended (probably because it’s free) – is called LA Convolver by Lernvall Audio. You can download it here. It’s a ZIP file, so you’ll have to decompress it. Once you’ve done that, then you need to follow some discrete steps:
Copy or Move the LAConvolver.component file to the [Macintosh HD]/Library/Audio/Plug-Ins/Components folder.

Other tutorials said to open up GarageBand and you’ll see LAConvolver as an Audio Units plug-in. But that didn’t work for me until I restarted my Macbook. So I recommend that you restart or shut down and restart before you open up GarageBand.
If, after restarting, you still don’t see your plugins in GarageBand, then one of two things can be going on:
- The restart didn’t refresh your audio unit plugins cache
- Though not throwing an error, the plugin isn’t compatible with your system for some reason.
But more likely than not, it’s item 1 that’s the culprit. In that case, do the following:
- Navigate to [Macintosh HD]/Library/Caches in Finder (or use Go menu).
- Once there, find the following and throw into the trash:
- com.apple.audiounits.cache file
- [Macintosh HD]/Library/Caches/AudioUnitCache
- Empty the trash
To be safe repeat this procedure in [Macintosh HD]/Users/<yourusername>/Library/Caches as well. For myself, I tend to do this when cleaning up crap on my Mac because I always forget if I installed something specifically for my username or making it available system-wide.
Once you’ve got everything cleaned up, reboot then restart GarageBand. That will trigger MacOS to rescan your Audio Unit plugins.
Once you open GarageBand, your convolver will be available as an Audio Units plug-in under Lernvall Audio (or Lancaster Audio if you’ve gone 64-bit) as shown below:
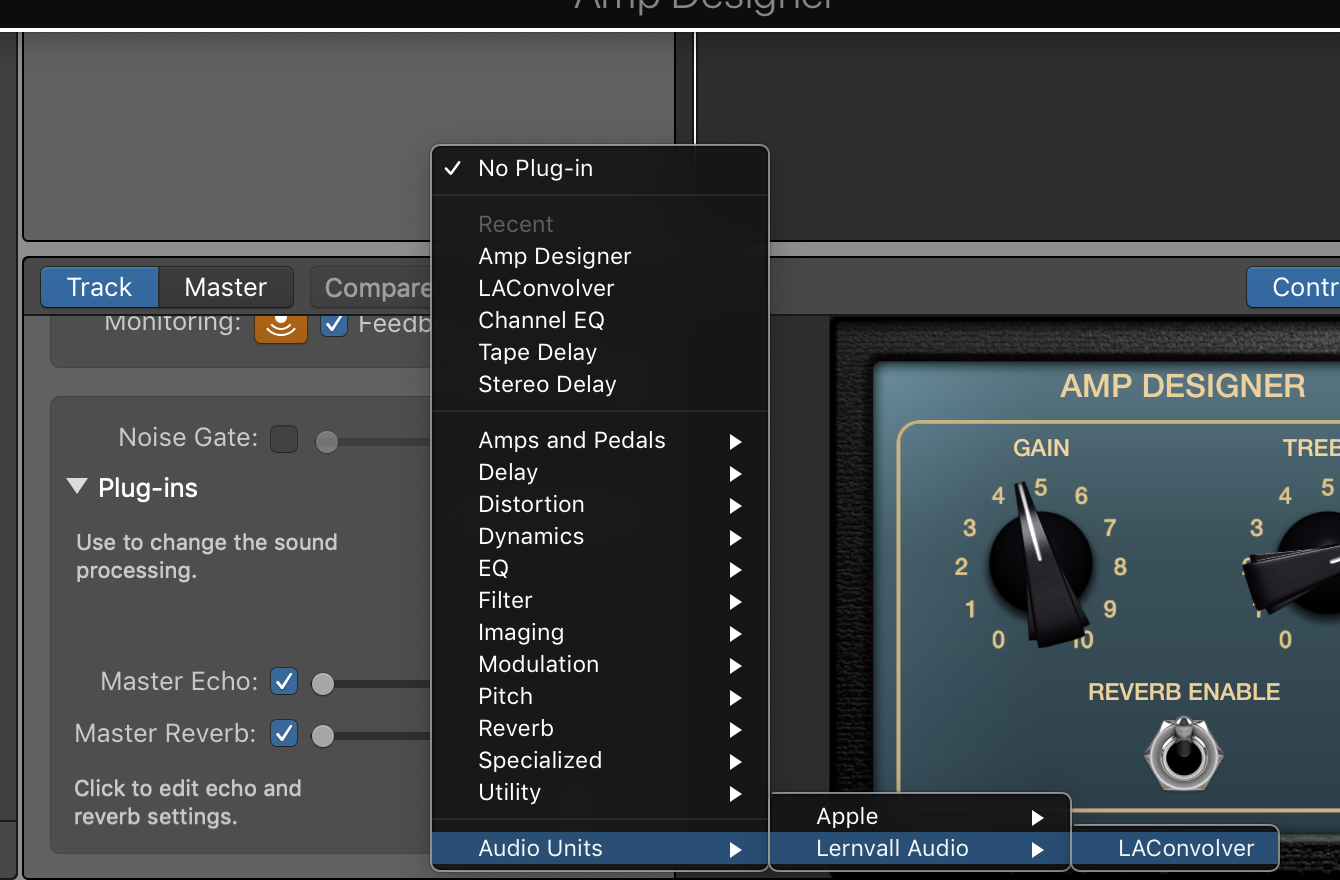
If you still don’t see it, then it’s possible that GarageBand was set up under your user profile on your Mac. For that, you’ll need to place the LAConvolver.component file into [Macintosh HD]/Users/<your user name>/Library/Audio/Plug-Ins/Components. This is what I had to do.
If LAConvolver was successfully added, then when you select the LA Convolver menu item, you should see the following plug-in dialog box:

We’ll get into loading IRs a little later. But first…
Next, you need to get some IRs
I’m a big fan of Pete Thorn, and he recommends using OwnHammer IRs. They have a free set that you can experiment with, but I just pulled the trigger on the Core Tone Bundle that consists of IR models of Fender, Vox, Marshall and Mesa cabinets.
Once you download your IRs (they come as Zip files from OwnHammer – not sure of other producers), I recommend that you move the Zip files to a convenient place. I put mine under a folder I created under the Music folder on my computer: [Macintosh HD]/Music/IRs:

Once you get the Zip files to a convenient location, you need to unzip them. With OwnHammer zips, they decompress to an OwnHammer folder. As you can see in the image above, I renamed the uncompressed folders to the cabinets so when I decompress another Zip file, it won’t overwrite my other IRs.
Understanding the IR Files
At least with the OwnHammer IR files, you might get confused by the sheer number of them as shown below for the Fender Deluxe Reverb (click on the image for a larger view):

The reason why there are so many is that the IR’s come in different flavors. For the files numbered 0 to 10, these represent mic placement on the cone; 0 being dead-center to 10 being at the edge. These are the predominant file types. There are also a couple of others such as “FRED” that set the mic on the edge and angle it 45-degrees, and ROOM, where the mic is set at a distance and you get some room reflection (I love this, by the way). In the image above, I’m showing the “Mics” folder which includes IR files for individual microphones, while the “Mixes” folder includes a combination of a couple of mics.
According to OwnHammer, the numbers don’t represent a specific distance from the center as the numbers increase. They’re rough positions, so if you chose “OH 112 DVRB FN-AXA 57-05.wav,” you’d choose an SM57 positioned roughly between the center cone and the edge. The graphic below illustrates this:

As you’d expect, the further away from the center a microphone is positioned, the warmer the sound gets; in other words, you lose highs.
Now it’s time to choose an IR to use in GarageBand
There are a couple of ways to set up your guitar sound. The first is to input your amp directly, using a load box whose line out runs into your audio interface. Then you can just add the LAConvolver plug-in to your track, choose the IR you want to use, and you can start recording away! (More on this below)
But if you’re like me and are often pressed for time and just want to lay something down, using the Amp Designer plug-in in combination with LAConvolver is very easy. This will give you a complete software-based signal chain. Of course, the weakness here is that you can’t use pedals, but if you just need basic sounds, this will work nicely. So here goes:
First, create a new, blank track. Select “Record using a microphone…” option. You don’t want to use the canned guitar/bass option because once you disable the cab and use the IR, I found that it messes up the signal and your track volume goes WAY down. Once you set up the amp and IR though, feel free to add other plug-ins.

Next, add the Amp Designer plug-in to the track. Choose the amp model you want to use.
Set the cabinet choice to “Direct.” This is extremely important because you want to bypass the cabinet completely and use the IR as your cabinet.

Now, add the LAConvolver plug-in by going to the Audio Units menu and selecting “LA Convolver.” Once you do this, you’ll get the LAConvolver plug-in dialog:
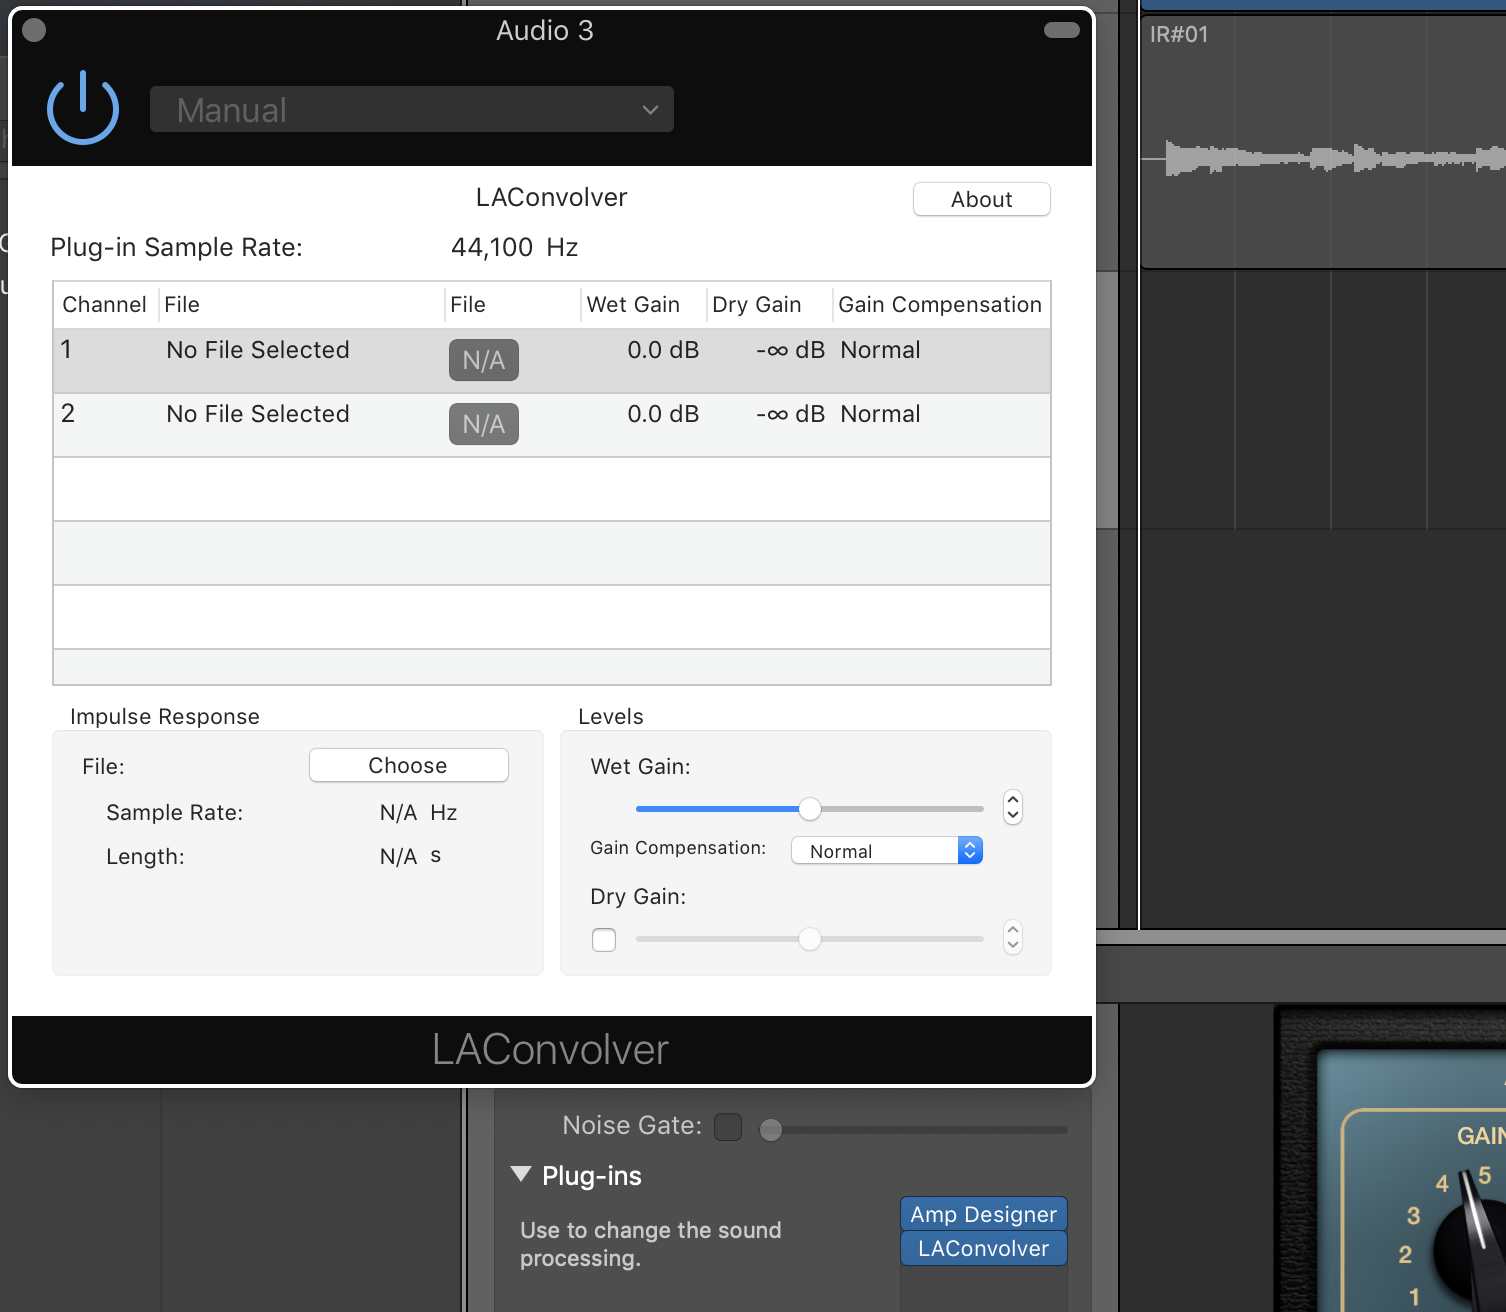
Next, choose your IR. Click on one of the channel rows, then click on the “Choose” button. You’ll then get a File Chooser dialog. Navigate to where you stored the uncompressed IRs and select an IR. For me, I chose the following:

You’ll see that there are IRs for Atomic, Fractal, Kemper and Line 6, plus generic Wav-200ms and Wav-500ms. Not sure what the difference is as of yet, but I just chose the Wav-200ms at 44.1 kHz, 112 DVRB, FN-AXA, Mixes, and the OH 112 DVRB FN-AXA 57-05 IR file, which uses two mics position between the center cone and edge.
Note that each IR has two channels in LA Convolver. This is actually pretty cool because you can choose an IR for one channel, and another for the other channel. But for my setup, I used the same file on each channel.
NOTE: Some people have reported that they only see one channel. I’m not sure why this is other than it might have to do with your interface. I have a 2-input interface so it’s possible that LA Convolver sees this as a stereo input and adds another channel.
In any case, once you’ve chosen your IR files, the dialog should be filled in like so:

I haven’t played much with the Wet Gain other than just testing out the output volume which could be useful if the gain is too high and starts clipping the track.
So that’s it! Record your tracks! Granted, you’ll have to do quite a bit of testing to find just the right IR. I spent about an hour trying out different ones until I found something I liked. But that’s kind of the fun of it!
If there’s anything I’ve missed, please let me know and I’ll add it!
Recording Your Tube Amp
The obvious advantage that IRs bring to the table is that you can use your tube amp and crank it to its sweet spot – and do it silently. I can’t tell you how awesome this has been for me. Absolutely awesome. It enables me to – however virtually – pair my amps with speakers/cabinets that I don’t have.
The reason I added this section below is that recording your tube amp isn’t necessarily as straight-forward as you might think. I had to do quite a bit of playing around with the equipment I have to get it right.
First of all, you need to make sure you have a load box, and preferably one that has a reactive load as opposed to just a purely resistive/dummy load. Without going into technical detail, reactive load boxes are generally accepted as the better option as they more closely mimic the impedance curve of a speaker and thus sound better than their resistive counterparts. For a deeper dive, here’s a great article on the subject.
But even then, not all reactive load boxes are the same. For instance, the video below demonstrates the tonal difference between the Two Notes Torpedo Captor versus the Julius Music Box:
The Julius Music Box tone, while not that bad, definitely has sonic content missing. It’s quite noticeable. But it’s also half the price of the Captor and three and half times cheaper than the new Torpedo Captor X.
Now most higher-end attenuators use a reactive load and many have a Line Out that converts the speaker out signal to line level. My Aracom DRX150 has this and that’s what I use. Unfortunately for me, using the Line Out straight into my audio interface creates a ton of noise, so I have to run it into a DI first, then use an XLR cable into my interface.
There are other load boxes on the market such as the Suhr Reactive Load and Suhr Reactive Load IR that has built-in IRs. These are a step up on the basic reactive load boxes.
But be forewarned. Load boxes like the ones from Two Notes and Suhr are NOT cheap, costing about $250 at a minimum.

“Hybrid” Attenuator-Load Box Solutions
The load boxes I mentioned above are dedicated boxes, but there are a few VERY nice boxes out there that not only provide reactive loads, but add a power amp and other features for even more versatility.
BOSS Waza Tube Amp Expander
To me, this is the ultimate. It provides a load, but has a power stage. You can actually load IRs into the unit itself (it already has IRs, but you can use your own) as it includes cabinet emulation. It even has built-in BOSS effects! It’s not cheap at $1299, but it brings a lot to the table.
Universal Audio Ox Amp Top Box
Close on the heels of the TAE is the Ox. It basically has the same features as the TAE but doesn’t include an effects loop and, of course, doesn’t have built-in BOSS effects. It’s also $1299, so it’s a bit pricey as well. But lots of people swear by this unit.
Fryette Power Station (PS-2 and PS-100)
At $699 for the PS-2 and $899 for the PS-100, what these units bring to the table make them definitely worth consideration. But of course, features are what’s important here and if all the Power Station brought was a reactive load, then $699 (or $899) would be too high a price to pay. But both of these units not only provide a variable reactive load (it’s a full sweep, not notched like others), both have a power amp and an effects loop, plus filters and presence to dial in the natural sound of your amp. The fundamental different between the PS-2 and PS-100 is that the PS-100 is a dual-mode unit that lets you have two different attenuation settings.
Whichever load box you choose, note that these aren’t just for studio use. I often use my attenuator in my live rig when I play smaller venues or at church. It allows me to get crunchy tones at a low volume. So there’s a lot of usefulness beyond the studio!
Computer Performance
Though I spent all that time above talking about using IRs in GarageBand, you have to bear in mind that IRs are files that need to be processed; that is, they use computing power. And if you have lots of tracks and/or use lots of filters, there’s going to be latency as your computer has to work harder.
And from that perspective, I’m actually considering using IRs in an external device like a Mooer Radar. By using a dedicated device like this, I won’t tax my Macbook Pro’s CPU. And from what I understand, there’s less than 2 milliseconds of latency with the Mooer. That’s VERY good performance.
The other reason I”m considering using an external device is purely for usability purposes. It’s great to use a plugin in GarageBand, but switching files takes a lot of time. With an external device, switching IRs happens with the turn of a knob or press of a button. It makes auditioning IRs A LOT easier.
Hopefully I’ve covered enough to get you started! The one thing I can tell you about using IRs is that they’re definitely game changers!

Many thanks for this thorough tutorial, well done. Do you know why I’m only getting 1 channel in LA Convolver? I don’t recall ever having the option to load two IR’s.
I have no idea, but that’s not a bad thing IMO. It’s a pain to have to fill two slots. It may very well be that I have my tracks set up as stereo tracks, but that’s not something I do deliberately – I don’t even know how to do that. 🙂
hello, despite how well explained it is, I can’t get convolver to work on my mac os Catalina. I need assistance. Thanks in advance
If you’re on Catalina, then you have to use Pulse by Lancaster: https://lancasteraudio.com/pulse/
Tried convolver on an OS Sierra Macbook but it didn’t work.
Nothing showing up in garageband. Very disappointing.
I appreciate your post though. Hopefully it helped someone.
Did you see the link to the other convolver software by Lancaster called Pulse? I had to use that for OSX Catalina. It’s also free and it has a much nicer GUI. https://lancasteraudio.com/pulse/.
I have tried both LAConvolver and Pulse, but it seems they produce different sound when using the same FIR file. Have anyone got the same problem? I am using 48.0kHz.
Sorry, wish I could help you. I can no longer use LAConvolver since upgraded my OS. But I’m curious about the sound being produced. Is one better than the other?