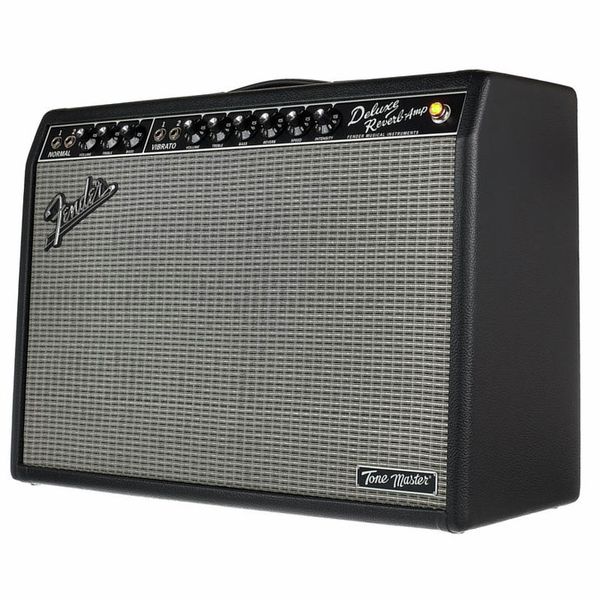
I wasn’t intending to buy the amp today, let alone any amp. But I wanted to try the Deluxe out as the Guitar Center in San Mateo, CA was just five minutes from my office. So after my last meeting, I headed there to try it out. I picked out a Tele from the rack, plugged it in, then twiddled the Bass and Treble knobs to get a good sound for the guitar. It took all of five minutes to make a decision to buy the amp. I was sold.
What did it for me was cranking down the attenuator to 0.2 Watt and cranking the volume all the way up. As soon as I struck a chord, I knew this was the amp I wanted. At that moment, I knew why people loved the sound of a cranked-up Deluxe. There’s something visceral about the overdriven tone of a Deluxe – you feel it in your bones.
No, I wasn’t pushing SPLs, but no matter. I realize that’s where the magic happens. But that cranked sound even at that low volume was absolutely amazing to me! Truth be told, I’d never run the amp fully cranked as I get a lot of my overdrive from my pedals. But that sweet, open overdrive just made me close my eyes and smile inside. I just can’t wait to gig with it!
Then to top it off, I got a 10% discount and the guy at Guitar Center threw in a nice ProLine amp stand to boot! I’m a happy man!
After I got home and had a bit of dinner, I started playing. And playing. I started out with my Taylor T5z as that will be the main guitar I use for gigs with the amp. I had to really roll off the lows on the amp for that guitar. But once I had the EQ dialed in… Wow! My next gig is going to be fun!
Then I switched to my R8 Les Paul. The amp started humming with that guitar, and I realized that I probably have a grounding issue – going to have to get it fixed. So I switched to a guitar I rarely play, and that is my ’90s Godin Artisan ST V. Damn! Why haven’t I been playing that guitar more?!!! It sounds absolutely KILLER through the Deluxe! It sounds like a fat Tele!
I distinctly remember having a difficult time dialing in the guitar with my old Katana 50. But I had absolutely no problem finding the right EQ settings with this guitar – they were the same as my T5z! I may switch back and forth between these guitars. I’ll see how that works at band rehearsal coming up on Sunday.
While I dug the Bright switch feature on the Twin, plus having a Midrange knob, I love how the Deluxe is uncomplicated. I mean REALLY uncomplicated. I started playing it around 6pm this evening, and I’ve been playing it for the last three hours. It sounds so killer! And since I don’t have a cacophony of features to dig through, I’m up and running lickety-split!
But here’s a feature about the amp that is so incredible yet has nothing to do with the amp’s sound. It only weighs 23 pounds! 23 freakin’ pounds! I haven’t had an amp that weighs this little since my trusty old Roland Cube 60! I can easily lug this amp to a gig without using a hand cart! And going up a staircase with this amp will be a breeze! I once played a gig where I had to haul my Katana Artist up some stairs and it was a pain in the ass! But this amp? It’s like carrying a suitcase. No problem!
What I’m really looking forward to is plugging this into my audio interface and PA. This is even more of a game-changer than my Katana with its line-out feature purely because it’s a balanced XLR out. With the Katana, I needed a 1/4″ TRS cable, then an XLR converter to plug into a PA. That’s not necessarily a bad thing, but using a single XLR is a helluva lot more convenient. As far as game-changing is concerned, as with my Katana, I just need to be loud enough to hear myself, then let the PA do the work of getting my sound out.
Summary: The flagship amp of the Katana series, the Artist provides the ultimate in versatility to an already versatile line of amps. But with its larger cabinet and WazaCraft speaker tuned specifically for the amp, it has a richness in sound that surpasses the rest of the line.
Pros: As with the Katana 50, I have lots of praise to heap on this amp. The sounds it produces in addition to the feel and dynamics are incredible as with the other amps in the line, but the Line Out is really the secret weapon of this amp. And having the cabinet resonance and Line Out Air Feel – which simulates microphone distance – on the front panel makes it super-easy to dial in your direct signal to a board or a DAW.
Cons: My only nit with this is that I wish it had at 25 Watt setting. The difference between the 50 Watt and 0.5 Watt is so drastic, it makes me wish for a “tweener” power level.
Tone Bone Score: 5 No two ways about it: This is a great amp.
Street Price: $599.99
I’ve already written so much about this amp since I got it, but I’ll reiterate: This ain’t yo daddy’s solid-state amp. Ever since I got the Katana 50, I couldn’t believe that a solid-state amp could have touch and dynamics similar to a tube amp, let alone get as big a sound. And as I said in my review of the 50, I really tried to make it suck, but couldn’t. I did the same with the Artist.
Granted, when I first got it, the speaker was absolutely fresh. But now that I’ve been playing the amp daily for the last couple of weeks, the speaker is breaking in and the sound is becoming silky-smooth. I’ve done four gigs with the Artist and the sound just gets better every time I play it.
On top of that, I’ve been using recording with it daily. The Line Out is incredible. The sound I get out of it is so natural and so very close to a miked cabinet that I haven’t bothered to set up any of my tube amps. Of course, that could change depending on the song I’m recording because you just can’t duplicate something like a Plexi.
But make no bones about it, though it is said that the speaker was tuned to approximate an old Greenback through a vintage Marshall, this has more to do with feel and dynamics and less about sound. As I’ve said before, though the Katana is technically a modeling amp, using BOSS’ TubeLogic technology, it wasn’t voiced to sound like a Marshall or a Fender. It has a sound all its own.
Fit and Finish
Though only 45 lbs., this amp is built like a tank. The cabinet is MDF and though there have been comments circulating that it would’ve been better for it to be made of solid pine or birch, the semi-closed back makes it incredibly resonant and able to capture the low frequencies very well.
I absolutely love that the controls are on a front panel! It makes it so convenient to tweak during a gig, which I had to do last weekend at church. We have a really finicky PA system (what can I say, it’s old), and for some reason, my guitar was sounding horrible through the Line Out. But all I had to do was turn the Line Out Air Feel to “Blend” and all was right. I had the same setup as the previous week and it sounded killer. Everything on the board was also set up the same. That the Air Feel control was on the front panel made it super convenient; not to mention that I didn’t have to go into the software to make that change…
As far as controls are concerned, if you have any of the other amps in the line, you’ll immediately be familiar with this control layout. The big difference is the exposure of the cabinet resonance and line out air feel knobs. On the back, there are jacks for a GA-FC (which I highly recommend getting), extension speakers (16 ohms), headphone/record out, MIDI in, expression pedal, an effects loop jacks. In other words, pretty much everything that you need.
As far as the GA-FC foot controller is concerned, that’s a must-have as it allows you to quickly switch channels but also turn effects on and off on the fly (which I find extremely useful). In addition, you can hook up an expression pedal directly to the GA-FC so you don’t need to run two long cables from the amp to use the foot controller and an expression pedal. The GA-FC also has an extra jack for a volume pedal.
How It Sounds
One striking difference between the Artist and the 50 is the Acoustic setting on the amp. My old 50 sounded okay with an Acoustic guitar, but the Artist has a rich, deep tone that rivals my old SWR California Blonde which I have always felt was the pinnacle of acoustic guitar amplification. The semi-closed back really helps in capturing and projecting the rich lows of an acoustic guitar. In fact, the lows are so good, that I have to roll them off a little on the EQ.
To date, I still haven’t miked the amp. For recording, the Line Out produces such a nice, natural sound that I haven’t seen a need to mic it. This is evidenced by the dynamics in the wave-form it produces. It is VERY dynamic, much like the output I’d get from miking the amp.
I’ve already posted these clips, but here’s a playlist I created:
The first three clips are of my acoustic guitar through the Line Out. The EQ was all neutral. With the last two songs, I wanted to see how the Line Out performed within the context of a song. Someone in a forum kind of bagged on me posting a song and should have only posted raw clips. But I argued that while raw sound clips are useful to a point, you really see how something performs when it’s done with a song. And in that regard, the Katana Artist’s Line Out is AWESOME!
Ease of Use
Like the rest of the Katana line, this amp is easy to set up. Even the Tone Studio software is pretty straight-forward to use. Some people might argue that there are lots of things to tweak and that, by virtue, makes it much more complicated. But I want to make absolutely clear that I believe the amp’s natural sound is great by its own merit. A lot of the tweaks and patches I’ve seen people make try to make the amp sound like another amp. But for me, I love the way the amp sounds on its own. So for me, it’s simply a matter of dialing in the gain settings and EQ. Since I make limited use of the onboard effects, I don’t do much tweaking, so set up – at least for me – is super-easy.
How It Plays
As I mentioned in my original Katana 50 review, this is what endeared me to the Katana in the first place. It was the first amp that gave me tube-like response and dynamics. But more than that, it didn’t feel as if the response and dynamics were simulated or artificial. In fact, it felt completely organic and natural, just as I would have expected with a tube amp. The Katana Artist inherits this but with the larger cabinet and much much better speaker, that responsiveness is coupled to great sound.
Is the Katana Price-Competitive?
One of the arguments people have made about the Artist is that its price starts getting into the territory of some low wattage amps. But the one thing you have to keep in mind is that while this is true, a tube amp at that price will not have anywhere near the features that come with the Katana by default. Plus, let’s face it, amps at that price are going to be fairly low wattage. They will not have the big sound that you can get out of the Katana. Furthermore, tube amps at this price point will most likely be heads. You have to spend more to get a cabinet.
So is the Katana price-competitive? To me at least, the value it brings for the price makes it a totally viable option.
Should You Upgrade?
This really is elephant in the room with respect to the Artist, so as opposed to giving you a pat answer, I’m going to take a bit of time with this…
To be honest, I probably wouldn’t have considered the Artist had I not given my Katana 50 to my youngest son. I was using the amp mainly for gigging, and I was perfectly happy with it. I certainly didn’t need a 100 Watt amp, especially considering the venues that I normally play. The Katana 50 was plenty loud; besides, when I needed sound reinforcement, it was simply a matter of miking the amp.
But one shortcoming I saw with the 50 was that I didn’t like to use it for recording. I was not at all a fan of the headphone/record out. From that perspective, I was just fine recording one of my tube amps and using an IR and using the 50 as a pure gigging amp. But all that changed with the Artist. The Line Out output quality is killer, and as I spend a bulk of my playing in my home studio, the Artist is quickly becoming my go-to for my basic guitar part foundation, if not more. So for me at least, upgrading made a ton of sense.
But for those of you who are a bit conflicted about upgrading, it really depends on how useful it would be for you. For me, I’ve discovered a TON of versatility in it due to the Line Out. But then again, I’m actively gigging and recording, so it is invaluable in those respects.
But to be honest, take away the Line Out, and the only glaring thing that is better with the Artist is the sound quality which is much richer than both the 50 and the 100. It’s obvious at all volume levels. That bigger cabinet definitely makes a difference. And for some, while the obvious difference in sound quality could be a deciding factor, for me – and I know it sounds crazy given how much I love this amp – it wouldn’t have been enough for me to upgrade. And to be completely honest, it wasn’t until I started using the Line Out in recordings that I truly discovered its real value for me.
So am I or am I not recommending the amp? Well… yes and no. I’m basing my assessment of the amp on its versatility in both stage and studio use. And as far as versatility is concerned, I can give a resounding yes. But I have to be transparent and say that if you’re just going to play the amp in your bedroom, or just want a straight-forward gigging amp, stick with what you have for now. It’s great, but it’s not enough of an upgrade.
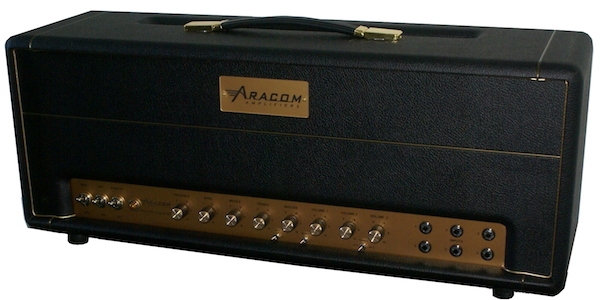
Summary: Based upon the PLX amp “platform” that Jeff Aragaki has created for creating customer-specific amps, this 100-watt beast is actually 3 classic Marshall amps in 1: Plexi 100 SuperLead (JMP), Plexi PA, and JCM800 (high gain).
Features
Three channels (Plexi SuperLead, Plexi PA, JCM800)
“Bite” Switch (mild mid boost)
Master Volume Control with Bypass Switch
Presence, Treble, Middle, B ass Tone Controls
Solid State/Tube Rectifier Simulation Switch
Channel Disable Switch
Bias Test Points with user accessible bias pot
Handwired turret board construction
“M” style large box head cabinet
Price: ~$2900
Tone Bone Score: 5.0 ~ Talk about high-gain versatility. This is no gimmick. Each different channel has voicing that you’d expect out of that particular model. The SuperLead is classic, bright Plexi, while the JCM800 has a darker, much more aggressive tone, and the SuperPA is all about clean headroom. While the amp in an of itself is special; the PLX platform is what make all this possible. If I’ve said it once, I’ll say it to the grave: Jeff Aragaki is genius!
About three years ago, Jeff Aragaki and I were talking about a new amp design. I told him that I would love to have a high-gain amp either in a 50 or 100 Watt version, but gave me the flexibility to voice it in various ways to fit the particular sound I wanted. We affectionately called this a “FlexPlex” because for me in particular, I wanted that Plexi sound, but wanted to be able to tweak it. Jeff actually built it, and I saw the prototype for it a couple of weeks ago.
But in the process of building the FlexPlex, you might say he “stumbled” upon a completely new way to build his amps; and that was basing his builds upon a platform. This wasn’t trivial, and no, I’m not just bandying about some buzzword. The platform that Jeff discovered has allowed him to create all sorts of different amps; starting with a common construct. I’m not sure about all the details, but the proof is in the pudding. Here Jeff’s words that describe this particular amp:
“The ARACOM PLX100 amplifier is a platform that allows us to build customer specific amplifiers with the features and specifications they desire. For this custom build, our customer wanted a 100 watt amplifier with the vintage Marshall Super PA look. The Super PA head cabinet has a “wide mouth” front panel opening, allowing access to four separate P.A. channels. The model designation for this custom ARACOM amplifier is” Super H.T”., H.T. representing the initials of our customer. However, instead of having 4 identical channels like a standard Super PA amplifier, the Super H.T. has 3 different channels, allowing for a highly versatile amplifier.
“The JMP channel offers clean and overdriven tones as expected with a Plexi SuperLead amplifier. It has two separate Bright switches that allow the channel to go from a Plexi Normal (Dark) channel tone to Plexi Bright channel tone, or something in between. The Super PA channel provides slightly less gain than the JMP channel, with a fuller bass response. The JCM channel is the high gain channel, designated for overdriven/distorted tones. The JCM’s Bright switch allows for the standard JCM800 bright tone or a slightly darker tone. The Master Volume control with a true bypass switch, allows for cranked up tone at lower volume levels. The rear panel Bias Test points, allows for quick and easy tube biasing.”
Fit and Finish
It sure looks like a Marshall… 🙂 But in all seriousness, it’s an Aracom Amp, and that means quality. Jeff doesn’t skimp on components, and he takes a lot of pride in making sure everything that leaves his shop looks absolutely professional, and the PLX100 is no exception. The tolex is perfect, and all the knobs are snug and turn smoothly. And since this amp was going overseas, you can bet that Jeff made sure that everything was sturdy to eliminate or severely reduce the risk of breakage.
Ease of Use
I normally don’t have this section in my reviews, but I thought it necessary in this case. While I absolutely love the amp, with all the switches and the push-pull knobs, I have to admit that I’d have to take a lot of time getting familiar with it. I don’t call that really a negative mark on the amp. For goodness’ sake! How else do you pack in all those features? But despite that, the knob and switch layout is pretty clear. It would take me awhile to find the sweet spot in each channel for all the guitars I’d play through it. But that’s the beauty of discovery and experimentation, wouldn’t you say?
How It Sounds
This amp sounds amazing! Jeff explained each channel as I would have, so I’ll just reiterate and say that his descriptions of each channel reflect my own experience with it. When I was in his shop testing the amp, we must’ve played around with it for at least an hour as he twiddled knobs and flipped switches to demonstrate the amazing number of voices that could come from this amp. The permutations of settings make this amp able to tackle practically any style of music. Oh! We did all the testing through a huge 4 X 12 at gig volumes, so it was LOUD! 🙂 I played a Les Paul, a Gene Baker prototype (it was a hybrid that is VERY cool), and a Strat through the amp, and each guitar sounded killer through it. My favorite channel by far was the SuperLead channel, which had lots of gain on tap, but wasn’t at all over the top. Next was the JCM channel – especially its dark mode which produced thumping overdrive. I wasn’t too wild about the SuperPA with a Les Paul, but with single coils, that channel was absolutely SWEET! It would be a perfect channel to use with overdrive pedals because of its clean headroom.
Overall Impression
What strikes me the most about the PLX100 is that you literally have three amps in one. If you had all three, you’d probably be close to $10,000. That this amp is only $2900 is pretty amazing to me. But that’s Jeff. He doesn’t make a huge profit on the gear he builds – that’s a personal choice. He just wants to build great amps. This is like my friend Perry Riggs of Slash L Guitars. He makes absolutely awesome guitars but sells them at a price-point that’s rather incredible. Both of these gentlemen are true artisans of their trade, and I’m glad there are folks like this.
With respect to the PLX100, I sure wish I played in venues where I really open up an amp like this and really do it justice. For my particular uses, this is way too much amp. But if I ever get the chance to regularly play large venues, you can bet that I’ll be calling Jeff Aragaki to build me an amp on the PLX100 platform. Or… maybe he has a 50 Watt version. 🙂
I don’t do a lot of tweaking of my gear; at least not to the extent that others do such as replacing caps and filters, unless they’re damaged, of course. But when I think some gear – especially amps – can be improved, I do some basic things. Mostly this involves swapping tubes or in the case of combos swapping out their speakers. With my VHT Special 6, which is a wonderful, hand-wired amp that’s made in China, I did both of these things, replacing the stock tubes and speaker to give it a much deeper voice than its default. The result has been marvelous!
Now, I do have to say that I used the amp for several months without doing a thing to it. I brought it to gigs and was very happy with its tone right out of the box. But when I finally brought it into my studio to record some songs, I did not like what I heard. It’s not that it was bad, it was just a bit too bright, no matter how I positioned my mics.
As luck would have it, I got contacted by Jensen’s North American rep to review the new Jensen Jet Electric Lightning. It was touted as a rock speaker made for loud applications. Since I was doing a review, I went to the Jensen site to look at the frequency response chart, and saw that it had a scooped frequency response; and very importantly, a nice, wide, and rounded bottom end, lower mid-range response, then spiking at just over 2kH for high-mid emphasis. By default, the Special 6’s stock voicing had a mid- to high-mid emphasis. Unfortunately, the tone control would make the tone a bit muddy, so I was looking to the Electric Lightning to help fix that.
Once I made the swap, the difference was like night and day! Combined with the Special 6’s cabinet, the projection of the speaker was such that it sounded WAY bigger than what its diminutive size might indicate. Even my band mates remarked on how big the amp sounded. I played it at several gigs and it was loud enough so I could monitor my tone, and just close-miked the amp to get it into the house. Very nice.
Then last summer when I started work on my latest album, on a whim, I decided to swap tubes as I had a few NOS 12AX7 and 6V6 tubes in my possession. So I put a 1959 GE 12AX7 and a 60’s RCA 6V6. As soon as I started playing, I started to smile. A cheap, sub-$200 amp was not supposed to sound this big and this good. One thing that the tubes did was really smooth out the tone, as they gave the amp a lot more clean headroom. In fact, whereas I only had to turn the volume up to about 11 o’clock to get some grind with the original, I had to dime the amp and put the booster on and really dig into my strings to get some grind. But I didn’t see this as a bad thing because it made the amp a perfect platform for drive pedals. In fact, that’s exactly how I use it. It works great with my overdrive and booster pedals, and with my Little Brute Drive distortion, fuhgettaboutit!
Now truth be told tbough, once I got my DV Mark Little 40, I hadn’t played the amp at a gig until yesterday when I took it to my weekly church gig. Most of my band was out of town for Memorial Day weekend, so it was only going to be me and another guitarist for instruments. So I decided to keep my rig simple. I moved my modulation pedals onto my 4-pedal board, got my Strat, picked up the Special 6 and went to the church for pre-service rehearsal. Not having played the amp in a couple of months, as before, once I switched the amp on, I just got a huge smile on my face. The amp just sounds killer.
I can say with confidence, that this is an amp that will never be sold or traded out of my stable. Even as I’m spending this summer thinning out my gear, I’m going to hold onto this amp. It’s validation that you don’t have to spend a lot of money to get some fantastic tone.
Sebago Sound PrototypeSummary: I don’t know what an original Steel String Singer sounds like, but if Sebago’s take on that amp is any indication, we have a winner here! This is an incredibly versatile amp that can fit any genre of music. This is my next amp.Pros: Versatility is the key with this amp. The notch High and Low notch filters let you dial in your tone to fit the genre or help fine tune the amp to your guitar.
Cons: None. But not a 5.0? I’ll explain below…
100-150 Watts (150 with 6550’s) from 4 power tubes
Reverb “loop” with send and receive knobs (send is signal gain into tank, receive is similar to mix)
Single input with switchable FET circuit
Gain control
Three-band EQ
Bright, Mid, Rock/Jazz mini toggles
Master control
Presence control
Individual High and Low notch filter knobs.
Power and Standby switches
Price: TBD, but will probably be somewhere between $2500 and $3000
Tone Bone Score: 4.75 ~ The only reason I took off a quarter point is because the reverb receive circuit was a bit noisy. I was able to dial back the hum by upping the send gain and dialing down the receive signal, but this is a prototype, so it’s understandable that there would be some tiny issues, and believe me, this is tiny.
My First Impressions article pretty much said everything that I had to say about this amp. My opinion hasn’t changed. This is an absolutely SUPERB amp that has me GAS-ing VERY BADLY. And after playing with this amp for the last few days, I’m in a dream state from the hypnotic tone that this amp produces – with all my guitars.
One thing I will add is that Bill Dunham emphasized that the amp is a great pedal platform. I still agree with that assessment, but frankly, this amp produces almost all the tones that I need, so I haven’t hooked my pedal board once this past week. The reverb is fantastic, and when I’ve taken the amp into overdrive, I just haven’t seen the need to use a pedal. The only exception to that is with the last clip I recorded where I ran my Strat through my Timmy overdrive before going into the amp, which was not quite at the breakup level; just slightly below.
Granted, at 100 Watts, I couldn’t take the amp into breakup without an attenuator. But luckily, my trusty Aracom PRX150-Pro comes to the rescue yet again in that department. A quick note on the distortion. I wasn’t really liking the fully cranked up tone of the amp with my Strat. It’s an entirely different matter with my Les Paul. The lead tone – which you’ll hear shortly – is just incredible. With the FET activated, and both Gain and Master cranked up (Gain at 9, Master at 10), the sustain, harmonics and overtones create this absolutely gorgeous lead tone. Now by itself, this amp won’t do metal. It’s not made for that, and I don’t think it was ever intended to do that. But crank it up and throw a distortion pedal in front of it, and I believe you could easily do metal.
Fit and Finish
I really won’t comment on this much because the final face plate is being produced so Bill modified a Double Trouble face plate. That’s also why I didn’t take pictures. It’s not finished, and I don’t want people to get the wrong idea that the amp will be in the condition in which it was tested. It looks great, but I’d rather get pictures of the finished product.
How It Sounds
Bill kept on saying when he dropped off the amp that it’s real strong point was clean. After playing with it, I heartily disagree. 🙂 Clean, dirty, it don’t matter. I dug the sound. In any case, I’ve recorded three clips to give you a general idea of the amp’s tonal possibilities. Mind you, I don’t have a mild breakup clip with a Strat. Once I get the real thing, I’ll share lots more clips. For now, you check out the ones I’ve recorded thus far. Note that these tracks are raw tracks. I used no EQ nor compression because I wanted to ensure that I’d capture all the dynamics of the amp.
Clean, Gretsch Electromatic (thin body)
Clean, Les Paul
Rock, Crunchy Rhythm (left), Solo (right)
Clip from an SRV tribute song I wrote called “In The Vibe”
All the clips were recorded using an Avatar 1 X 12 closed back cabinet with the fantastic Fane Medusa 150 speaker. I used a single mic – a Sennheiser e609 – positioned about 18″ from the cabinet pointed directly at the center of the cone. Part of why you might hear a little static is the ambient room noise from my garage. Barely detectable, but it’s there.
With the rock clip, one thing I had to get used to was the note separation in touch sensitivity of the amp when I’ve got it cranked; actually, even in heavy overdrive. I didn’t really have to change the way I play, I just had to make sure that if I was chording, then I needed to be smooth with my strums, otherwise you’d hear every dang string being plucked. 🙂 It was a pretty easy adjustment.
With the SRV tribute song, as with the other clips, I didn’t EQ the guitars at all, though with the lead, I did add some reverb and a touch of delay to give the tone some air. I also ran the guitar through my Timmy overdrive in front of the amp. Other than that, what you hear is what the amp and the Strat are producing naturally though the final recording has a touch of compression. With the first part of the clip, I’m playing through the neck pickup, then switch to the bridge pickup and turn the volume of the guitar up a couple of notches.
In any case, to me, the clips I’ve provided tell a good story of what this amp is capable of. As I mentioned, in a clips, what I’ve laid down is the raw amp sound, completely unprocessed except for the SRV tribute. The tones are absolutely gorgeous!
Overall Impression
I suppose you can pretty much guess what my impression is of this amp. Once Bill gets this into production, it’ll be my next amp. Better start saving my pennies. 🙂
Sorry, no pictures nor sound clips – yet – but I wanted to get out a first impressions post on this wonderful amp.
Personally, I’ve never heard or seen a real Dumble Steel String Singer other than Doug Doppler’s video of one of Henry Kaiser’s SSS, so I can’t really make a comparison between Sebago’s amp and the original. But if I were to sum up what I’ve heard from Bill’s newest amp in my short time playing with it, and if you don’t want to read any further, all I can say is that this amp sounds like nothing I’ve ever played before; presenting a complex and rich tonal palette that truly gives it the ability to be used in ANY type of genre. And make no mistake, it doesn’t lean towards a particular camp, as in Fender or Marshall. This amp has a sound all its own, and it has completely blown me away!
I don’t say that lightly, by any means. I’ve tended to be a bit jaded with Dumble-style amps probably due to all the hype that’s associated with them. And though it could be argued that Sebago is doing yet another knock-off of Dumble amps, I believe Bill Dunham’s approach is not to create pure clones, but rather to create great amps that he believes capture the spirit of a Dumble amp; and not be an exact reproduction. At least to me, being a copy-cat is absolutely boring, and Sebago amps are far from boring.
Before I get into discussing the amp further, let me go through its features:
100-150 Watts (150 with 6550’s) from 4 power tubes
Reverb “loop” with send and receive knobs
Single input with switchable FET circuit
Gain control
Three-band EQ
Bright, Mid, Rock/Jazz mini toggles
Master control
Presence control
Individual High and Low notch filter knobs.
Power and Standby switches
When Bill first contacted me the other day about the new amp, I asked him if it would have the FET input. He replied no, but when he delivered the amp, he had constructed the FET circuit. I’m glad he did because it tweaks the tone in a very nice way. Unlike an original Dumble, the FET circuit on the Sebago amp is relegated to another input. Bill instead makes it an activated feature via switch (either push-pull or footswitch). According to Bill, the FET provides some extra gain at front-end that produces an asymmetrical clipping that’s not quite distortion though you know something’s happened. To me, it “feels” like a compressor as when it’s switched on, the tone feels much richer and fatter. If I were to own this amp, which I probably will in the future, I’d probably have the FET on all the time.
The distinctive thing about Dumble amps is all the EQ tweaking you can do. The Overdrive Special has the three mini toggles plus the three-band EQ knobs. But the Steel String Singer adds two incredibly useful High and Low notch filter knobs. I believe these two filter knobs are responsible for making the magic of this amp, and these are the knobs that I played with the most, once I set up the EQ. Having the filter knobs really helped me dial in all sorts of tones from spanky, sparkling cleans to big bottom-end crunch – with a Strat, no less! The Low notch acts like a cut, where the High acts like a midrange voicing knob that you find on various amps. The combination of these two allow you to adjust the amp’s basic tone to fit your guitar and cabinet. For instance, I’m playing the amp through my Avatar 2 X 12 with a Celestion Gold and a Jensen Jet Falcon. Even with the Falcon, which has a lot of bottom-end content, the cabinet tends to be bright. But a few clicks of the Low notch filter helped bring out the lows. Just incredible.
As far as the reverb goes, I dig that it’s in a loop, and that you can control how much signal goes into the tank, and control how much gets added back. It allows for really fine control of the reverb, and I spent quite a bit of the time playing with it to see what it could produce. In the end, I set the Send to about 10-11 am, and just twiddled with the Receive to control how much I reverb I wanted to add back into my signal. Very cool.
So how does it sound? With cleans on a Strat, it is other-worldly. There’s so much harmonic content in the signal that depending upon how you set the notch filters and reverb, you can get almost a chorus-like effect which is absolutely dreamy. But you can also get spanky country cleans again, by adjusting the notch filters. Those really give the amp its personality. As far as dirt tones go, as Bill put it, most of the harmonic content is in the preamp section, so you can crank the preamp and keep the master down. Me, I like cranking the power tubes to get them working. But either clean or dirty, there’s a real depth; almost a 3D quality to the tone that’s total ear candy!
With both the Gain and Master cranked, I have to admit that the amp doesn’t sound all that good. The overdrive sound becomes really muddy, and even more so with the reverb on, and no amount of EQ would clean it up. But backing off the Master to about 2:30 to 3pm, gave me a nice, ballsy growl. Can’t wait to try that out with my Les Paul.
Bill did say that at least to him, the amp is a great pedal platform, and that putting a Tube Screamer in front of the amp can get you that SRV tone. Based upon my eval thus far, with the FET and a Tube Screamer, that may just be true. There’s TONS of clean headroom with this amp, so using it with pedals will be ideal.
I found that the sweet spot of the amp is setting it at the edge of breakup with the FET on. In addition to the aforementioned compressor-like quality the FET introduces, the clipping gives the signal a bit of “hair.” I wouldn’t necessarily call it breakup, but you know there’s some distortion. It’s a great tone that I hope to be able to capture once I make some recordings of the amp.
Gawd! I know I’m loving a piece of gear when I write a lot about it. This amp has so much character, and I have yet to really do an exploration of it in both the studio and at a gig, which I will be doing this weekend. I am SO looking forward to playing with it more!
By the way, the name of the amp obviously will not be “Steel String Singer.” Bill has told me what he intends the name to be, but I won’t share it until the product’s actually out the door. It will have a Southwest-flavored name in celebration of that SRV tone. But make no bones about it, this amp can do way more than the blues.
And thank goodness I have my Aracom PRX150-Pro attenuator. I could not do the dirty tests without breaking windows. 🙂
One of the guitarists in my church band recently got a Carr Mercury, which is a great little amp. In addition to sporting vintage styling, it has some great power scaling from 8 Watts down to 1/10 Watt, a three-position boost to vary the drive to the single EL34 power tube, and a very nice and liquid reverb. All in all, it sounds pretty killer. Add my bandmate’s Barron Wesley custom guitar, and it’s a great tone combo!
But as he plays next to my rig, which consists of a Les Paul going into an Aracom PLX18BB Trem (“PLX”) which is a clone of the very simple Marshall 18 Watt Plexi, I felt the Carr’s tone paled in comparison to the tone my rig produces. Mind you, the Carr sounds killer. But in comparison to the PLX, its attack is much faster, and there’s noticeably less sag from rectifier than the PLX, so my perception is that there’s not much sustain with the amp..
Granted, I realize this is purely subjective, but there is something very special about the PLX. Perhaps it’s due to that classic “Bluebreaker” tone – hence the BB designation of the amp – that Clapton made so popular while with John Mayall and the Bluesbreakers. The Les Paul/Plexi combination is absolutely magical. Perhaps it’s also due in part to the absolute simplicity of the 18 Watt Plexi’s circuitry. Or perhaps it’s due to how the amp sags that gives it this almost reverb-like tone. Whatever it is, it’s a tone with which I completely identify.
I realize that I probably mention the PLX in this blog more than any amp that I have or have tested. But it has become my “go-to” amp. As the title of this article says, some rig combinations just never get old.
In front of the PLX, I have just a few pedals because I like to keep things simple. Here’s the complete chain:
Les Paul R8 -> Timmy Overdrive -> TC Electronic Corona Chorus -> Mad Professor Deep Blue Delay (handwired) -> DigiTech RV-7 Reverb -> Aracom PLX18 BB Trem -> Aracom PRX150 Attenuator -> Fane Medusa 150 12″ speaker.
I typically only use the delay and reverb when playing clean, which is actually quite a bit. But when I’m playing driven, either with the Timmy or with the amp cranked, I just let the amp speak for itself. 🙂
I mentioned the sag of the PLX. It’s not so saggy that you get a lot of crosstones. But Jeff Aragaki (amp builder) did find a sweet spot in setting up the rectifier that balanced the classic responsiveness of the original Plexi with enough sag in the rectifier to make the amp absolutely expressive.
I made some modifications of my own in the way of tubes. I have gorgeous 1959 RCA grey glass pre-amp tubes in it to drive the pre-amp. I actually kept the original JJ EL84 power tubes in the amp because they compress quite nicely when driven without over-compressing into mush. Then to add fatness, I dropped in the gorgeous, super-sensitive (103 dB) Fane Medusa 150 12″ speaker. Combine that with a large 1 X 12 combo cabinet, and you’ve got a nice resonating chamber for the speaker which adds further depth to the tone.
Upon writing the above, I think a huge reason why I love the tone of this amp so much as compared to the Carr probably has a lot to do with the size of the cabinet, which can also easily house 2 10″ speakers. That extra room for the sound to bounce around creates a lot of complexity.
In any case, that particular combination of gear never gets old to me. Even though I have lott of other guitars and amps, when I gig, I go to that setup. Now if only Jeff will build me my FlexPlex 50… 🙂
Summary: Nice, moderate vowel-tone envelope filter box for guitar. You can get downright funky with this pedal. While it may not get as “vowelly” as competitive products, it certainly has a lot of tone on tap.
Pros: Great features and tone, and the pedal’s super quite when active. The controls are super-easy to manipulate.
Cons: While I love the sound of this pedal, its physical footprint is just plain big, making it impractical to put on my pedal board. Also, the plastic enclosure makes me a little “iffy” about its gig-worthiness.
Features
21 Filter Sounds including 2 Pole Low Pass, 4 Pole Low Pass, Single Peak, Triple Peak, Peak and Notch and Phasers.
Positive and Negative filter sweep with variable range and sensitivity.
Dual range speed control allows equal adjustment of Attack and Decay speeds, or alternatively, a fixed, fast attack and adjustable Decay.
Modern Design — a thoughtfully designed box that features rugged construction and sleek looks.
State-of-the-art DSP — our proprietary 56-bit Digital Signal Processor, the SA601 and crystal clear 24-bit converters.
Motion Control — all Soundblox™ pedals are “Hot Hand® Ready” and can be used with any Hot Hand motion sensor to extend the capabilities of the unit.
Active Analog Bypass — bypass is fully routed around the DSP and active input ensures zero signal degradation.
Dimensions: 7 in/17.8cm (length not including 1/O jacks) x 4 in/10.2 cm (width) x 2 in/5cm (height, including knobs).
Price: ~$120 Street
Tone Bone Score: 4.75 ~ On tone alone, I’d give this a 5, but its size and plastic enclosure give it a lower mark.
A few months ago, I was thinking that the next tonal territory I wanted to tackle was using an envelope filter. I love that “auto-wah,” vowel tone. I’ve tried out a few over the months, but I got a chance to spend a good deal of time with the Source Audio unit in my studio, and I have to say that tonally, it’s a real winner for me.
Out of the different envelope filters I’ve tried, this one has just about the most features I’ve seen to date, with 21 filter sounds, which means you can get A LOT of different tones out this box. But despite the amount of tweakability, it’s super-easy to dial in tones, and to be completely honest, though I’ve had this unit for a couple of months to play with (thank you Source Audio – and no, this is just demo unit, though I’ll probably buy it), I have yet to touch the manual. Source Audio even sent me a wired “Hot Hand” controller that allows you to manipulate the signal with a ring that’s wired to the pedal. But I haven’t used it yet – the Hot Hand-less configuration has just worked for me.
There are only a couple of things that really irked me about the pedal. The first, and this goes for all Soundblox pedals in general is its large footprint. For me to use it at gigs with my pedal board, I’ve had to remove my wah pedal. It’s 7″ long, for goodness’ sake! Plus the plastic enclosure makes me a little nervous. I gig a lot, and I’m not sure just how well this would hold up getting banged around in my car.
But despite those little annoyances, I still dig the pedal – A LOT. For one, it’s insanely priced at around $120 street. Plus, it’s dead quiet on or off due to the analog true bypass switch, which is a great feature for a lower-price-point pedal.
How It Sounds
Of course, its sound is what sold me. But it’s even more than that because the pedal also reacts to input gain. So in addition to getting the 21 different voicings, by adjusting your input volume and pick attack, you can affect the tone of the pedal. I’ve literally spent hours playing around with this pedal, and every time I play it, I discover something new. Love it!
The following clips were all played with my Fender American Deluxe Strat into my trusty Roland Cube 60, set to a clean “Blackface” setting. I didn’t want to color the tone with any kind of drive or distortion. Note that I don’t remember any of the settings that I used on the pedal. In fact, when I recorded these, I just set the pedal to what I though would sound good, then hit “record.” 🙂
First off, is a little ditty that I put together with a clean rhythm track, and doing a lead over it.
Second is another lead track, but I added in some reverb and delay to give the tone some space.
Next, it’s just my guitar and the pedal. The first part of the clip demonstrates the pedal’s response to pick attack. Then I just play a random lead and some fast funk chords.
Finally, I set the pedal to extremes. I was after the most raunchy tone that the pedal can produce without going over the top (which it can), and this is the result:
Overall Impression
This is a fantastic pedal! Even with the misgivings I have with its size and construction, there’s no denying that the tone it produces really moves me.
Summary: This amp is a classic and loved the world over for its great sound.
Pros: Great acoustic sound, but it’s versatile enough to use as a clean amp for solid-body guitars.
Cons: This is a nit: It’s heavy at 50lbs.
Features:
120 Watts
Speakers: 200 Watt 12″ and a 25 Watt high-freq tweeter
Instrument Input Jack
Stereo Input Jack
Tuner Out Jack
Balanced Mic Input Jack
Gain Controls with LED Overload Indicator and Pull Phase
Aural Enhancer Control (Channel 1)
Two independent channels
Two independent effects loops with independent effects blend knobs for each channel
On-board reverb – it’s nice and subtle
Price: ~$300 – $600 Street (if you can find one)
Tone Bone Score: 5.0 ~ I’ve used this amp in a variety of settings, and with a variety of guitars, and it has NEVER let me down. The sound is rich and full, no matter what guitar you put in front of it, but it doesn’t take away from the natural tone of the guitar.
My first exposure to the California Blonde was through a church bandmate who would use it for our services. My initial impressions of the amp were NOT good, mainly because this guy just doesn’t take care of his gear. The knobs were scratchy and the jacks were loose and would occasionally crackle. But one thing was for sure: When he had it working, it had a great tone. I was always impressed by the sound of that amp, and REALLY impressed by its ability to project – it is a LOUD amp.
SWR now has a second edition of this amp, and the original is no longer available, but I got mine through my friend Jeff Aragaki of Aracom Amps who acquired one from an estate sale. He had a bunch of gear to sell, and one of the items was this classic California Blonde.
I wasn’t planning on getting an amp at the sale. I just wanted one of the many guitars he had, and ended up getting my gorgeous Strat. But just for shits and giggles, I checked out the amps. The ‘blonde immediately caught my eye (blondes have a way of doing that to me 🙂 ), so I asked Jeff if we could hook it up. Luckily I had my acoustic in the back of my SUV so I could give the amp a proper test. So we hooked it up, powered it on, I strummed a chord, turned to Jeff and said, “I’ll get this too…” I did play through it for about 15 more minutes to really go through its controls, but from having to adjust my buddy’s ‘blonde in the past, I was pretty familiar with the amp.
Since I purchased it, I’ve used it with my acoustics, as a clean amp for my Strat (and using a distortion pedal with it – it rocks), and just last night, I used it for its intended purpose: as my guitar amp for my outdoor gig, using my Gretsch Electromatic. As I mentioned above, no matter what I’ve thrown in front of it, this amp has delivered the goods.
Fit and Finish
Despite the amp being several years old, it has withstood the test of time. That’s a testament to how solidly built this amp is. Even my buddy’s amp – despite being mishandled – was still rock solid. My amp was and is in absolutely pristine condition. This thing is built like a tank. The enclosure, though made with a combination of plywood and particle board is THICK. Chrome-plated corner protectors adorn all the corners (this amp was made for gigging). No stray joints here folks, the build quality is fantastic.
The tilted control panel is an absolutely nice and convenient touch, allowing for quick access to the knobs. This is much better than the Genz-Benz Shenandoah 150 upright that I’ve played that has a flush control panel. Makes it hard to adjust. The metal speaker grille on the ‘blonde demonstrates again that this amp was meant to be gigged.
The only nit that I have with the amp is that at 50 lbs, it’s really heavy. But that’s understandable and forgivable considering the thick wood of the cabinet and the magnet of the 200 Watt speaker, which must be pretty big (I haven’t taken off the back panel). I’ll trade weight for ruggedness any day; besides, that’s what hand carts are for! 🙂
How It Sounds
The California Blonde has a rich, deep tone, but as I mentioned above, it doesn’t take away from the natural tone of the guitar. And though I mentioned that the amp is loud, the cabinet really disperses sound at a wide angle, creating a three-dimensional effect that makes the sound seem to float in the air.
I used it outdoors at my gig yesterday, and it was fantastic! I ran chorus, delay and reverb through the loop, and I have to say that the effects blend knob is a god-send, allowing me to mix as much or as little of my board signal into the dry signal. Because of how the amp disperses sound, I used very little reverb, and many times just had it off. For ambient tones, I used my MXR Carbon Copy delay set to a mild slap-back. That seemed to work best with the amp.
The tweeter’s effect is subtle, but a very nice addition indeed, as it provides just a touch of shimmer to the tone. I tried the amp with the tweeter switched off, and just turned it back on because I wanted the shimmer. With a Strat, the tweeter is a necessity in my opinion.
Last night, I started out running my guitar signal only through the amp, but then later added some signal into my Fishman SA220 PA so I could get even better sound dispersal. The line out is great on this amp, and reproduces the signal very true to the original. In fact, when I’ve used this amp at church, we run it right into the board, and the sound is very nicely balanced.
Overall Impression
This amp is a workhorse. I really couldn’t be happier with this amp. It totally delivers the goods for me!
Summary: Others boast transparency, but the Paul Cochrane Timmy overdrive is one of the very few transparent overdrives I’ve ever used, and to me it is the best OD I’ve ever owned!
Pros: Super-simple to dial in a great tone for the guitar you’re using. Bass and Treble cut knobs make all the difference in the world with respect to dialing in your tone!
Cons: None.
Features:
Separate Bass (pre-distortion) and Treble (post-distortion) cut dials
Gain knob to control amount of clipping
Volume/Boost to control output gain
Three-way clipping switch to choose between two types of symmetrical clipping (up, middle) and asymmetrical clipping (down)
Price: $129 direct (twice as much on ebay if you don’t want to wait 6 months)
Tone Bone Score: 5.0 ~ I’ve only played with this for a little over an hour this evening, and already I’m in love with this OD pedal! You know me, I love OD pedals, but this one was well worth the wait. I can confidently say that this will NEVER leave my board.
Like many, I had heard of the Tim and Timmy pedals from Paul Cochrane, but I had never played one. I had only heard accounts online, then heard one in action at a concert. After speaking with the guitarist (Dylan Brock of Luce), and hearing him rave about the pedal, I finally got around to ordering one from Paul Cochrane back in October 2010. I finally got the pedal today, and it is hands-down the best damn overdrive pedal I’ve ever played in my life – and I’ve played a lot of them.
I now have only two overdrive pedals on my board: My trusty Tone Freak Effects Abunai 2, and now, my Timmy pedal. They will never leave my board. The Abunai 2 is much more of a distortion pedal than an overdrive and I love the color and compression it adds to my signal. The Timmy, on the other hand, is truly transparent. It takes your tone and give you more of it. And while other pedals will give you a midrange hump or scoop your tone, the Timmy lets you dial in (actually cut out) the amount of bass or treble you want in your signal.
Volume and Gain are pretty standard, so no need to go into those features. What makes this pedal special are the EQ knobs. Both are cut knobs. Fully counter-clockwise, they let in all the bass or treble. As you turn the knobs clockwise, they cut out. It’s a little backwards, but it makes sense once you start messing with the pedals. Paul says he made these like that because of the taper of the pots and doing it in reverse avoided dead spots.
The bass knob functions pre-distortion or before the clipping circuit. Other pedals dial out bass at a fixed level to avoid the bass being too muddy. The Timmy allows you to dial in as much or as little bass as you want. The treble knob functions post-distortion. Again, other pedals have treble set at a fixed point after the circuit to avoid fuzziness. The Timmy lets you dial in as much or as little as you want. The net result is a finer level of EQ control than I’ve ever experienced with an OD pedal, and those two knobs make that pedal very special for me.
I thought I was done with Overdrive pedals…
I actually thought I was done with Overdrive pedals for the most part, and instead started relying on my clean boost and occasionally would fire up my Abunai 2 to add some color and compression to my tone. But that all changed when I got my latest Strat. Even though the Kinman pickups and the X-Bridge pickups have more gain than stock Strat pickups, even cranked, they don’t have enough gain to get my vintage Plexi-style amps into their sweet spot – even with the amp cranked. For instance, I had to use my clean boost and/or my Abunai 2 this past weekend to push my amp into its sweet spot.
The clean boost works great in giving me the gain I need, but it doesn’t give me much sustain. The Abunai 2 gives me sustain, but it colors my tone and adds compression (I like that only for certain situations). Enter the Timmy. With the Timmy, I can get the gain boost I need to push my amp into its sweet spot, and with its clipping circuit, I can get a bit of sustain – but without the compression, which is HUGE for me. Mind you, this is all for a Strat. It’s a completely different story with my Les Pauls, as they have plenty of gain on tap, and have LOTS more natural sustain than a Strat. With a Strat, you always need some help. It’s not a bad thing, it’s just it is what it is.
With the Timmy, I think I’m now all set for OD pedals for awhile. Notice I didn’t say I was done… 🙂
I know, I normally do some description of how it looks and how it’s built, but suffice it to say that the pedal’s built solidly, and the purple finish is cool. ‘Nuff said. It’s how it sounds that is important.
How it sounds…
As Paul explained to me six months ago, the Tim and Timmy were designed to be transparent overdrives; that is, they take your tone and give you more of it. Though the signal path does include a clipping circuit, unlike other OD pedals, the Tim/Timmy circuit doesn’t add any color. In any case, here are a couple of clips.
In both clips, I have my Aracom VRX22 set up in its drive channel with the master and and volume knobs set to about 1pm each. With a Les Paul, cranked up in its bridge pickup, this will give me a sweet overdrive tone with lots of harmonics. With a Strat, these gain positions set it at the edge of breakup, and I have to really dig in to get distortion out of the amp.
The first clip is just a raw recording switching between just the Strat cranked up in its bridge position, then playing the same thing with the Timmy engaged. I did add a bit of extra volume to the Timmy so I could make sure that the amp got pushed into its sweet spot. Give it a listen:
The next clip is a re-recording of the song that I used for my Strat review. This time, I play the first part with the raw Strat, then in the second part add the Timmy to finish the song:
Overall Impression
In my mind, there’s nothing not to like about the Timmy. When Dylan Brock said to me, “Man, I just love my Timmy pedal,” I really couldn’t understand what he was talking about at the time. I now understand, and I mentioned above, the Timmy will never leave my board.


