 |
Fulltone Mini Deja Vibe
Summary: Fulltone makes some of the best pedals in the world, hands-down. You pay for the quality, but you’ll almost never walk away disappointed for the coin you have to pay for a Fulltone pedal. The Mini Deja Vibe is a great take on the original UniVibe, and faithfully reproduces the old ‘Vibe sound. Pros: Fulltone quality, and pure ‘Vibe sound. Chorus setting is intense and sweeping, and mixed with reverb and just a little breakup, you can easily get that Hendrix and Trower sound. Vintage/Modern switch provides great versatility. Cons: Pricey for what you get. Vibrato is too subtle and intensity knob belies the narrow range of intensity this pedal should be capable of – at least for me. Price: $249 Street |
 |
Voodoo Lab Micro Vibe
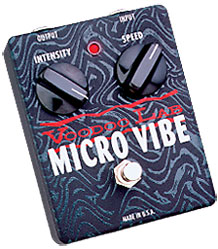
Summary: The MicroVibe does one thing and one thing only, reproducing the orignal UniVibe sound quite faithfully. A bit darker in presentation than the MicroVibe (think David Gilmore). Pros: Super simple to dial in a great tone, plus awesome value for the tone that this box produces. Cons: None Price: $149 Street |
With some of the songs I’ve written, chorus just doesn’t seem to be enough, so I’ve been looking at going the “vibe” route to get a more psychedelic sound. Over the past few days, I’ve listened to sound clips and read reviews, and narrowed my search down to two ‘vibes that I’m considering: The Fulltone Mini Deja Vibe, and the Voodoo Lab Micro Vibe. Both pedals’ manufacturers claim to faithfully reproduce the original UniVibe circuitry. And, at least to my ears, both do a great job. I recently had the chance to A/B boxes at the same time.
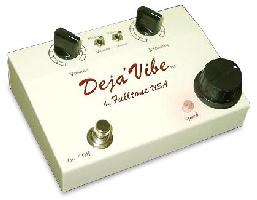 Fulltone Mini Deja Vibe
The “Mini” is a stomp box take on Fulltone Deja 2 pedal, with the same circuitry as its expression pedal counterpart. It has three knobs for Volume, Intensity, and Speed, plus two toggles: One to switch between a Modern and Vintage sound and the other to switch between Vibrato and Chorus. In general, I dig Fulltone pedals, and in general, I’ve been really blown away by the tones they can produce. So I was a bit surprised that this particular pedal just didn’t have that kind of impact on me. Mind you, the tone’s incredible, but to my ears, not spectacular – at least not enough to justify the $249 price tag. No doubt that it does psychedelic really well. On the “chorus” setting in the vintage mode, the tone was spectacular. But on the vibrato effect in either modern or vintage mode, was so subtle as to be practically undetectable. It’s there, you notice it, but there’s just not much to it.
I suppose it could be argued that you’re getting this for the chorus mode, which is what the ‘Vibe is all about. But I have a problem with expensive toys that have features that are practically insignificant. Mind you, I didn’t have the expectation that the vibrato should be more like a tremolo. But my expectation was that it would be quite a bit more profound. So combine with the high price, the Mini Deja Vibe gets 4 Tone Bones.
 Voodoo Lab Micro Vibe
By comparison, the Micro Vibe is a lesson in simplicity. It does one thing and one thing only: It creates that sweet, Vibe tone. As with the Mini Deja Vibe, Voodoo Lab claims to faithfully reproduce the circuit of the original UniVibe, and like the Mini, it does it very well, though with just tad bit darker shading. But it wasn’t so dark that a little EQ adjustment couldn’t make it ring sweetly.
With just two knobs for Intensity and Speed, it’s very easy to dial in the right tone to fit your needs. I was really impressed with this pedal. It sounded great, it was very quiet, and I had a ball playing with different knob positions. I don’t know if it could’ve helped to have a volume knob like the Mini Deja Vibe, I certainly didn’t miss it. On top of all this, the pedal has true bypass switching. All these features together, plus the nice price of $149 gets the Voodoo Lab Micro Vibe 5 Tone Bones.
Now I know there are going to be some purists out there who will probably think I’m crazy for choosing the Micro over the Mini. But like I said, the Mini doesn’t sound bad at all. In fact, tone-wise in Chorus mode, the sound was spectacular. But if I could get what I was looking for in a smaller and less expensive pedal, and all I have to do is EQ a bit to make it sound a little brighter, the Micro Vibe makes so much more sense to me.
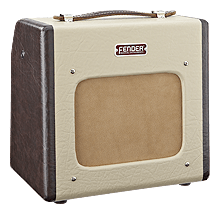 You really don’t get a taste for how well gear actually performs until you use it in a performance or recording situation. After all, doing tests is one thing; mixing it up in a band or recording a track with it are entirely different animals. This past weekend, I had the chance to put my new Champ 600 through its paces in both a recording and performance situations. Before I go into specific details, let me just sum up for those who don’t want to read on: In my book, for what the Fender Champion 600 has to offer, it is an absolute champ! Don’t let the diminutive size fool you. Even in stock livery, the Champion 600 produces beautiful tone; that is, it produces the natural tone of your guitar. As long as you don’t expect it to be more than what it is and what it offers, this little amp will make you very happy! I’m very tickled by this amp and the experience I just had with it.


 I’m at once sad and amazed right now. Sad because I’m retiring my TS-808 Tube Screamer (sort of – I’ll get into that later), but amazed that I actually replaced it with a $50 pedal, the
  One of my first posts on GuitarGear.org was entitled, “
