Feeds:
Posts
Comments

Archive for the ‘guitar gear’ Category

Customer Service Cartoon

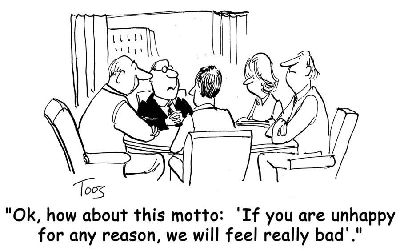
If you’re like me, you dread calling up any company’s customer service center. Nowadays you never know if the person on the other end of the line is even in the same country as you. But when customer service is good; that is, the rep listens attentively to your problem, and can offer a solution, or short of that, does his or her best to solve your problem, you come away feeling good. Perhaps more importantly, the “feel-good” image you get about the company will most likely make you a repeat customer.

About a week ago, I called up the Jim Dunlop company in search of some parts. I stupidly misplaced the extra wires that came with my Dunlop DC-Brick, and needed to get replacements (and some extras just in case). I got routed to a tech support guy who helped me get the right part numbers, and he transferred me to a sales rep who promptly took my order – all in the space of about 3 minutes. Very quick, very efficient. I was impressed.

A couple of days ago, the wires arrived. I excitedly opened the box, and my heart sank as I realized that they were the wrong wires! I didn’t get mad mainly because I thought that I might have not provided a good enough description for the tech to get the right part. But I resolved to call the company and make a new order for the right wires.

I called them up yesterday, and mentioned to the tech that I probably ordered the wrong wires, and said, “What I need are the wires with the 1/8″ male on one end, and the center-negative female on the other. The part number for the ones I ordered were […].” The tech replied, “Hmmm…. that’s actually part number for those wires, but you got 1/8″ males on both ends. Our mistake. In that case, I’m going to take your information down right now and we’ll ship you 4 of the correct parts free of charge.”

Wow! I was so impressed with that level of customer service that I offered to pay the shipping, but he insisted that since it was Dunlop’s mistake, they needed to rectify the situation. Now that’s great customer service, and even though I hadn’t been a Dunlop customer prior to this, they’ve moved to the top of my list for companies that I know will provide great customer service should I have a problem.

Customer care is important, folks. Since I’ve become a real gear addict, it is one of the things that I consider before purchasing anything. Especially if I’m going to buy something that’s expensive, I call up a company’s customer service to ask questions and see how they respond. If I don’t feel comfortable with their customer care, I don’t feel as comfortable with buying the gear. Take, for instance, this review about the PRS DGT. A reader, Jimi Ray Clapton, had been waiting 9 months for his new DGT, and it still hadn’t come. He even spoke to PRS himself at a show with no results. Every time he called, there were further delays with very little action or follow-up. Consider that if you spend a few thousand dollars on a piece of gear, you want some attentive customer service! I would at least…

I know it’s a bit of a pain, but do yourself a favor and include customer service as part of your buying decision. You’ll want to know that the company you’re dealing with is going to be responsive to your needs.

Read Full Post »

5 Tone Bones - Gear has stellar performance, value, and quality. This is definitely top of the class, best of breed, and it’s a no-brainer to add this to your gear lineup! Voodoo Lab Micro Vibe

Summary: Looking for that vibey sound? Look no further. The Micro Vibe serves up a range of vibe tone from chimey chorus to thick, soupy psychedelic in nice compact stomp box.

Pros: Incredibly versatile vibe that has multiple personalities depending upon where you set the knobs.

Cons: A little tricky to set up in your chain, and can be finicky with overdrive pedals, and can make your low-end really boomy (not hard to overcome, though).

Price: $149 Street

I wrote a comparison review between the Micro Vibe and the Fulltone Mini Deja Vibe, two excellent ‘vibe pedals out on the market, but since I recently purchased the Micro Vibe, I thought I’d do a full review because my original evaluation was done in a more controlled environment A/B’ing the two pedals.

First off, this pedal is extremely easy to use. Two knobs control intensity and speed, and toggle switch turns the unit on and off. This pedal is true-bypass as well, so when it’s off, it’s really off – very nice to find in a relatively affordable pedal. To get that psychedelic sound, you set intensity about 4 or 5 o’clock, and the speed anywhere between 11 and 2 o’clock. For a more chorus-like effect, I set both Intensity at 12 o’clock and speed at about 1 o’clock. I’m still playing with it, but so far, so good!

Like the Fulltone, the Micro Vibe boasts a faithful reproduction of the original UniVibe’s circuitry. I’m not much of an electrical guy, so I’ll take their word for it. However, in the previous comparison review, I mentioned that the Micro Vibe has a slightly darker tone than the Mini Deja. To me, it has a rich tone that really brings out the lows – though I found through my latest experimentation that you really have to be careful about your EQ. Too much low-end, and you’ll get a really muddy sound. I found that with both the Mini Deja and the Micro Vibe, but a bit more so with the Micro Vibe. It wasn’t too hard to overcome with a little EQ adjustment, though, so that was just a minor problem. All in all though, the two pedals sounded very similar, giving off that ‘vibe sound that I just love.

What the Fulltone has over the Micro Vibe is a Vibrato mode, that gives you the pulse from the photoresistor without the phase effect. It also costs almost twice as much. For me, I wanted a dedicated ‘vibe pedal with no other accoutrements, and the Micro Vibe serves that up just fine!

One thing that I found really nice with the Micro Vibe was how the pedal’s intensity responded to the input gain from my guitar. Higher gain produced higher levels of intensity. That’s very cool because it’s possible to dial back the intensity of the effect from your guitar.

In any case, here are a couple of sound clips I recorded to demonstrate a bit of the Micro Vibe’s capabilities:

TS-808 plus Micro Vibe:

Micro Vibe with a bit of reverb:

Both clips were played with my Strat and output through a Fender Champion 600.

I did find it a bit challenging placing the Micro Vibe in my signal chain. Placed before my overdrive pedals, it was pretty tough to control, and the resultant pulsing drive wasn’t too pleasing to the ear – though it was correctable with some minor tweaks to the OD pedals. I found that it worked the best (at least so far) at the end of my chain, right before my BBE Sonic Maximizer. It’ll stay there for awhile, then I’ll switch its position to see how it compares.

Here’s an interesting thing that I found that I forgot to mention: The Micro Vibe sounds absolutely horrid with a Fulltone OCD. I really wasn’t expecting that. It probably could be the chip that’s used in the OCD. Whether I put the Micro Vibe in front of the OCD, or after it didn’t matter. The combination was UGLY! But it sounds awesome with Tube Screamer-type pedals like my TS-808 and Bad Monkey.

In conclusion, if you’re looking for that vibey sound, the Voodoo Lab Micro Vibe delivers that in spades, and at a very affordable price!

Read Full Post »

About a month ago, a friend of mine asked me to update his web site with some minor text changes, and to help him drive more traffic to it. As I’ve been doing web development professionally for the last ten years, it was natural for him to ask me, and since he’s like an older brother to me, how could I refuse to do it? I finished the task in an evening, and didn’t think once about getting paid for the job. But his wife insisted that they pay me because my work helped produce income from their site.

But in lieu of them writing me a check for my services, I suggested that they order some gear for me and have it shipped to my house. So, I pointed them to the Voodoo Lab Micro Vibe pedal that I’ve been wanting, and it should arrive within the week!

So if you don’t have the clams to buy gear, see if you can trade services with people to get some gear that you’d like!

Is it realistic? Sure it is. I bartered building a web site for my architect for a lower architectural fee when we were rebuilding our house. I also built a web site for our contractor in exchange for his labor in laying our hardwood floors. Bartering works.

Read Full Post »

dear01_stompbox.jpgI walked into my garage this morning, which also doubles as my home studio and I looked around and saw several items that I’m not using at all right now. This includes a couple of solid state amps, a few pedals, and a sweet, digital recording workstation that I inherited from my brother that I never use because GarageBand is so much easier. My wife is great about all this, but she recently told me I have to do some spring cleaning. “Look at the big amp,” she said, “You haven’t gigged with that in a couple of years, and I haven’t seen you record with it either. Maybe you ought to get rid of some stuff… Besides, you need to make room for the shelving I want to put in here this spring”

Yikes! Looks like I have to take an inventory of what I can part with, but there is a rub to this. My friend Phil of Phil ‘n the Blanks said to me last week, “Don’t try to hide it, you’ve got GAS. I read your site all the time, and I’m amazed at all the s&*t you buy. Besides, if you get rid of some stuff, you’ll just replace it with other stuff…” OMG!!! How true. I found a place nearby that trades good-condition used gear for store credit. Damn! And on top of that, they’re a G & L guitar dealer! Maybe if I sell enough stuff…

The point? Sure, we gearheads go through periods of spring cleaning, but it’s more like gear rotation, as we rotate in new stuff for the stuff we no longer use.

Why not share your “spring cleaning” story?

Read Full Post »

Fender Champion 600 Re-issue
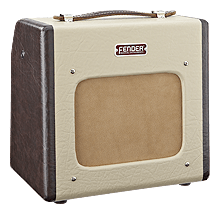
You really don’t get a taste for how well gear actually performs until you use it in a performance or recording situation. After all, doing tests is one thing; mixing it up in a band or recording a track with it are entirely different animals. This past weekend, I had the chance to put my new Champ 600 through its paces in both a recording and performance situations. Before I go into specific details, let me just sum up for those who don’t want to read on: In my book, for what the Fender Champion 600 has to offer, it is an absolute champ! Don’t let the diminutive size fool you. Even in stock livery, the Champion 600 produces beautiful tone; that is, it produces the natural tone of your guitar. As long as you don’t expect it to be more than what it is and what it offers, this little amp will make you very happy! I’m very tickled by this amp and the experience I just had with it.

Let’s dive into how I actually used it, shall we?

Into the Studio

As some of you may know, I have a home studio, and if you’ve read my past articles, I’ve written several articles centering on gear that could be used in low-volume/small venue applications. I purchased the Champ specifically for this purpose. From the standpoint of volume, the Champ is a dream come true! It’s quiet when idle (some people have mentioned that it hums and cracks – thank goodness I didn’t get one of those), and amazingly enough, it’s a very expressive amp, despite its tiny six-inch speaker. With the single knob to control volume, this amp is meant to produce the natural tonal character of whatever guitar is plugged into it, and it does this incredibly well. But because it has zero bells and whistles such as reverb and EQ, those are things you have to provide, but it takes to pedals quite nicely.

Obviously because of its small size, there are some limitations. You lose a lot of the bottom end you’d normally get from a larger speaker in a bigger cabinet. But if you’re looking to record a high-midrange, ringy tone, the Champ performs like an ace in this range! The tone is gorgeous! Which actually puzzled me when I recorded with it this weekend because I read several reviews where people swapped out the stock speaker because they felt it was too flat. I recorded with it and absolutely loved the tone it produced – and the speaker’s not even broken in yet! Maybe my ears just aren’t as sensitive (which is a huge possibility) as the other reviewers…

Now addressing the lack of bottom end in the Champ, I decided to drive my Hot Rod’s speaker with it, using an extension cord. This is where the amp really shined, in my opinion. You still get the ringy tone, but with a larger speaker, the tone is oh so very rich.

Click here to listen to the song I recorded using just the Champ with three different guitars:

  • Gibson ES-335: I used this for the main rhythm track using the stock amp with the little 6″ speaker. For effects I added a smidgen of reverb, and layered chorus on top of that. The result was a gorgeous ringing tone!
  • Fender Strat with ’57 Tex-Mex Reissue pickups – This provided the second rhythm track with mild distortion. For this track, I drove my Hot Rod’s cab with the Champ. To fatten out the tone a bit, I employed about a 2.5 to 1 compression. Because my Strat doesn’t have a lot of natural overdrive, I added just a touch of drive using a combination of my TS-808 and OCD pedals, both set to very low drive levels.
  • Epiphone ’58 Korina Explorer Reissue – Again, I used my Hot Rod’s speaker cab. But there’s so much natural drive and sustain with this guitar, that I didn’t have to use ANY effects with it. This added the extra kick in the chorus of the song.

Of course, no sound engineer – amateur or pro – would be worth their salt without some mastering tricks. But truth be told, the ONLY thing I did with the guitar tracks on the song was to adjust their volume levels, and add just a touch of reverb (about 7%) to the Strat track. That’s it! I’m very pleased.

Live Performance

As a test, I brought the Champ to play at my weekly Church service. I figured that I mic my amps anyway, so it would be a great test to see how it performed. In this venue, I’m not worried about cutting through the mix – just having enough volume so I can hear it. Since we employ active mixing, our sound guy knows to pump up my house volume when I do leads or play the main rhythm parts for a song. So how did it perform? Well… a lot better than I expected, but I did miss the bottom end in my output signal. It wasn’t that I was dissatisfied, but in a performance situation, this amp will sound A LOT better driving a large speaker in a bigger cab. Other than that, I was generally pleased with how it sounded.

So to sum it all up, the Champ is a dream in the studio, and with the help of an extension cab, will perform great in small-venue/low-volume performance situations.

Read Full Post »

Vacuum tubes @ thetubestore. New and NOS electron tubes for any amplifier.

Want to replace tubes in your amp? Look no further. The Tube Store is THE place to go for tubes. They have great prices, and more importantly, have tons and tons of knowledge about tubes. What’s even more amazing is they also know how a particular tube will sound in a lot of different amps. I’ve purchased tubes from these guys twice so far. Being a bit dense as far as tubes and electronics goes, I need a lot of help in choosing what to buy, and I’ve called them directly. In both cases, they’ve take a lot of time to explain and educate me on how a particular tube or combination of tubes will sound in my amp. We’re talkin’ old skool customer service here, folks! So with their permission, I’m giving them a plug here GuitarGear.org, and will also be displaying their logo on the site!

Great service needs to recognized!

Read Full Post »

4 Tone Bones - Excellent gear, that exceeds expectations of its performance, value, and quality. Strongly consider purchasing this. Fender® Champion 600

Price: $149 (street)

Summary: Great tone can come in small packages, and the Fender Champ is a great example of this. Simple and straight-forward, it’s easy to use, and even easier on the pocketbook. Not really meant to be used as something you’d gig with (though you could easily add an extension cabinet), it’s a great amp for practicing and for the home studio recording artist looking for a low-wattage solution.

Pros: Vintage looks and great sound and quality for a small price.

Cons: You sacrifice a bit of low-end for the diminutive size.

Fender Champion 600 Re-issue

Recording in a home studio presents various challenges to the DIY recording artist. But no other challenge is greater than controlling the output volume of amps, especially if you want to push them into breakup. To get even a small amount of breakup, you’ve got to increase gain to push the pre-amp and/or power tubes; and invariably, this is accompanied by a boost in output volume. There are various ways to deal with this from creating amp enclosures to using attenuators or even installing tube adapters to use lower wattage output tubes, and they all work reasonably well. Another approach is to simply get a smaller wattage amp in the 5 – 15 Watt category. Most have much smaller speakers than their larger counterparts, so their output volume is naturally lower, plus with the smaller wattage, it’s easier to overdrive them at lower volumes, thus producing breakup without shaking tiles loose.

Among the 5 Watt amps available, the two seemingly most-popular amps are the Fender® Champion 600 and the Epiphone Valve Junior Combo. I recently had the chance to try out the Champ.

Vintage Roots, Great Sound: Bargain Price

First of all, let’s be real honest: The Champ is a $200 amp, sporting a single volume knob and a standby switch. That’s it. This is not an amp that you compare to a boutique amp in any respect, so don’t try to compare it to something like a Carr mini-Mercury – they’re in two completely different classes! A re-issue of the original 1950 Fender Champion, it employs modern mass-production techniques as opposed to the hand-wired, point-to-point construction from which most boutique amps are built. But for what you pay for this amp, and for the quality of sound that it produces, you just can’t go wrong. Bear in mind that the Champ is a no-frills amp whose sole purpose in life is to amplify the natural sound of your guitar. It’s not meant for gigging with a full band. On the other hand, it creates really nice tone (albeit with a little loss of the bottom-end). As long as you don’t try think of this amp as any more than what it is, it’ll make you pretty happy.

Looks

This is a very retro-looking amp, with the original two-tone brown on beige tolex design. It actually looks like a mini television! and the leather handle is a real nice touch – though I’d be careful not to strain the handle too much… It’s a little weird to see a single volume knob, but that just tells you that this is a no-frills amp, as I mentioned before.

Sound Quality

I’ve already mentioned that the Champ produces really nice tone, and even though I missed the bottom-end that you’d get with a larger speaker, the quality of the sound that it does produce is stellar. Besides, in a recording application, you can always tweak the bottom-end a bit with EQ, but I digress. I tested the Champ out with a G & L Comanche, a Strat, and a Les Paul Standard. As expected, the amp reacted very differently with each of the different guitars, but surprisingly, it retained the character of each guitar, which I thought might be lost because of its diminutive size. The Strat played clean and smooth, and position 4 (center/bridge) was twangy and ringy as expected. What surprised me even more was with the Strat, I couldn’t get the amp to break-up until I cranked the volume past 9 (it goes up to 12). There’s lots and lots of clean headroom with single coils, so if you want to get break-up, you’d be best served using an overdrive pedal of sorts.

It was far easier to get amp to break up with the Comanche and Les Paul, as expected. It was a bit more difficult with the Comanche as it uses the hybrid Z-coil pickups, but it was still easier to get breakup than with he Strat. The LP broke up nicely with volume at about halfway, and the volume knobs pegged.

From a distortion standpoint, the Champ produces distortion similar to a Fender Deluxe. It’s not creamy smooth, but it’s also not too gritty – though it does get really ugly at high volumes – probably due to speaker distortion, which is never nice. But dialed in just right, the Champ produces really subtle breakup which is very ringy and pleasant.

Being that you can’t really do much tone shaping with the amp itself, it’s up to you to throw whatever boxes you need to achieve the tone you’re after. But that shouldn’t be too much of a problem for most folks. Besides, in lots of cases, you may not want to put any boxes in your signal chain before this amp. Here’s a decent-sounding YouTube video that demonstrates how the Champ sounds. I think you’ll be surprised:

Value

For the money, it’s hard to go wrong with the Fender Champion 600. A cheaper alternative would be the Epiphone Valve Junior which costs only $129.00 for the head. I’ll be writing a review for that as well in the very near future, but if you’re looking for that nice, Fender clean tone in a low-wattage application, but don’t want to shell out several hundred dollars for even a small deluxe, the Champ is a great way to go!

Update: As you can see at the top, the price listed is $149. Fender dropped the price after I wrote the article. Of course, I paid the original $200+ for the damn amp, but there you have it…

Read Full Post »

pearl3.jpg

Read an interesting article by GuitarFlame (www.guitarflame.com) called: The science of playing the acoustic guitar where he talked about a very good shredder who picked up an acoustic guitar, and sounded… bad. That made me giggle a bit because I’ve seen the same thing with a lot of shredders. They sound horrible on acoustic guitars; actually I’ve heard several who sound pretty bad playing clean. As GuitarFlame put it, there’s more than meets the eye to playing acoustic. That’s certainly true, but I think it’s even more than that. I think a lot guitarists forget that 90% of their tone comes from their hands. Lots of guitarists, especially young ones, think it’s all in the equipment, but it’s not. Yes, equipment has a lot to do with the quality of the sound that you produce, but your hands and fingers are responsible for making the sound, and thus giving you your tone. How you articulate your fretting hand, where you pick, palm muting, finger picking, all these in their various combinations produce different tones. Pick closer to the bridge, and you get a tinny, chimey tone; closer to the neck and you get a fatter tone because of the larger amplitude of the string vibrations.

I’ve discussed at length with a close friend about this very topic – several times. He’s got the money to buy gear any time. And while he sounds a little better each time he buys a new guitar or amp, it’s only his sound quality that improves. I finally challenged him after this last round of acquisitions to not buy more equipment and work on his tone. I told him that the cheapest way to start sounding better is to simply… practice. Developing tone is free – you just need to take the time to do it.

Read Full Post »

G & L Guitars Comanche Solid Body

Review Setup: Solid Swamp Ash Body, Hard Rock Maple Neck with Rosewood fretboard. Z-coil pickups.

Price as configured: $1700.00 (custom setups available)

Summary: I give this 4.5 Tone Bones! The G&L Comanche is an excellent, hand-made, versatile guitar from the shop Leo Fender and George Fullerton started after Leo sold the Fender company. Incredible playability, and sweet, sweet sound from the Z-coil humbuckers. Not only that, with the flick of a mini-switch, you can engage all three pickups at once for a truly aggressive sound. This is a guitar that is not for the faint of heart. It wants to be played, not babied. Read on!

G&L Guitars Comanche

I love writing this blog because it forces me to check out gear that I wouldn’t otherwise take a second glance at, and sometimes make new discoveries of gear that I didn’t even know existed. This entry is the result of one of those chance discoveries.

I thought I knew my guitar builders beyond the mainstream and semi-mainstream such as Gibson, Fender, PRS, etc. So it came as a HUGE surprise to walk into a small shop in Sacramento yesterday and see what looked like Stratocaster and Telecaster knock-offs hanging on the walls, only to be informed by the shop owner that the guitars were made by the prototype shop that George Fullerton and Leo Fender (hence, G & L) started after Leo sold the Fender company. Building on the traditional Fender body shapes, their creations extend the lines with solid and semi-hollow versions with various pickup configurations that reach far beyond their corporate counterparts. The results are guitars that push the envelope with design and innovation, while retaining the visual pedigree that made George Fullerton and Leo Fender famous in the first place. Also, all G & L’s are hand made. I know that alone may deter some players from even considering this brand, but amazingly enough, they’re not as expensive as you might think; more on that later. I had the chance to play the solid-body Comanche with tobacco sunburst through a ultra-sweet Rivera Venus 3 (I’ll write a review on that later 🙂 ).

At a distance, when you first the see the Comanche, you recognize the familiar body shape and pickup positioning, and you might say, “Hmmm… nice Strat.” Then, as you move forward, you see that the headstock is slightly different from a Strat, the bridge is really different from a Strat. The body is also a little narrower. Then you notice the absolutely weird-shaped pickups. These are an invention of Leo Fender. They’re actually two, hand-wrapped and offset three-string, single coil pickups with reverse polarity to eliminate hum. They’re almost like hybrid humbucker.

Look and Feel

The Comanche I played had a gorgeous tobacco sunburst finish overlaying a swamp ash body, with a hard rock maple neck and a rosewood fretboard. Surprisingly, this wasn’t a light guitar. In fact, it felt a little heavier than my own Strat, but the feel was luscious. The only ding that I gave the Comanche was that the back of the neck is gloss-lacquered. I personally prefer a silk finish, especially with a maple neck. It might be psychological, but that’s what I like. Speaking of the neck, it was a nice, C-shape, and the rosewood fretboard was a dream to play. I’m a big fan of rosewood fretboards. They provide great tactile feel, plus add warmth to the overall tone.

Sound

The best way to describe the tone of the Comanche is “a bit thicker than a Strat, but thinner than a Les Paul.” It’s this balance that is very appealing about this guitar. Just like the body style, with the sound, you recognize the pedigree, but it’s… different. Since I’ve played it , I’ve read some other reviews and most mentioned that the Comanche has an aggressive tone. It does, but that aggressiveness can be easily tempered by dialing back tone and volume controls; plus, tone also depends on the amp you’re using. I happened to test the Comanche out with a Rivera Venus 3, and the tones it produced were sweet and clean, owing a lot to the high amount of clean headroom available in the Venus 3. In typical Class A fashion, increased input gain produced nice pre-amp clipping, and with all three pickups engaged, this guitar could get as dirty as the best of ’em.

Unlike a Strat, the “hybrid” Z-coil pickups add nice amounts of sustain, which is further helped by the resonant swamp ash body. Bends and slow vibrato created nice, subtle overtones. On top of that, the touch sensitivity, even at lower volume levels, was very, very nice. All in all, I didn’t find the Comanche as aggressive as other reviewers found it; certainly more aggressive-sounding than a Strat, but as I mentioned, not as fat as a LP.

Click here to listen to some audio clips.

The audio clips sound really Texas-twangy, which is actually quite cool, but the clips don’t really show what this versatile guitar can do. The Comanche is capable of showing many faces, depending upon how you adjust it.

Playability

As I mentioned above, this baby wants to be played. The action is just right, and the neck is real fast despite the glossy lacquer finish on the back. The rosewood fretboard is especially nice, providing excellent tactile feedback. As I mentioned above, this guitar is not for the faint of heart. It’s meant to be played and coaxed and caressed to produce its wonderful song. While it’s easy to coax incredible tones from this guitar, its versatility might scare away those who won’t take the time to discover all its virtues.

I recommend this guitar for serious tone freaks who are in search of a “fatter” Strat sound, but want to retain that natural high-end ring. While not cheap, it’s also not unreasonable, especially for a completely hand-made instrument!

Read Full Post »

5 Tone Bones - Gear has stellar performance, value, and quality. This is definitely top of the class, best of breed, and it’<p><p>s a no-brainer to add this to your gear lineup! The THD web site says of the Yellow Jackets, “It’s like having a new amp…” and that’s an understatement! Pull your old tubes, pop in the converters, then plug in the EL-84’s and listen to your amp sing! Sometimes great things just come real easy! Read on….

If you follow this blog, you know that I just recently did a write-up of the THD Yellow Jackets. At the time though, they were just on order, and I hadn’t played with them yet. Well, they arrived today, and of course, I just couldn’t wait to get them installed. I opened up the packing box which revealed a little plastic box floating amidst a packing popcorn. I quickly pulled it out, opened up the box, and pulled out the instructions… er… what little of them there were. They basically just said, pull out your old tubes, plug in the converters, then plug in the EL-84 tubes that come with the converters. Turn your amp on, and play. That’s it. It took me all of three minutes to get the converters and new tubes installed.

In nervous anticipation, I plugged my Epi Explorer into my amp and switched it on, strummed a G chord on my clean channel and… No change. Just the same sweet sound produced by my pre-amp tubes. Then I switched to my drive channel and WAS TOTALLY BLOWN AWAY!!! You see, as much as I love my Hot Rod, the drive channel has been somewhat useless for me. Even with new 6L6GC tubes, the clipping was very rough and gritty. It was okay for some songs, but was just not pleasing to me, so I did the next best thing: I bought a couple of overdrive boxes to get that sweet pre-amp distortion.

But with the Yellow Jackets installed, I finally have a useable drive channel! The distortion is smooth, and it seems like the touch sensitivity has increased ten-fold! Not only that, it sounds like the converters introduce a little compression which really helps define the tone, and all this at bedroom levels!Mind you, installing the Yellow Jackets doesn’t reduce your volume (I think I might have mentioned that they do – my bad – they don’t). What they do is get the amp into breakup a lot earlier, so you can slather on the drive and distortion without having to shake the walls of your house! For home studio musicians, and most of us who play in small venues, being able to get great distortion tone at low volumes is akin to searching for the Holy Grail. I’ve tried all sorts of things from upping the input gain on my DAW to using modelers. In either case, the result is less than desirable. But with the Yellow Jackets, I’ve found the elusive grail, and I’m lovin’ it!

As I mentioned in the previous write-up, I ordered the Triode version of the Yellow Jackets. This essentially reduces my output to 5 Watts. Don’t be fooled – my amp’s still freakin’ loud. But what I’ve found in the last couple of hours playing with my three main electrics is that my amp is much more versatile. I can still crank up the volume, but I can get a lot more varied tones at lower volumes, and that is always a good thing.

By the way, you can’t buy the Yellow Jackets from THD directly, but you can get them for a great price at The Tube Store. I got mine for $99.95 (that includes two converters and two EL-84 tubes).

Read Full Post »

« Newer Posts - Older Posts »