 Talk about getting a “clean” tone, and invariably, some Fender amp will be mentioned, especially the models from the 50’s like the Twin. By far, “Fender clean” is the clean tone that has been emulated for decades by amp manufacturers the world over. Unfortunately, if you want that clean tone from the 50’s, you’ll have to get a used Fender amp from a vintage shop – and they’re not cheap. Enter Victoria Amplification. As Mark Baier (owner of Victoria Amps) says on the company site’s “About Us” page:
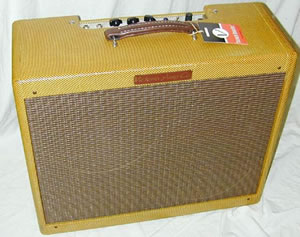
“In 1993, I set out to faithfully recreate the crown jewels among the many classic amplifiers developed by Leo Fender. The tweed amps of the late ’50s defined the sound of rock and blues on vinyl and on stage, but they had also become increasingly scarce, and well beyond the reach of most working musicians.”
And recreate the sounds of those amps he has! So much so, that one might be inclined to say that his amps are even more “Fender than Fender,” as each amp is meticulously hand-wired point-to-point. Most Fender amps today rely significantly on solid state technology, especially for amps in the 40+ Watt range; for instance, using solid-state rectifiers to convert AC-DC current. Granted, solid state rectifiers are considered to be more “reliable” and don’t suffer from voltage sag like a tube rectifier. However, that voltage sag can actually be a real plus when using a tube rectifier as the sag can act like a compressor/sustainer as the voltage builds in the rectifier when you strike a note on your guitar. Thus, amps with tube rectifiers tend to sound “warmer” than their solid-state brethren.
I recently had the chance to plug into a “Double Deluxe,” and I have to say that I am now in love! In testing, I played the Double Deluxe with a Fender Custom Shop ’57 Re-issue Strat (I didn’t have enough time on my lunch break to plug other guitars into it). The first thing I noticed was the touch sensitivity of the amp, even at low volumes. Cranking the volume knob on the guitar produced a singing clean tone, with just the hint of breakup. With my own Fender Hot Rod Deluxe, to achieve this at lower volumes means I have to use a drive pedal. But this little amp, responds well to input gain; I think the tube rectifier has a lot to do with this, though it doesn’t matter. It just sounds great!
The Double Deluxe also responds well to attack. Light finger picking produces beautiful ringing tones, while a heavier, driven attack produces a pleasing, even-toned crunch that is like candy for the ears. Unlike a lot of newer Fender models, the Double Deluxe responded very well to tone settings (there’s just a single knob), which was very impressive, as I could dial in the tone for fatter, thinner, or balanced tone presentation. No matter how you set the tone or attack the guitar, the Double Deluxe retains note definition, and doesn’t muddy up at all.
The 2 – 12″ Jensen P12Q vintage speaker re-issues also have a lot to do with how great this amp sounds. These are generally very warm speakers that don’t squeak with lots of high-frequency harmonics when pushed. Rather, what you get is a very complex sound that you can tweak with the tone knob; and here’s an interesting thing: This amp has no reverb, but you could swear that there’s reverb built in! That’s a testament to the beautiful complexity of sound that this amp generates.
Operating the Double Deluxe is pure simplicity. Plug into one of the inputs (normal or bright – the amp has four inputs so you can jumper between the two “channels;” hence the “Double” in “Double Deluxe”), set the volume according to the input you’re using, then dial in the tone with the single knob. How much easier could it get? You might be thinking that you need individual control over lows, mids, and highs, but this amp just doesn’t need it. Just set the tone knob to what’s pleasing to you and play.
Here are some specs (taken off the web site):
- Completely hand-wired point-to-point
- 5E3-type circuit. Class A cathode bias push-pull operation. (40 Watts by default)
- Tube complement:1-5AR4, 4-6V6GT, 1-12AX7, 1-12AY7
- 2-Jensen P12Q speakers
- Cabinet Dimensions (HxWxD, Inches) 20.5 x 24.5 x 11
- List Price: $2695.00 / ~$1900-2000 (street)
Note that you can swap the 5AR4 rectifier with 5Y3 rectifier to reduce the amp’s output to 30Watts. Very cool.
When I first saw the list price of this amp on the Victoria Amplification web site, I gulped. I thought these amps were accessible. But I looked around, and you can get one for less than 2 grand, so I was calmed immediately. And for the price, what you get is a lot of amp that you can use for all sorts of applications.
Over the past couple of years, I’ve played lots of different amps from big manufacturers to small boutique shops. And among the tweed amps I’ve tested, Victoria Amps Double Deluxe is at the top of my list. If you’ve got a distributor near you, I suggest taking a trip there as soon as you can. You won’t be disappointed!
Read Full Post »
 Okay, yet another product review on a fairly mundane piece of gear, but hey, sometimes you have to be practical!
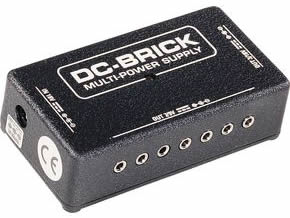 A power supply? I know, kind of mundane, but if you’re still using 9V batteries, you might want to rethink your power supply needs. Here’s a common situation: You’re in the middle of a set, and your beautifully clean tone starts getting kind of fuzzy. It’s not too bad at first, but worsens as the gig progresses. You look down at your effect pedals, and one pedal’s light seems to be a bit dimmer than it normally is. You realize the battery is going dead. So after the song, you go back to your gig bag to get another 9V. You’re shocked to find that you don’t have a spare!
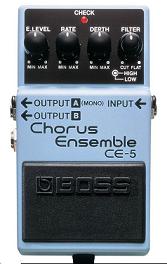 When it comes to chorus sounds, Roland/BOSS is pretty much the standard for the last twenty or so years. The CE-2 has especially been very sought-after used pedal 1) for its simplicity and; 2) for it’s analog design. I owned a CE-2 back in the 80’s, and have since kicked myself since I traded it for other hardware – that I don’t use at all anymore! Since then, BOSS has gone through a couple of renditions with the Chorus Ensemble line, and now offers the CE-5 Chorus Ensemble. A pedal that even though digital, sounds pretty darn good.
 …when you learn a new lick or technique?
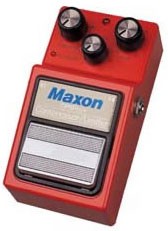 The last review I wrote was on the Demeter Opto Compulator, a great compressor that I had the chance to A/B a couple of weeks ago. In the review, I said that that was the comp I was going to buy, but that was until I did a side-by-side comparison with the Maxon CP-9 Pro+ today. Now it looks like the winner of my search for a good, transparent compressor is the Maxon CP-9 Pro+. But I’ll have to admit, I’m very torn between the two.