Just read a great article in Guitar Jam Daily entitled: Industry Insider: The Cobain Backlash and it got me thinking about what really makes a guitarist great. I know, this is such a subjective thing that if you ask ten different people, you’ll get ten different answers. But I’d like to posit an idea about what makes a guitarist great. The idea hit me because of its simplicity, and it’s simply this: Musicality. I know, rather nebulous but – at least in my opinion – it’s the one word that truly captures the many facets of a guitarist’s greatness. It’s also a term that isn’t limited by style or genre.
 I began thinking about musicality being the key to measuring guitar prowess several months ago after reading an interview in Guitar Player with Ana Vidovic, THE babe of classical guitar. In that piece she talked about really focusing on her musicality, and got me thinking about my own musicality, which then lead me to thinking about musicality being the true measure of a guitarist’s greatness.
 So what’s musicality? To put it simply, musicality is the relationship between instrumental technique and musical expression. Achieving a close relationship between the two requires a certain level of virtuosity in the instrument you’re playing and also a thorough understanding of the music being played: Where volume or rhythmic or expression characteristics can be applied within the body of a song. A truly musical musician will add subtle (and sometimes not so subtle) nuances to the things they’re playing; and while quantifying musicality can be a difficult thing, it’s very easy to discern between a musician with a high degree of musicality and someone who isn’t quite as musical.
Unfortunately, many of the guitar magazines out there seem to focus on shredders, so it has warped a lot of people’s views on who would or could be a great guitarist. In their view, the faster you play the better. But speed doesn’t mean at thing as far as musicality is concerned. But as long as we’re talking about speed, let’s look at a couple of pure, lightspeed-quick shredders: Yngvie Malmstein and Herman Li of Dragonforce. Herman Li is incredibly fast and he has tons of tricks up his sleeve. But listen to a few Dragonforce songs, and you realize that he’s using the same licks in practically every song. Where’s the musicality in that. On the other hand, Yngvie has so much more control not only over his speed and dynamics but also the tonal characteristics of the various phrases within his leads. So where Herman is a super great guitar technician, Yngvie is a true maestro.
But let’s not just look at shredders. Remember, musicality is not genre specific. What’s important is the relationship a guitarist builds between his or her guitar with the songs they play. From that perspective, let me list just a few of my favorite great guitarists:
- James Taylor
- Albert King
- Elliot Smith
- Joaquin Lievano
- Neal Schon
This by no means is a complete list. I listed guitarists from different genres. None of them were the fastest, and in Elliot Smith’s case, not necessarily a real technician per se, but each brought a very definite musicality to the table in all the songs they play(ed).
So next time you want to compare what guitarist is better, you might think about comparing them on a different level other than speed and technique and ask, “Just how musical is this player?”


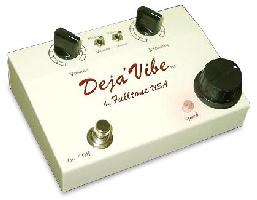 Fulltone Mini Deja Vibe
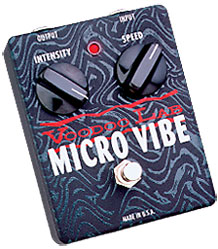 Voodoo Lab Micro Vibe


 I’m at once sad and amazed right now. Sad because I’m retiring my TS-808 Tube Screamer (sort of – I’ll get into that later), but amazed that I actually replaced it with a $50 pedal, the
