I purposely made the title hanging like I did because I’ve made a name for myself by not panning products. But there are some products that really don’t make a lot of sense to me. Recently, I’ve been seeing a lot of ads pop up on my social media for the Jamstack portable amp; you know, the one that attaches to the body of your computer. It’s a novel idea, and the demo videos certainly do the product justice, BUT…
I’m not sure where I would personally find this device useful. Now I realize that it’s really not meant to be a performance amp. And I can see some real usefulness for jamming at home. But if I’m just jamming and practicing, it’s just as easy for me to plug my guitar into one of my amps, or attach my iRig to my guitar and mess around with AmpliTube on my computer.
At $249, it’s a pretty hefty price to pay for something that will never leave my house. Yeah, I suppose I could take it to friends’ houses to play. But when I’ve done jam sessions in the past, there’s usually some kind of drum kit. No way could this keep up with a drummer, even if he or she played really softly.
I searched long and hard and couldn’t find a single review from one of the major guitar gear magazines. Maybe I missed them, but the only reviews I’ve seen on this are mostly from tech gadget sites that aren’t guitar focused. And the reviews that are on general musical instrument sites seem suspiciously like paid advertisements disguised as reviews. And more than anything else, the absence of a review from a major trade rag despite all the money that’s being spent advertising this gives me pause.
If the cost was more in line with some of the micro amps that are out there, I’d probably take a more serious look. But at more than twice the price of a micro amp, it’s a tough proposition to get me to even consider equipment like this.
Now don’t get me wrong, I’m sure that Jamstack works great for what it does. But there aren’t enough compelling features to get me to buy one.
If you’ve read this blog for any amount of time, you’ve probably seen that I have a fairly sensitive bullshit radar. It’s not that I’m a natural skeptic, but I’ve been around gear for so long that when I see something that has a super high price and claiming all sorts of improvements to my tone, I become quite a bit wary. And especially when it comes to cords and wires, I tend to be quite a bit of a skeptic. But the exception to that is instrument cords.
Now this is not going to be a comparison article where I say one particular cord is the best, blah, blah blah… When I see articles like that, that’s when my BS alarm goes off. But by the same token, I’m also not of the belief that you can just use any old cable and you’ll sound great.
On Low Capacitance
Since the ’90’s, cable manufacturers have been touting their low capacitance cables, and how a low capacitance cable opens up your sound. The argument is that with a lower capacitance, less electricity will be stored in the cable, allowing more signal to pass through. Amazingly enough, I actually agree with this. The effect of capacitance in a cable is that it acts like a low pass filter, essentially rolling off the highs. By lowering the capacitance, more highs pass through the cable, thus allowing much more of the signal to get to your amp.
BUT… Low Cap Doesn’t Mean It’s Better for YOU
Manufacturers of low cap cables will make you think they are simply better because they allow more signal to pass through to the amp. In general, that’s a good thing, but that doesn’t necessarily mean it will work for you. You see, more of something doesn’t mean it’s better. Sometimes, it’s just more.
I have a couple of low capacitance cables, but I only use those for certain guitars, like my acoustic, where I want the full range of signal to pass to my acoustic amp or a board. But I actually tend to use a cable that has a higher capacitance for my electric guitars because my entire chain is set up to be pretty bright. I actually like to have some of the highs rolled off.
And since I started using my Godin Artisan ST-V, I’m actually in search of an even higher capacitance cable for that guitar. It’s bright, Bright, BRIGHT! And though I roll off the highs on my amp when I use it, I want a little help prior to my amp. That way, I can effectively set up my amp one way to serve a couple of guitars during a gig. It’s a kind of a convenience thing.
Does Low Cap = Better Quality?
Yes and no. I say this because in general, it seems that higher quality materials need to be used to achieve lower capacitance.
But as we all know, build quality varies from manufacturer. For instance, hands down, Mogami makes about the best cables in the business, at least as far as build quality goes. They use really high-quality materials and have all sorts of features built into them. But you pay for that quality and those features; on the order of at least twice as much as a similar cable.
I use Mogami XLR cables for vocals. Even my cheapo Sennheiser e835 and my Sennheiser e609 instrument mic sound much better with my Mogami XLRs. And with a great mic, it’s like removing a blanket from the mic. Admittedly though, the sound difference is subtle – the “blanket” is thin as it were – but it counts. But I cherish those (read: I don’t want to “f” them up), so I rarely take them to gigs. For gigs, and frankly because the audience won’t be able to tell the difference, I just use some generic brand cables like Monster or whatever the house may have.
Back to instrument cables, I generally get cables whose quality is good enough, so I tend to go with middle-of-the-road Hosa cables. Their build quality is solid, though nowhere near on par with Mogami. But I’m also a real stickler for treating cables well, so my instrument cables tend to last a long time.
And by the way, Hosa makes a line of low cap cables that are very affordable and work just fine; no hiss, no crackle when the tips move. That’s all you need right? You can get a 10-foot cable for around $20.00.
The point to this is that yes, you can get the ultimate build quality with something like a Mogami or some boutique cable maker. But low cap can be had at a decent build quality and you won’t have to spend an arm and a leg to get it.
So… Does It REALLY Make a Difference?
Yes. But you have to look at it from the perspective of how the cable fits in with the rest of your rig. I know I took some time to get this conclusion, but I wanted to take some time illustrate this very important point: Low cap cables will give you more of your signal, but you may just find that you don’t like getting everything.
I’m a cradle Catholic, so Catholicism – and its associated dogma – are a large part of my life. But while I fully accept and believe in my religious dogma (for instance, Jesus is the Son of God and there is only one God), what I have always had a problem with is how that dogma has often gotten translated into rigidity in the practice of said dogma, or used as a way to demean, destroy and take advantage of others who either may not be aware or fully versed in the knowledge of the dogma.
So what does this have to do with guitar gear?
Lots, actually. I’ve been playing guitar for close to 50 years now and one thing that has always annoyed me is the dogmatic perspectives I’ve encountered during that time. You’ve all heard them:
A modeling or solid state amp could never be as good as a tube amp.
You pay more for a piece of gear because it’s better.
Gibsons and Fenders and other brands have a signature sound.
People say this stuff all the time. And they believe it so fully that they become demeaning and dismissive of anyone who may disagree with them. The way these people interact with others is with something akin to religious zealotry.
In the past, my more confrontational self would love to engage with these people. But I have to admit that my reaction was just as militant and dismissive. Now I just roll my eyes and say, “Whatever, dude…”
The problem with rigidity or fundamentalism in general is that it prevents people from seeing or even accepting; much less tolerate, alternative viewpoints. And from the perspective of gear, there’s so much fantastic gear out there that often gets overlooked because people can’t see past their personal dogma.
I’m writing this because I too can be accused of having been dogmatic. But especially since I’ve been writing this blog, I’ve had to be much more open to the different ways people approach gear.
For instance, I used to be of the belief that I had to have a big pedal board with lots of effects to create great sound. As a result, I have lots and lots of pedals, especially overdrive pedals. Now, I just use three, maybe four pedals to get my sound. Admittedly, part of that is that I’m older and don’t want to lug around a lot of gear, but a large part of it is that I’ve found my sound, and only need a few pedals to enhance my sound as opposed to define my sound.
But I also know that others will differ with my approach. I have a friend who plays with no pedals whatsoever. He plugs directly into a 50 Watt Marshal Plexi and lets his fingers do the talking. On the other hand, I have another friend who has 20 pedals on his board and stacks overdrives and distortion boxes and has three different delays.
Look, we all have our personal truths, and they’re all valid. For me, I have a very “you do you, I’ll do me” attitude about gear. Where I have a problem is when those truths are used to exalt over others. I’m a firm believer in ecumenicism – there are many paths to God. So too with gear. There are many ways to make music.
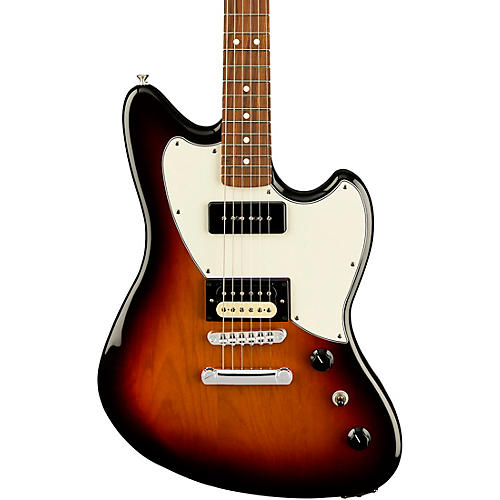
I have to admit that I haven’t been too impressed with Fender’s offerings for quite awhile. I have three Strats and a Tele, but I haven’t seen anything coming out of Fender that got me really excited; that is, until now.
When I checked my email this morning, I saw one from Fender entitled, “Alternate Reality | The Powercaster.” At first, I rolled my eyes, but when I went to read the email, I was immediately intrigued by the body shape. I thought that it looked like a Jazzmaster or Jaguar. Then on closer inspection of the picture, I saw that it has a P90 in the neck and a humbucker in the bridge. The very first thing that came to my mind was: Rock Machine. So I decided to take a closer look.
So I went to the Powercaster product page. Maybe I shouldn’t have because now I want one of these!
Before I go on, here are the basic specs:
Alder body
Roasted maple neck (wood is roasted to remove all moisture)
Pau ferro fingerboard
Synthetic bone nut
24.75″ scale length
9.5″ neck radius
Modern “C” neck shape
Adjusto-matic bridge with hardtail
Comes in 3-color Sunburst, Surf Green and White Opal (it’s like a translucent grey)
Made in Mexico
Street price (so far): $899.00
One of the first things I noticed was the scale length and neck radius. Look familiar? It should because those are Les Paul neck specs. When I saw the scale length, I started salivating because the feel would be like a Les Paul. And being a Les Paul guy, I imagined that I would be right at home with this guitar.
After reviewing the Powercaster site, I went to the forums and gear blogs to see what others thought. The reviews were mixed. One person didn’t like the Tune-O-Matic style bridge (I actually would’ve preferred a more modern bridge like a Gotoh 510). Another didn’t like the thought that Powercaster didn’t have a “Fender” sound based on demos he saw. Another didn’t like the Gibson scale length.
Others like me, love the features. But the person who didn’t like the scale length also brought up a couple of valid points. First, they didn’t quite know who the target consumer of this guitar would be. He also pointed out that considering the price and where it’s made, the price point sits just below American-made prices. These are very valid points that I’m sure will need to be sussed out a bit more.
Personally, I think that this guitar is aimed at someone like me who doesn’t have a dogmatic perspective of brands; for instance, if something is branded Fender, then it has to have a Fender sound – whatever that is. I tend to judge gear based on their own merits, and I LOVE that P90/Humbucker combination! I also love that roasted maple neck because dry wood is very resonant. And as far as the price is concerned, while it’s about $150 more than other MIM guitars, I don’t think it’s really all that out of line.
Of course, while I’m excited by the features and possibilities this guitar has on offer, I need to get my hands on one and play it. But it sure shows a LOT of promise!
As with anything we learn over time, playing guitar is a journey replete with ups and downs, feasts and famines, motivations and let-downs. It’s a never-ending, circuitous path that always guarantees that there’s something else around the next bend to discover and explore.
As guitarists, we’re seekers. We’re explorers. We’re trailblazers into a wilderness that is simultaneously both familiar and new; familiar in the sense that we can see the paths that others have taken, and new in that while we may tread the same ground as others, the tracks we make are ours and ours alone.
There is no wrong journey. Some journeys have several stops along the way. Some go at a snail’s pace. Others, like my own, meander all over the landscape. Others take a straight path and reach higher and higher pinnacles of skill and technique quickly. But no way is better than the other.
Along the way, we may pick up things from other sojourners. But we make the choices in how to apply and use those things in our own journey.
The gear we use is also a reflection of the nature of our journey. Some travel light with only a single guitar. Others need a wagon or large transport to get them along. Others use the latest in high-tech gadgetry while others go unplugged. And still, it’s all good, no way is better.
And the nature of our journey will change over time. Sometimes, we may just need a guitar and an amp and perhaps one or two pedals if any. There will be times when we’ll be lugging a stack and two full-size pedalboards and three backup guitars. At other times, we may go digital or may go completely analog. And still, it’s all good, no way is better.
Along with our journey, we may experience doubt about our equipment. We can see what others have and wonder if our own equipment is good enough. Furthermore, we will encounter people on our journey who are passionate about the right way to travel. They’ll tell us to follow their path and to provision ourselves with the same things they’ve provisioned for themselves.
Sometimes it’ll make sense. Other times it won’t. Just remember that those who give out the free advice are speaking from what they see through the lens of their own experience. We have to live with our own choices and the choices others have made well, they have to own.
As a humorous aside, here’s a video clip from “Mad Max: Beyond Thunderdome.”
As the dude said: Remember, no matter where you go, there you are… In other words, if we translate that to our own journey, wherever we’re at, we have what we have, we know what we know, we play what we play. And the cool thing with that is that what we have, know or play can be in flux depending on wherever we’re at. Chew on that for a bit!
You see, the journey of playing and learning guitar is intensely personal. Even if your primary motivation is to emulate a guitar hero or someone whom you idolize, you still have to make your own choices and YOU have to be the one who learns. It’s fine to seek advice and mentorship from others; in fact, I’d say that one of the beauties of being on a guitar journey is that there is a large, global community with which to interact and from which to learn.
I was having a conversation with a fellow guitarist and gear slut who shared a story of how he first bought an Epiphone Les Paul then later purchased a Gibson Les Paul. He said to me that the difference in sound was like night and day. “I agree,” I replied, “But not for the reason you might think.”
I went on to explain that I’ve played a number of Epiphone Les Pauls over the years that were actually really killer. But even though they were named “Les Paul,” at least to me, they had a different sound than a Gibson Les Paul which, frankly, is the standard. But different, at least in this case, doesn’t mean bad. I went on to say that I’ve known several players who actually prefer an Epiphone Les Paul over a Gibson Les Paul and not because of price. They actually prefer the sound.
He chided me in owning a Custom Shop Les Paul and played devil’s advocate with me suggesting that I might think it sounds better because I paid so much for it. 🙂 But I said I didn’t pay full market value for it at the time, and I wanted the standard Les Paul sound.
Then recently, someone I know said he suggested to another that he check out the BOSS Katana 50. But that person said that he’d rather get a tube amp because the Katana was so cheap and it couldn’t be that high of quality. Of course, I laughed at that statement and immediately reminded me of a scene from Men in Black when Will Smith puts on the “last suit he’ll ever need.”
An experienced player can make anything sound decent; that is unless that thing really does suck and no one could ever hope to salvage a good tone out of it.
But here’s the thing: The Katana simply ROCKS! I’m continually blown away by the sound this amp produces. Sure, it’s an inexpensive amp. But it’s not cheap-sounding. I just used it this morning at an annual event that I play at a local high school. I used my acoustic through it, and just adored the sound!
Yeah, yeah, yeah, I’ve been extolling the Katana’s virtues for quite a while, but it is the epitome of “quality rules.” With any gear, the sound that it produces trumps the price every time. And quality can be had at ANY price; so can shite… I’ve played amps that cost thousands of dollars and have come away scratching my head after giving them a thorough – and fair – rundown, asking myself, Why the hell does this cost so much?
On the flip side, I’ve paid LOTS for some gear that I think is much better than everything else to which I compared it. Case in point, my hand-wired Mad Professor Deep Blue Delay. I paid $325 for it at the time, and it has never left my board. People have suggested lots of different analog delays and I’ve tried many. But I haven’t found anything to date that floats my boat like that pedal does.
So the point to all this is to get the gear that inspires you. Sometimes you might pay a lot for it; sometimes, you may not. And if you think I’m full of it, here’s my attitude (from Forgetting Sarah Marshall):
But since I returned to participating in online guitar forums, as I experienced in the past, there’s always that one in the crowd that let’s just say is much less conciliatory with their evaluation of others’ tone. On the one hand, lots of people enjoy the audaciousness of people who do this and use it as their entrance into the discussion to pile on; on the other hand, it makes me and, perhaps, others like me, cringe at the rudeness.
Personally, my first thought when I read comments like this is what makes this person think they know what’s good tone and what’s not? And if the comment is particularly rude, I’ll look at that person’s profile or do a search on them to see if they’ve got the stones to back up their audacity. What I find is a mixed bag. Some are skilled and active musicians; others are just “bedroom” players. But they do have one thing in common: To me at least, they come off as real a-holes.
But personality evaluations aside, the title of the article points to the spurious nature of “good tone.” You see, the problem with tone is that its measure is purely subjective. What sounds good to one may sound terrible to others. It’s also such a nebulous subject that it’s virtually impossible to provide a definitive list of what the characteristics of good tone actually are.
You’ll read or hear people mention terms like musical or lush or three-dimensional. Most people are implicitly aware of what those terms mean, but those adjectives are just as ambiguous as tone. I’m not here to tell you what good tone is but after years and years of playing I’ve come to an understanding that could help clarify things.
The Two Sides of Tone
There are in fact, two sides to this tone thing. The first is what we as the musicians consider to be good tone and the second is what others think of it.
Fundamentally, the most important judges of our tone are ourselves. In chasing that unicorn of good tone, what we’re searching for is what pleases us. So we pore over magazines, both physical and virtual; participate in online forums; watch and listen to countless demos of gear in our quest to find our sound. After all, at least for many, our sound inspires us to make music.
Note that I wasn’t all-inclusive by saying “at least for many” above. This is because I’ve known many gear sluts who just buy gear because it sounds cool or has some nostalgia or whatever attached to it and don’t pay much attention to the context in which they apply it. I have a good friend who used to play with me who put a ProCo Rat in his signal chain. That’s fine, but he would try to use it with an acoustic guitar. It sounded absolutely horrible to me and the rest of the band. And that’s a perfect segue into the other side of the tone equation.
The tricky thing about tone is that while I will stand by what I said that we’re the most important judges of our tone, especially if you gig, you have to realize that it’s important to sound good to your audience. I have to admit that it’s a bit of a pride-swallowing experience to get negative feedback from others on the tone you’ve worked so hard to achieve, but nevertheless, it’s important to listen.
Years ago, I was playing in a band, and during a break, a bandmate told me during a break, “Dude, I’m sure you’re ripping it up, but I can barely hear you.” I told him I was plenty loud and the amp I was playing had a fairly deep voicing. But he persisted and said, “Yeah, maybe so, but I can’t hear you and you’re the lead guitarist.”
At first, I was a little miffed because I had worked out and dialed in my tone for the gig. But I realized that if my bandmate was standing 15 feet away from me, and he couldn’t make out my tone, I was probably getting lost in the mix. So I went back to my amp at the back of the stage, added more mids and highs without turning up my volume, then suddenly, I was cutting through!
That brighter and slightly biting tone did not really please me at first; not that it was a bad tone. It’s just that I was so conditioned to playing with a smoother and deeper tone that I wasn’t really used to it. But from then on, when it was time for me to solo, I just hit my booster for a few dB of gain, and my sound punched right through the mix! That made everyone smile – including me. For goodness sake! I was playing a Les Paul through a Marshall! It was supposed to be midrange punchy, and I dialed it back! 🙂
Since then, I’ve come to love that tone, but it took getting, and more importantly, accepting that feedback that helped me break through. And after that gig, a fellow guitarist I knew who was attending the event approached me and said, “I don’t know what you did to your rig in your second set, but you sounded killer!” So… lesson learned.
So in light of all that was discussed, remember that first and foremost, develop the tone that pleases YOU. But be open to what others might have to say. It’s that compromise that will get you on your way to good tone.
The fallout of this is that for most people, it will slow the rate of their gear acquisitions. At least for me, once I found my sound and got some positive feedback on it, I’ve been extremely careful in my gear choices. Anything I get now has to be able to strike the balance between what I like and how it may sound to my audience.
Last night I was fiddling about with the different IRs I purchased from OwnHammer yesterday running different amp models in GarageBand through various IRs. What I came to realize is that while the amp models are okay and actually very nice for clean tones, their overdrive tones actually suck pretty bad with the IRs, and I wanted to do some recording this evening.
So this morning, I got a wild hair and hooked up one of my amps – an Aracom VRX18 which is based on the classic Plexi 18 circuit – and ran it through my Aracom DRX attenuator which can act as a load box, then ran a line out into my audio interface.
Then I opened up GarageBand, added a generic audio track, chose an IR and even though there was a lot of line noise (I was able to filter out a lot of it eventually), what I heard in my headphones was my amp – the way it should sound!
So like I said in the title, IRs are game changers for recording! Check out a comparison:
The first track uses a GarageBand British amp model going into a GarageBand British 1 X 12. The clean tone really isn’t all that bad if a little bright (which could be EQ’d), but I wanted to capture the raw, dry tone. The second track is my Aracom VRX18 amp into an OwnHammer IR. Damn! The difference is literally night and day; especially with the overdrive tones!
That’s it! I’m going to be using this technique for recording from now on!
PSA ~ If you’re on a Mac and have upgraded to OSX Catalina, the Lernvall Audio Convolver discussed here will not work! With Catalina, Apple decided to stop supporting 32-bit software. Some things will still work, but many plug-ins like LA Convolver will no longer work. I found this out the hard way…
But luckily, there is a solution called Pulse from Lancaster Audio. And guess what? It’s also FREE!!! Check it out here.
If you’re doing home recording, like me, you don’t have a lot of money to spend on expensive recording equipment or even just gear like amps and cabinets and especially, microphones. You need to find economical ways to lay down your sound. Well, I recently discovered Impulse Responses, which are digital profiles of real cabinets that you can use with GarageBand, either using the amp models or, using your own amp running into a load box (if it’s a tube amp) and using the IR as your virtual cabinet.
But to use them in GarageBand, I had to do a little digging. There were tutorials out there, but some skipped over some important information or the posts were so old that they were literally missing content. So I had to figure out a lot of stuff on my own, and once I did, I decided to do a tutorial myself.
First, you need a convolver plugin
Update: While the discussion below revolves around the LA Convolver, the same procedures apply if you’re going to be using the Lancaster Audio plugin.
A convolver is software that convolves an audio stream with an impulse response. To put it simply, this plugin allows you to load IRs for use in GarageBand. There’s no real magic here other than the great sound that the IRs provide. IRs are WAV files; though they’re actually special WAV files. If you tried to listen to them, they sound like clicks. The convolver plugin takes that WAV file and makes it usable in GarageBand as a speaker cabinet.
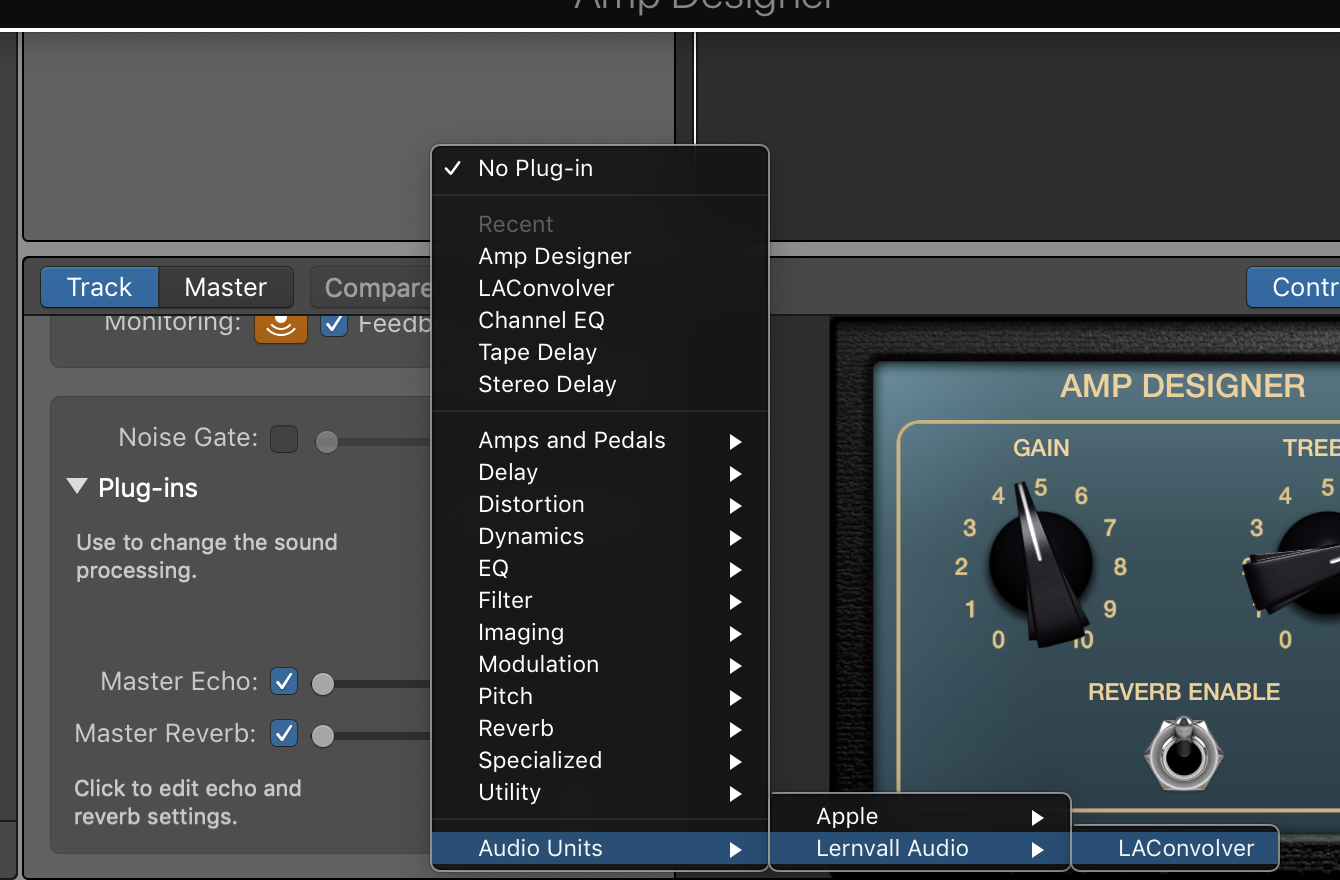
The one that I use – and seems to be the one that is most recommended (probably because it’s free) – is called LA Convolver by Lernvall Audio. You can download it here. It’s a ZIP file, so you’ll have to decompress it. Once you’ve done that, then you need to follow some discrete steps:
Copy or Move the LAConvolver.component file to the [Macintosh HD]/Library/Audio/Plug-Ins/Components folder.
Other tutorials said to open up GarageBand and you’ll see LAConvolver as an Audio Units plug-in. But that didn’t work for me until I restarted my Macbook. So I recommend that you restart or shut down and restart before you open up GarageBand.
If, after restarting, you still don’t see your plugins in GarageBand, then one of two things can be going on:
The restart didn’t refresh your audio unit plugins cache
Though not throwing an error, the plugin isn’t compatible with your system for some reason.
But more likely than not, it’s item 1 that’s the culprit. In that case, do the following:
Navigate to [Macintosh HD]/Library/Caches in Finder (or use Go menu).
Once there, find the following and throw into the trash:
com.apple.audiounits.cache file
[Macintosh HD]/Library/Caches/AudioUnitCache
Empty the trash
To be safe repeat this procedure in [Macintosh HD]/Users/<yourusername>/Library/Caches as well. For myself, I tend to do this when cleaning up crap on my Mac because I always forget if I installed something specifically for my username or making it available system-wide.
Once you’ve got everything cleaned up, reboot then restart GarageBand. That will trigger MacOS to rescan your Audio Unit plugins.
Once you open GarageBand, your convolver will be available as an Audio Units plug-in under Lernvall Audio (or Lancaster Audio if you’ve gone 64-bit) as shown below:
If you still don’t see it, then it’s possible that GarageBand was set up under your user profile on your Mac. For that, you’ll need to place the LAConvolver.component file into [Macintosh HD]/Users/<your user name>/Library/Audio/Plug-Ins/Components. This is what I had to do.
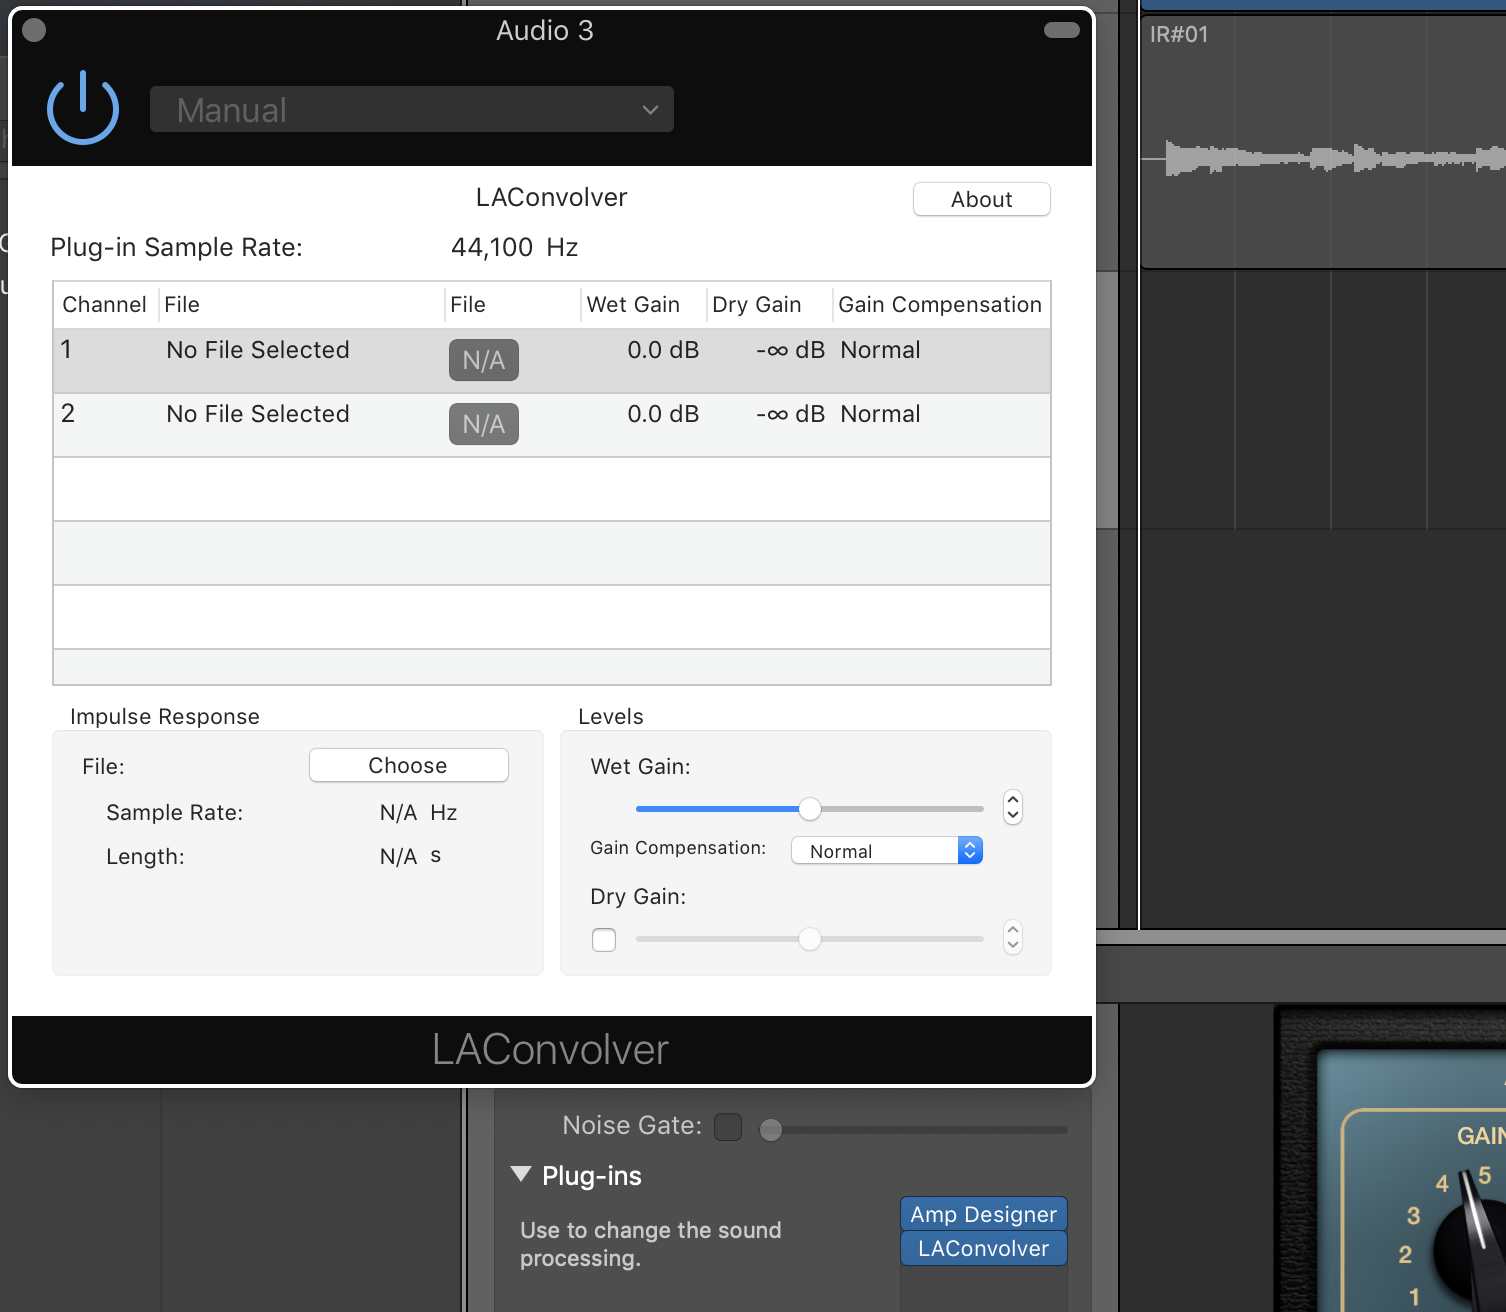
If LAConvolver was successfully added, then when you select the LA Convolver menu item, you should see the following plug-in dialog box:
We’ll get into loading IRs a little later. But first…
Next, you need to get some IRs
I’m a big fan of Pete Thorn, and he recommends using OwnHammer IRs. They have a free set that you can experiment with, but I just pulled the trigger on the Core Tone Bundle that consists of IR models of Fender, Vox, Marshall and Mesa cabinets.
Once you download your IRs (they come as Zip files from OwnHammer – not sure of other producers), I recommend that you move the Zip files to a convenient place. I put mine under a folder I created under the Music folder on my computer: [Macintosh HD]/Music/IRs:
Once you get the Zip files to a convenient location, you need to unzip them. With OwnHammer zips, they decompress to an OwnHammer folder. As you can see in the image above, I renamed the uncompressed folders to the cabinets so when I decompress another Zip file, it won’t overwrite my other IRs.
Understanding the IR Files
At least with the OwnHammer IR files, you might get confused by the sheer number of them as shown below for the Fender Deluxe Reverb (click on the image for a larger view):
The reason why there are so many is that the IR’s come in different flavors. For the files numbered 0 to 10, these represent mic placement on the cone; 0 being dead-center to 10 being at the edge. These are the predominant file types. There are also a couple of others such as “FRED” that set the mic on the edge and angle it 45-degrees, and ROOM, where the mic is set at a distance and you get some room reflection (I love this, by the way). In the image above, I’m showing the “Mics” folder which includes IR files for individual microphones, while the “Mixes” folder includes a combination of a couple of mics.
According to OwnHammer, the numbers don’t represent a specific distance from the center as the numbers increase. They’re rough positions, so if you chose “OH 112 DVRB FN-AXA 57-05.wav,” you’d choose an SM57 positioned roughly between the center cone and the edge. The graphic below illustrates this:
As you’d expect, the further away from the center a microphone is positioned, the warmer the sound gets; in other words, you lose highs.
Now it’s time to choose an IR to use in GarageBand
There are a couple of ways to set up your guitar sound. The first is to input your amp directly, using a load box whose line out runs into your audio interface. Then you can just add the LAConvolver plug-in to your track, choose the IR you want to use, and you can start recording away! (More on this below)
But if you’re like me and are often pressed for time and just want to lay something down, using the Amp Designer plug-in in combination with LAConvolver is very easy. This will give you a complete software-based signal chain. Of course, the weakness here is that you can’t use pedals, but if you just need basic sounds, this will work nicely. So here goes:
First, create a new, blank track. Select “Record using a microphone…” option. You don’t want to use the canned guitar/bass option because once you disable the cab and use the IR, I found that it messes up the signal and your track volume goes WAY down. Once you set up the amp and IR though, feel free to add other plug-ins.
Next, add the Amp Designer plug-in to the track. Choose the amp model you want to use.
Set the cabinet choice to “Direct.” This is extremely important because you want to bypass the cabinet completely and use the IR as your cabinet.
Now, add the LAConvolver plug-in by going to the Audio Units menu and selecting “LA Convolver.” Once you do this, you’ll get the LAConvolver plug-in dialog:
Next, choose your IR. Click on one of the channel rows, then click on the “Choose” button. You’ll then get a File Chooser dialog. Navigate to where you stored the uncompressed IRs and select an IR. For me, I chose the following:
You’ll see that there are IRs for Atomic, Fractal, Kemper and Line 6, plus generic Wav-200ms and Wav-500ms. Not sure what the difference is as of yet, but I just chose the Wav-200ms at 44.1 kHz, 112 DVRB, FN-AXA, Mixes, and the OH 112 DVRB FN-AXA 57-05 IR file, which uses two mics position between the center cone and edge.
Note that each IR has two channels in LA Convolver. This is actually pretty cool because you can choose an IR for one channel, and another for the other channel. But for my setup, I used the same file on each channel.
NOTE: Some people have reported that they only see one channel. I’m not sure why this is other than it might have to do with your interface. I have a 2-input interface so it’s possible that LA Convolver sees this as a stereo input and adds another channel.
In any case, once you’ve chosen your IR files, the dialog should be filled in like so:
I haven’t played much with the Wet Gain other than just testing out the output volume which could be useful if the gain is too high and starts clipping the track.
So that’s it! Record your tracks! Granted, you’ll have to do quite a bit of testing to find just the right IR. I spent about an hour trying out different ones until I found something I liked. But that’s kind of the fun of it!
If there’s anything I’ve missed, please let me know and I’ll add it!
Recording Your Tube Amp
The obvious advantage that IRs bring to the table is that you can use your tube amp and crank it to its sweet spot – and do it silently. I can’t tell you how awesome this has been for me. Absolutely awesome. It enables me to – however virtually – pair my amps with speakers/cabinets that I don’t have.
The reason I added this section below is that recording your tube amp isn’t necessarily as straight-forward as you might think. I had to do quite a bit of playing around with the equipment I have to get it right.
First of all, you need to make sure you have a load box, and preferably one that has a reactive load as opposed to just a purely resistive/dummy load. Without going into technical detail, reactive load boxes are generally accepted as the better option as they more closely mimic the impedance curve of a speaker and thus sound better than their resistive counterparts. For a deeper dive, here’s a great article on the subject.
But even then, not all reactive load boxes are the same. For instance, the video below demonstrates the tonal difference between the Two Notes Torpedo Captor versus the Julius Music Box:
The Julius Music Box tone, while not that bad, definitely has sonic content missing. It’s quite noticeable. But it’s also half the price of the Captor and three and half times cheaper than the new Torpedo Captor X.
Now most higher-end attenuators use a reactive load and many have a Line Out that converts the speaker out signal to line level. My Aracom DRX150 has this and that’s what I use. Unfortunately for me, using the Line Out straight into my audio interface creates a ton of noise, so I have to run it into a DI first, then use an XLR cable into my interface.
There are other load boxes on the market such as the Suhr Reactive Load and Suhr Reactive Load IR that has built-in IRs. These are a step up on the basic reactive load boxes.
But be forewarned. Load boxes like the ones from Two Notes and Suhr are NOT cheap, costing about $250 at a minimum.
Load box configuration
“Hybrid” Attenuator-Load Box Solutions
The load boxes I mentioned above are dedicated boxes, but there are a few VERY nice boxes out there that not only provide reactive loads, but add a power amp and other features for even more versatility.
BOSS Waza Tube Amp Expander
To me, this is the ultimate. It provides a load, but has a power stage. You can actually load IRs into the unit itself (it already has IRs, but you can use your own) as it includes cabinet emulation. It even has built-in BOSS effects! It’s not cheap at $1299, but it brings a lot to the table.
Universal Audio Ox Amp Top Box
Close on the heels of the TAE is the Ox. It basically has the same features as the TAE but doesn’t include an effects loop and, of course, doesn’t have built-in BOSS effects. It’s also $1299, so it’s a bit pricey as well. But lots of people swear by this unit.
Fryette Power Station (PS-2 and PS-100)
At $699 for the PS-2 and $899 for the PS-100, what these units bring to the table make them definitely worth consideration. But of course, features are what’s important here and if all the Power Station brought was a reactive load, then $699 (or $899) would be too high a price to pay. But both of these units not only provide a variable reactive load (it’s a full sweep, not notched like others), both have a power amp and an effects loop, plus filters and presence to dial in the natural sound of your amp. The fundamental different between the PS-2 and PS-100 is that the PS-100 is a dual-mode unit that lets you have two different attenuation settings.
Whichever load box you choose, note that these aren’t just for studio use. I often use my attenuator in my live rig when I play smaller venues or at church. It allows me to get crunchy tones at a low volume. So there’s a lot of usefulness beyond the studio!
Computer Performance
Though I spent all that time above talking about using IRs in GarageBand, you have to bear in mind that IRs are files that need to be processed; that is, they use computing power. And if you have lots of tracks and/or use lots of filters, there’s going to be latency as your computer has to work harder.
And from that perspective, I’m actually considering using IRs in an external device like a Mooer Radar. By using a dedicated device like this, I won’t tax my Macbook Pro’s CPU. And from what I understand, there’s less than 2 milliseconds of latency with the Mooer. That’s VERY good performance.
The other reason I”m considering using an external device is purely for usability purposes. It’s great to use a plugin in GarageBand, but switching files takes a lot of time. With an external device, switching IRs happens with the turn of a knob or press of a button. It makes auditioning IRs A LOT easier.
Hopefully I’ve covered enough to get you started! The one thing I can tell you about using IRs is that they’re definitely game changers!
Like many, I don’t have a lot of money to spend on studio time, so I’m left to recording on my own. I’ve gotten better over the years with mixing and equalizing and in general, my production quality has gone up significantly. But one area where I haven’t been that satisfied is with guitars.
My “normal” way of recording guitars has been through close-miking my amps. But in the recent past, I’ve been using a lot of software sims for amps – they just make it easier. For instance, the amp models in the Amp Designer in GarageBand 10 (which is based on the Logic engine) are pretty damn good now. A few years ago, I wouldn’t have touched them because they were very dry-sounding and lifeless. But they’re so responsive and dynamic now that it’s just easier to use the models for recording.
Up until recently, I’ve just been using the default cabinets that are supplied with GarageBand, and admittedly, they’re just okay. They get the job done. And I’ve been able to EQ the guitar parts to liven them up.
But a few months ago, I discovered Impulse Responses (IRs), which are digitized profiles of speaker cabinets that were said to be extremely realistic. Companies like OwnHammer have huge libraries of cab/speaker sounds. I had heard recordings of IRs and was completely blown away by how good they sounded.
So today, I finally pulled the trigger and got the Core Library from OwnHammer to use in GarageBand. It took just a little while to get all the software configured and usable in GarageBand and once I had it set up, wow! What a difference in sound!
Below are clips that I made using a Silverface amp model totally clean, with the spring reverb set to 5. I used the default EQ settings on the amp model with no EQ in GarageBand.
Both clips actually sound pretty good. But the clip using the Impulse Response has a lot more definition – at least to my ears. 🙂
The GarageBand cabinet was the default for the Silverface 2 X 12 amp model. It is supposed to simulate the cabinet being miked with a Royer 121 ribbon. The IR I used was a profile of a 1 X 12 cabinet from a Deluxe Reverb and uses a combination of Shure SM57 and Royer 121 mics. I chose the IR file that positioned the mics roughly between the center and the edge of the speaker cone. You can’t do that with the default cabs in GarageBand!
With Impulse Responses, many are set up with different microphones PLUS positioning on the speaker cone. This is incredible because it allows you go really fine-tune the cabinet sound.
I’m looking forward to playing with this even more!