As some might know, I’ve spent the last year working on my first album, “You Stir My Soul,” which is a collection of contemporary religious songs I wrote for the Catholic Mass. About three weeks ago, I finished the album and submitted it to a digital distribution company to place on iTunes. They indicated that it would take about 8-10 weeks before it was available, but last night, I noticed that it had already become available!
This is a huge milestone in my life! I don’t have any illusions that it will elevate me to superstardom. But I’ve accomplished what has been a lifelong dream for me.
Admittedly, a couple of the songs really aren’t production quality, but I learned a lot about the music production process since then. The ones that have a much clearer sound to them are the songs I recorded later in the process. Oh well, first album, lesson learned.
Getting a good guitar sound on a recording can be a real challenge when recording at home. It’s not that it’s difficult mechanically, it’s difficult because of the environment. Working around the limitations of the environment is really the challenge. For instance:
Most of us don’t have a dedicated sound-proof room; thus, we get a lot of sound leakage that translates to neighbors (and family) screaming to turn down the volume.
Furthermore, most home recording areas aren’t optimized for a “flat” acoustic response. You can do some dampening to reduce room reverb, but you can’t eliminate it entirely.
Finally, most of us don’t have expensive recording gear.
But despite all that, it’s still possible to record great, high-quality guitar tracks. I’ve done a lot of recording at home in the past year and thought I might share some of the things I’ve learned in capturing good guitar sounds. Mind you, I’m no audio expert. Everything I’ve learned comes from pure trial and error.
First of all, invest in a decent tube pre-amp. PreSonus makes a great one called the TUBEPre. You can read my review on it here. Even if you use a dynamic mic that will draw power from your line, a pre-amp will boost your mic signal, and at low-volume levels, this is absolutely essential. Also, a pre-amp will add a lot of warmth to your mic signal. In my mind, it’s an essential piece of gear.
Ribbon mics are great for adding depth to your sound, or for recording two amps at once. Unlike unidirectional or cardioid mics that have a reception field that’s in one direction, ribbon mics record in a figure eight pattern in two directions. What this means is that it’ll pick up the ambient sound behind the mic as well. I typically place my ribbon mic about a foot away from my amp cab, then place a 3/4″ thick piece of plywood about a foot behind the mic. This helps reflect the sound back to the rear of the mic. And as long as you keep the volume low on your amp, you won’t get feedback.I also have used my ribbon mic to record two amps at once. For instance, in this song, in the overdriven guitar part, I ran a dry signal out to one amp, then used the other signal to run through my board into the other amp. The net result was it sound like I was employing a lot more output than I actually was. In fact, you could speak (with just a tiny bit of effort 🙂 ) over the combined volume of the amps.
Use two mics to record an acoustic guitar. I read somewhere that using an “X” pattern aimed at the sound hole is really effective. Personally, I use my ribbon mic pointed at about a 30″ angle at the center of my guitar’s body, then use a dynamic mic pointed straight at it. The ribbon mic is about 6-8″ away from my strings, and the dynamic is placed about 10″ inches. The result is a very deep, very natural sound that captures the natural tones from your acoustic guitar.
Because we’re talking low-volume here, there are pedals that you should have that will help quite a bit in getting a good sound:
a. First, get a decent compressor pedal. I’ve got the Maxon CP-9 Pro+, and just love it. This will help fatten your signal, and give the impression that you have a bit more amp than you actually have.
b. Invest in a couple of decent overdrive pedals. Personally, I use three: a DigiTech Bad Monkey, an Ibanez TS-808 and a Fulltone OCD. I will either use these individually, or “stack” them in a signal to produce varying levels of overdrive. I know, many purists want to get that power tube saturation sound, but at low volume levels, that’s not practical. Besides combined with a compressor, you can get pretty close.
As far as reverb is concerned, I tend to use very light spring reverb, then layer reverb on top of that in my recording program. It makes it much easier to control on the recording. Some folks use dedicated pedals, which is fine, but I prefer to capture as much of the raw signal as possible, then layer reverb or other effects on top of that raw, dry signal. However, this doesn’t necessarily apply to time-based effects like chorus, flange, vibe, delay or phase. I’ve never been satisfied with the sound quality of software based time-based effects.
There’s nothing like the sound of a tube amp. Unfortunately, with larger tube amps, they just don’t sound good unless they’re cranked. But there are a number of low wattage “practice” amps that actually produce incredibly good sound if you close-mic them. The one I use in particular is the Fender Champion 600. Epiphone also makes the Valve Junior, which has gotten some great reviews. Another low-wattage amp that I’ve been considering is the Blackheart Little Giant BH5-112, which is a switchable 3W/5W amp with a 12″ Eminence speaker. Very cool. Blackheart also makes a 7W/15W version called the “Handsome Devil,” that is also worth a look.
As I mentioned above, I’m not a professional sound guy, and I certainly wouldn’t call myself a recording engineer. But I recorded my first album over the past year entirely at home, under less than ideal recording conditions. It’s entirely possible to do. You just have to find ways to work out, work around and work with the limitations of your environment.
Summary: A fantastic and versatile, and super-affordable mic with a wide field that is equally at home with vocals, and instrument/amp sound reinforcement.
Pros: Nice, flat response, with built-in presence boost produces very clear sound.
Cons: None
Price: $99 Street
One of the underlying themes in the reviews I write here at GuitarGear.org is that cheap doesn’t necessarily equate to low quality, and as a gear freak, saving money where I can means I have more money to get more gear. I totally dig on finding excellent gear that doesn’t break the bank, and the Sennheiser e835 falls squarely into that camp.
I discovered this mic a few years ago when my trusty, but tired SM-58 stopped working. By chance, Guitar Center was having one of its blowout sales, and the e835 happened to be on sale for $79.00. So I decided to try it out, and am kicking myself for not buy 4 or 5 of these at the sale price. Oh well…
One thing that I couldn’t stand about the SM-58 was its boomy lows. I’m the type of singer that has the mic close to or touching my lips so that I’m right in the capsule. But with the SM-58, I couldn’t do that because the over-abundance of lows would muddy my vocal tone – and forget about using it to mic a cab!
On the other hand, I found that the e835 has a much flatter tonal response, and close-mic’ing anything is pretty easy, with very little EQ tweaking. It has a built-in presence boost that flattens out the EQ compared to the more scooped EQ of the SM-58. With that kind of flat response, the e835 becomes a very versatile tool that’s usable on-stage, in the studio, and can even be great for mic’ing guitar cabs! At $99 street price, you just can’t go wrong with this mic!
To prove how nice the e835 sounds, let me point you to a song I just recorded using e835. In this song, I used the e835 for both guitars and vocals. With the guitars, I wanted to add a little spacial depth to the guitar tone (I was using a Fender Champ 600 amp with only a 6″ speaker, so I needed a bit of depth), so I close-mic’d the amp with the e835, and used a Nady RM-200 ribbon mic placed off-axis about 10″ away. The Nady only adds a bit of depth, as the e835 does the bulk of the tonal work. But regardless of guitar or vocal, from the song, you can tell that the e835 really shines as a super-versatile mic.
I actually wrote this song quite awhile ago – I think Christmas Day, 2006. I did an early recording of it – very bad quality, and as I’ve been working on my demo, realized that I hadn’t re-recorded it. This was a must-have song on my demo.
Note that I have instrumentation details on the iCompositions site, but I will say that my Fender Champion 600 is a really great amp for home studio use. For this recording, I didn’t even bother running the amp through my Hot Rod’s speaker cab. I close mic’d the amp using a combination of a Nady RM200 ribbon mic, plus my trusty Sennheiser e835, which really brings out the low-end without being muddy. In my opinion, the 835 and 935 series mics just blow the Shure SM58 and 58Beta away. I’ll be writing a review on the Sennheiser in a bit… In any case, enjoy the song!
I wrote this song based upon a passage in the Gospel of Mark, Jesus talks about being called into justice and mercy. The passage inspired me to write “We Are Called.” Note that the only amp I used was a Fender Champ 600. Using two different mics, spaced at different distances to provide a little depth. I placed a dynamic mic right in front of the grille cloth, and a ribbon mic off-axis about 10″ away. The result was a very nice tone. The dynamic mic picked up the lows really well, while the ribbon caught the ambient – all this from a 5Watt amp with a 6″ speaker! Ha! You gotta love it.
For the opening lead part, I did “cheat” a bit and used my Hot Rod’s speaker cab for a bit more tonal depth, but still powered with the Champ. I love that little amp! Here’s the song:
Equipment:
Guitars: ES-333, Strat; Piano, Bass
Drum loops were standard GarageBand loops, and everything was mastered in GarageBand. Not bad for demo-quality work.
A couple of years ago, I called Tom Booth, a prolific Catholic songwriter and recording artist. I was seeking advice on the best way to approach putting a demo together of the songs I’d written for Mass. I wanted to know things such as how much I should budget, what players I should bring in – lots of things. He patiently listened to my questions, and at times interjected with some comments, but his final comment really surprised me. He said that in lieu of going into the studio that I should invest in good recording gear and record my demo at home. I was stunned by this. He didn’t say much more than that, nor did he explain his reasoning. But in retrospect, I don’t think he could’ve given me better advice.
So, based upon that conversation, I invested in a high-powered PC with tons of RAM and huge hard disk space, purchased a simple 2-input DAW (an MBox 2), installed ProTools LE, got a couple of good mics and cables, and was off to the races. I was jazzed to have a killer setup with tons of horsepower, and with ProTools, I’d be able to transfer the stuff I did at home to a studio’s computer. Sounds reasonable, right? Well, that was just the beginning of a nightmare…
I soon found out that you practically need a degree to get down even the most basic operations of ProTools. Yes, it’s powerful, and yes, it’s pretty much the standard, but there’s so much to it with all its internal features – not to mention the plug-ins that come standard with it – I had to spend hours and hours learning how to operate the software before I could become even reasonably productive.
That experience turned me off to recording; so much so that I lost my taste for it after recording just a few songs. The thought of laboring over the niggling details of ProTools and trying to understand how all the plug-ins worked with it made me groan with weariness. So I gave it up. After all, all I wanted to do was get my tracks down and output them to a reasonable sound quality – good enough for a demo.
Mind you, I’m not dissing ProTools. If I had the time to spend with it, I’d be all over the software, learning the ins and outs. But the problem is, as is the case with many home recording artists, I have to feed my family, so I work during the day. I also have a huge family, so my wife and I have to split up duties carting kids around from place to place on weekends. That leaves precious few hours during the week to get my songs recorded. With my lack of experience with ProTools, and the daunting task of having to learn it, I simply gave up on recording, and concentrated on songwriting. I wrote a ton of songs, and in 2006 kind of hit a groove with my songwriting where I was really liking what I was writing. But the problem with that was that the songs were piling up, and I knew that I had to get them recorded.
Up until about 6 months ago, it had been about two years since I had given up on serious recording. I still thought about it, but felt a little trapped by the equipment in which I had invested so much time and money. But luckily, a professional tragedy helped catapult me into recording again. For years, I’ve been somewhat of a poster child for high-tech start-ups. And in early 2007, I joined a tiny start-up that was working in the “Web 2.0” space. It was exciting, I made a very nice salary, and got a good chunk of stock to boot. After two-and-a-half months of being employed there, the company shut down. Our team of 12 employees was brought into a conference room and told by the founder that the company was closed and that we should pack up our things. All the assets would be put for sale, including all our hardware and software. Bummer. But what I got out of it was worth way more than gold.
In the company’s fire sale, I was able to get a bunch of equipment; among them were two iMacs that I purchased for my kids. I set them up, and started playing with one of them. In my explorations, I discovered a little program GarageBand. I had heard of it, but had previously dismissed it as yet another Apple “toy-ware” since I had my own full-blown recording solution (we’re all susceptible to our snobby notions sometimes). Well, in my playing, I started putting loops together, and created a song purely from loops. Then I got some valuable input from my blog buddy Ig at igblog who uses an MBox with GarageBand. I hooked up my own MBox, and whammo! I was back in the recording business!
Admittedly, GarageBand has its shortcomings, and some invaluable tools that I had in ProTools, such as direct WAV editing aren’t present. But more importantly, it allows me to concentrate on recording, and it has decent enough mastering tools to output decent demo cuts. Bear in mind that this isn’t necessarily a plug for GarageBand, and although I love it, there are some other fine, very easy-to-use packages out there.
No matter what package you choose, there some important lessons that I’ve learned in the creation of my own demo that I’d like to share:
First and foremost, the most important thing is to get your music out there. Whether or not you do it in the studio or in the comfort of your home, time to production is critical. Don’t let technological barriers get in your way like I did. There are always simpler solutions that will help speed up your process.
Speaking of technical barriers, and addressing what Tom Booth said to me, in retrospect, I’d give this advice: Get the recording gear that suits your minimum recording needs, but will give you some decent sound quality. After all, you’re recording a demo, so you’re not after finished production-quality recordings, but something that will convey your sound.
Once you have a recording solution, you should consider buying some other equipment:
buy a couple of decent mics. You don’t need Neumann. I use a Nady RM-200 ribbon mic and a Senheiser 830 stage mic. I use both interchangeably for vocals and instruments. Of course, if you already have good mics, definitely use them.
Invest in a decent mic pre-amp. Presonus makes the TUBEPre which is $99. It’s a great little tube pre that will add warmth to the things you mic.
If you can swing it, get a little 5 Watt tube amp for recording guitar parts at low volume. It’s amazing what these things sound like when close-mic’d. You can then use your software package to filter and fatten.
If you need MIDI, I’ve found it a lot more useful to have at least a 44-key keyboard with semi-weighted or fully-weighted keys. And you don’t need to spend a mint on a controller. You can get a decent controller for less than $200.
Most integrated packages like GarageBand or Logic Express have some basic mastering tools to output your recordings. Learn to use them; especially the dynamics processors like a compressor. Mind you, you don’t want too much compression, but you’ll do yourself a huge favor by controlling your peak volumes.
Finally, and I know I said this before: Always keep on telling yourself that this ain’t finished product. It’s not supposed to be finished. It’s supposed to convey to the listener what your sound is all about. You can get it close, and you should, but don’t fret over the little imperfections here and there.
You really don’t get a taste for how well gear actually performs until you use it in a performance or recording situation. After all, doing tests is one thing; mixing it up in a band or recording a track with it are entirely different animals. This past weekend, I had the chance to put my new Champ 600 through its paces in both a recording and performance situations. Before I go into specific details, let me just sum up for those who don’t want to read on: In my book, for what the Fender Champion 600 has to offer, it is an absolute champ! Don’t let the diminutive size fool you. Even in stock livery, the Champion 600 produces beautiful tone; that is, it produces the natural tone of your guitar. As long as you don’t expect it to be more than what it is and what it offers, this little amp will make you very happy! I’m very tickled by this amp and the experience I just had with it.
Let’s dive into how I actually used it, shall we?
Into the Studio
As some of you may know, I have a home studio, and if you’ve read my past articles, I’ve written several articles centering on gear that could be used in low-volume/small venue applications. I purchased the Champ specifically for this purpose. From the standpoint of volume, the Champ is a dream come true! It’s quiet when idle (some people have mentioned that it hums and cracks – thank goodness I didn’t get one of those), and amazingly enough, it’s a very expressive amp, despite its tiny six-inch speaker. With the single knob to control volume, this amp is meant to produce the natural tonal character of whatever guitar is plugged into it, and it does this incredibly well. But because it has zero bells and whistles such as reverb and EQ, those are things you have to provide, but it takes to pedals quite nicely.
Obviously because of its small size, there are some limitations. You lose a lot of the bottom end you’d normally get from a larger speaker in a bigger cabinet. But if you’re looking to record a high-midrange, ringy tone, the Champ performs like an ace in this range! The tone is gorgeous! Which actually puzzled me when I recorded with it this weekend because I read several reviews where people swapped out the stock speaker because they felt it was too flat. I recorded with it and absolutely loved the tone it produced – and the speaker’s not even broken in yet! Maybe my ears just aren’t as sensitive (which is a huge possibility) as the other reviewers…
Now addressing the lack of bottom end in the Champ, I decided to drive my Hot Rod’s speaker with it, using an extension cord. This is where the amp really shined, in my opinion. You still get the ringy tone, but with a larger speaker, the tone is oh so very rich.
Gibson ES-335: I used this for the main rhythm track using the stock amp with the little 6″ speaker. For effects I added a smidgen of reverb, and layered chorus on top of that. The result was a gorgeous ringing tone!
Fender Strat with ’57 Tex-Mex Reissue pickups – This provided the second rhythm track with mild distortion. For this track, I drove my Hot Rod’s cab with the Champ. To fatten out the tone a bit, I employed about a 2.5 to 1 compression. Because my Strat doesn’t have a lot of natural overdrive, I added just a touch of drive using a combination of my TS-808 and OCD pedals, both set to very low drive levels.
Epiphone ’58 Korina Explorer Reissue – Again, I used my Hot Rod’s speaker cab. But there’s so much natural drive and sustain with this guitar, that I didn’t have to use ANY effects with it. This added the extra kick in the chorus of the song.
Of course, no sound engineer – amateur or pro – would be worth their salt without some mastering tricks. But truth be told, the ONLY thing I did with the guitar tracks on the song was to adjust their volume levels, and add just a touch of reverb (about 7%) to the Strat track. That’s it! I’m very pleased.
Live Performance
As a test, I brought the Champ to play at my weekly Church service. I figured that I mic my amps anyway, so it would be a great test to see how it performed. In this venue, I’m not worried about cutting through the mix – just having enough volume so I can hear it. Since we employ active mixing, our sound guy knows to pump up my house volume when I do leads or play the main rhythm parts for a song. So how did it perform? Well… a lot better than I expected, but I did miss the bottom end in my output signal. It wasn’t that I was dissatisfied, but in a performance situation, this amp will sound A LOT better driving a large speaker in a bigger cab. Other than that, I was generally pleased with how it sounded.
So to sum it all up, the Champ is a dream in the studio, and with the help of an extension cab, will perform great in small-venue/low-volume performance situations.
I actually wrote this song a couple of years ago, and have played it live a ton of times since then. Don’t know why I didn’t record it earlier, but I think I was a little scared of the arrangement of the guitars – I needed three to pull it off, with each one doing a different thing. It was a little daunting, especially considering this is a really straight-forward song. It’s loosely based on Saint Paul’s “Faith, Hope, and Love…” passage, but I added a bit more to the message; mainly dealing with putting your full trust in God, and leaving it up to Him to guide your life. Of course, we all have our choices, but why worry when we’ve got Faith, Hope and Love? 🙂
Anyway, give it a listen. Frankly, it’s one of my favorite songs because it’s loud and rockin’, but in a real fun way!
Equipment Used
Amps:
Fender Hot Rod Deluxe – I’ve got THD Yellow Jackets in the power tube section – very sweet, early distortion.
Fender Champion 600 – This is my debut of this cute little amp. I played my ES-335 with it stock for the base rhythm track, and drove the 1 X 12 cabinet on my Hot Rod with it, when playing my Strat for the “counterpoint” rhythm part.
Guitars:
Gibson ES-335 – This sounded so very sweet through the Champ, and I haven’t even full broken it in yet!!! That’s a testament to how great that little amp is!
Fender Strat – Admittedly, the Champ sounded a little tinny with the Strat, which is what I expected, but driving my 1 X 12 cab on my Hot Rod really did the trick!
Epiphone ’58 Korina Explorer Re-issue – Used this with my Hot Rod in the drive channel, which create an ever so sweet distortion with the EL-84’s. Combined with the fact that the Explorer just wants to overdrive naturally, this was a great combination.
All other instruments were MIDI (bass and organ). I used a combination of several GarageBand drum loops to create the drum track.
Note: This was also the very first time, I used extensive volume automation in a song. I’ve avoided it because I felt it was too much work. It is a lot of work! But I wanted to mix down the song without normalization this time because GB normalization can make a song too quiet. And in this case where I was hitting the red zone in gain – it was in a place where I wanted to get a bit of breakup anyway – but it’s so slight, you barely notice it. Once I get into the studio, we’ll be able to master it properly. But for now, it’ll do for a
I wrote this song in mid-2006, but didn’t get around to recording it until this past week. It’s yet another praise song, but it’s a praise song with a twist. It’s written as a blues/funk piece. One wouldn’t normally equate funk/blues with contemporary Christian music, but all I can say is that’s what I came up with. It’s not that I’m trying to do the unexpected – the song kind of worked itself out like that, and it’s also a sound that I like. That point really hit home after I read an interview in the latest issue of Guitar World last weekend with Lenny Kravitz. The interviewer commented that he crossed different styles in his latest album, and his reply was (paraphrasing), “I write music that I like to hear. If you try to write music that you think people will like, it loses its soul.” That’s kind of the place that I’m coming from with the music I’m recording right now. Most of it really leans towards the blues, but it’s music that I like, and what I’m influenced by, so it provides the context for my songwriting. Anyway, have a listen! I hope you like it!
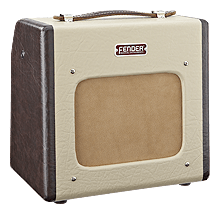
Summary: Great tone can come in small packages, and the Fender Champ is a great example of this. Simple and straight-forward, it’s easy to use, and even easier on the pocketbook. Not really meant to be used as something you’d gig with (though you could easily add an extension cabinet), it’s a great amp for practicing and for the home studio recording artist looking for a low-wattage solution.
Pros: Vintage looks and great sound and quality for a small price.
Cons: You sacrifice a bit of low-end for the diminutive size.
Recording in a home studio presents various challenges to the DIY recording artist. But no other challenge is greater than controlling the output volume of amps, especially if you want to push them into breakup. To get even a small amount of breakup, you’ve got to increase gain to push the pre-amp and/or power tubes; and invariably, this is accompanied by a boost in output volume. There are various ways to deal with this from creating amp enclosures to using attenuators or even installing tube adapters to use lower wattage output tubes, and they all work reasonably well. Another approach is to simply get a smaller wattage amp in the 5 – 15 Watt category. Most have much smaller speakers than their larger counterparts, so their output volume is naturally lower, plus with the smaller wattage, it’s easier to overdrive them at lower volumes, thus producing breakup without shaking tiles loose.
First of all, let’s be real honest: The Champ is a $200 amp, sporting a single volume knob and a standby switch. That’s it. This is not an amp that you compare to a boutique amp in any respect, so don’t try to compare it to something like a Carr mini-Mercury – they’re in two completely different classes! A re-issue of the original 1950 Fender Champion, it employs modern mass-production techniques as opposed to the hand-wired, point-to-point construction from which most boutique amps are built. But for what you pay for this amp, and for the quality of sound that it produces, you just can’t go wrong. Bear in mind that the Champ is a no-frills amp whose sole purpose in life is to amplify the natural sound of your guitar. It’s not meant for gigging with a full band. On the other hand, it creates really nice tone (albeit with a little loss of the bottom-end). As long as you don’t try think of this amp as any more than what it is, it’ll make you pretty happy.
Looks
This is a very retro-looking amp, with the original two-tone brown on beige tolex design. It actually looks like a mini television! and the leather handle is a real nice touch – though I’d be careful not to strain the handle too much… It’s a little weird to see a single volume knob, but that just tells you that this is a no-frills amp, as I mentioned before.
Sound Quality
I’ve already mentioned that the Champ produces really nice tone, and even though I missed the bottom-end that you’d get with a larger speaker, the quality of the sound that it does produce is stellar. Besides, in a recording application, you can always tweak the bottom-end a bit with EQ, but I digress. I tested the Champ out with a G & L Comanche, a Strat, and a Les Paul Standard. As expected, the amp reacted very differently with each of the different guitars, but surprisingly, it retained the character of each guitar, which I thought might be lost because of its diminutive size. The Strat played clean and smooth, and position 4 (center/bridge) was twangy and ringy as expected. What surprised me even more was with the Strat, I couldn’t get the amp to break-up until I cranked the volume past 9 (it goes up to 12). There’s lots and lots of clean headroom with single coils, so if you want to get break-up, you’d be best served using an overdrive pedal of sorts.
It was far easier to get amp to break up with the Comanche and Les Paul, as expected. It was a bit more difficult with the Comanche as it uses the hybrid Z-coil pickups, but it was still easier to get breakup than with he Strat. The LP broke up nicely with volume at about halfway, and the volume knobs pegged.
From a distortion standpoint, the Champ produces distortion similar to a Fender Deluxe. It’s not creamy smooth, but it’s also not too gritty – though it does get really ugly at high volumes – probably due to speaker distortion, which is never nice. But dialed in just right, the Champ produces really subtle breakup which is very ringy and pleasant.
Being that you can’t really do much tone shaping with the amp itself, it’s up to you to throw whatever boxes you need to achieve the tone you’re after. But that shouldn’t be too much of a problem for most folks. Besides, in lots of cases, you may not want to put any boxes in your signal chain before this amp. Here’s a decent-sounding YouTube video that demonstrates how the Champ sounds. I think you’ll be surprised:
Value
For the money, it’s hard to go wrong with the Fender Champion 600. A cheaper alternative would be the Epiphone Valve Junior which costs only $129.00 for the head. I’ll be writing a review for that as well in the very near future, but if you’re looking for that nice, Fender clean tone in a low-wattage application, but don’t want to shell out several hundred dollars for even a small deluxe, the Champ is a great way to go!
Update: As you can see at the top, the price listed is $149. Fender dropped the price after I wrote the article. Of course, I paid the original $200+ for the damn amp, but there you have it…


 You really don’t get a taste for how well gear actually performs until you use it in a performance or recording situation. After all, doing tests is one thing; mixing it up in a band or recording a track with it are entirely different animals. This past weekend, I had the chance to put my new Champ 600 through its paces in both a recording and performance situations. Before I go into specific details, let me just sum up for those who don’t want to read on: In my book, for what the Fender Champion 600 has to offer, it is an absolute champ! Don’t let the diminutive size fool you. Even in stock livery, the Champion 600 produces beautiful tone; that is, it produces the natural tone of your guitar. As long as you don’t expect it to be more than what it is and what it offers, this little amp will make you very happy! I’m very tickled by this amp and the experience I just had with it.