 |
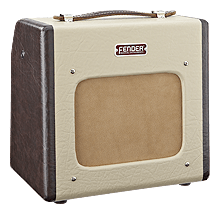
Fender® Champion 600
Price: $149 (street) Summary: Great tone can come in small packages, and the Fender Champ is a great example of this. Simple and straight-forward, it’s easy to use, and even easier on the pocketbook. Not really meant to be used as something you’d gig with (though you could easily add an extension cabinet), it’s a great amp for practicing and for the home studio recording artist looking for a low-wattage solution. Pros: Vintage looks and great sound and quality for a small price. Cons: You sacrifice a bit of low-end for the diminutive size. |
Recording in a home studio presents various challenges to the DIY recording artist. But no other challenge is greater than controlling the output volume of amps, especially if you want to push them into breakup. To get even a small amount of breakup, you’ve got to increase gain to push the pre-amp and/or power tubes; and invariably, this is accompanied by a boost in output volume. There are various ways to deal with this from creating amp enclosures to using attenuators or even installing tube adapters to use lower wattage output tubes, and they all work reasonably well. Another approach is to simply get a smaller wattage amp in the 5 – 15 Watt category. Most have much smaller speakers than their larger counterparts, so their output volume is naturally lower, plus with the smaller wattage, it’s easier to overdrive them at lower volumes, thus producing breakup without shaking tiles loose.
Among the 5 Watt amps available, the two seemingly most-popular amps are the Fender® Champion 600 and the Epiphone Valve Junior Combo. I recently had the chance to try out the Champ.
Vintage Roots, Great Sound: Bargain Price
First of all, let’s be real honest: The Champ is a $200 amp, sporting a single volume knob and a standby switch. That’s it. This is not an amp that you compare to a boutique amp in any respect, so don’t try to compare it to something like a Carr mini-Mercury – they’re in two completely different classes! A re-issue of the original 1950 Fender Champion, it employs modern mass-production techniques as opposed to the hand-wired, point-to-point construction from which most boutique amps are built. But for what you pay for this amp, and for the quality of sound that it produces, you just can’t go wrong. Bear in mind that the Champ is a no-frills amp whose sole purpose in life is to amplify the natural sound of your guitar. It’s not meant for gigging with a full band. On the other hand, it creates really nice tone (albeit with a little loss of the bottom-end). As long as you don’t try think of this amp as any more than what it is, it’ll make you pretty happy.
Looks
This is a very retro-looking amp, with the original two-tone brown on beige tolex design. It actually looks like a mini television! and the leather handle is a real nice touch – though I’d be careful not to strain the handle too much… It’s a little weird to see a single volume knob, but that just tells you that this is a no-frills amp, as I mentioned before.
Sound Quality
I’ve already mentioned that the Champ produces really nice tone, and even though I missed the bottom-end that you’d get with a larger speaker, the quality of the sound that it does produce is stellar. Besides, in a recording application, you can always tweak the bottom-end a bit with EQ, but I digress. I tested the Champ out with a G & L Comanche, a Strat, and a Les Paul Standard. As expected, the amp reacted very differently with each of the different guitars, but surprisingly, it retained the character of each guitar, which I thought might be lost because of its diminutive size. The Strat played clean and smooth, and position 4 (center/bridge) was twangy and ringy as expected. What surprised me even more was with the Strat, I couldn’t get the amp to break-up until I cranked the volume past 9 (it goes up to 12). There’s lots and lots of clean headroom with single coils, so if you want to get break-up, you’d be best served using an overdrive pedal of sorts.
It was far easier to get amp to break up with the Comanche and Les Paul, as expected. It was a bit more difficult with the Comanche as it uses the hybrid Z-coil pickups, but it was still easier to get breakup than with he Strat. The LP broke up nicely with volume at about halfway, and the volume knobs pegged.
From a distortion standpoint, the Champ produces distortion similar to a Fender Deluxe. It’s not creamy smooth, but it’s also not too gritty – though it does get really ugly at high volumes – probably due to speaker distortion, which is never nice. But dialed in just right, the Champ produces really subtle breakup which is very ringy and pleasant.
Being that you can’t really do much tone shaping with the amp itself, it’s up to you to throw whatever boxes you need to achieve the tone you’re after. But that shouldn’t be too much of a problem for most folks. Besides, in lots of cases, you may not want to put any boxes in your signal chain before this amp. Here’s a decent-sounding YouTube video that demonstrates how the Champ sounds. I think you’ll be surprised:
Value
For the money, it’s hard to go wrong with the Fender Champion 600. A cheaper alternative would be the Epiphone Valve Junior which costs only $129.00 for the head. I’ll be writing a review for that as well in the very near future, but if you’re looking for that nice, Fender clean tone in a low-wattage application, but don’t want to shell out several hundred dollars for even a small deluxe, the Champ is a great way to go!
Update: As you can see at the top, the price listed is $149. Fender dropped the price after I wrote the article. Of course, I paid the original $200+ for the damn amp, but there you have it…

 One of my first posts on GuitarGear.org was entitled, “
 Talk about getting a “clean” tone, and invariably, some Fender amp will be mentioned, especially the models from the 50’s like the Twin. By far, “Fender clean” is the clean tone that has been emulated for decades by amp manufacturers the world over. Unfortunately, if you want that clean tone from the 50’s, you’ll have to get a used Fender amp from a vintage shop – and they’re not cheap. Enter
 I’ve been searching for a decent compression/sustainer for a long time, and I’ve tried out a bunch over the last year. Surprisingly enough, it wasn’t until recently that I decided to check out the MXR DynaComp. The DynaComp has been around for a long time, and has several faithful followers. Unfortunately, I’m not one of them. It’s not that this is a bad pedal – it’s pretty rugged, very simple to use, but it just doesn’t have what I need for the type of music that I play, which at the moment is bluesy and I use minimal overdrive. But I digress. This won’t be a long review. I’ll just give you my assessment…