Feeds:
Posts
Comments

Archive for the ‘guitar’ Category

Demeter Opto CompulatorI was at a casino last weekend, sitting in a bar with a couple of friends and listening to this great duo play classic rock hits. During one of their breaks between sets, I went to the stage to talk to the guitarist (he had a cool name: Buford) and checked out his gear. He had a fairly simple setup: Just two effect boxes going into a Vox amp modeler that then went straight into his mixing console. What caught my eye though were his two effect pedals, both by Demeter (pronounced Deh’ meh tur) Amplification. One was Demeter’s FUZ-1 Fuzzulator drive box, and the other was the Opto Compulator. I knew a bit about the Fuzzulator, but I wanted to know more about the Compulator, as I’ve been considering purchasing a compression pedal for some time. So I asked him a few questions about the box. Here’s how the conversation went:

What’s your main application for the compressor?
Even though this is a pretty small stage, we’re playing in a fairly open environment at low volume. When I need to play distorted, I’ve got to fatten up my signal a bit, so I can cut through the crowd noise. Distortion always thins out your tone a bit, so this helps me compensate for that.

Doesn’t a compressor affect your overall tone?
In general, yeah. But this has got to be the most transparent compressor I’ve ever used. With this box, I maintain my tone, but just give it a slightly fatter delivery. And like I said before, in this environment, I need a fatter signal to cut through the crowd noise. I’ve played with a bunch, and this one is the absolute best I’ve ever had.

So what’s so special about the Compulator?
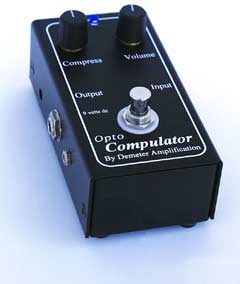
Like I said, it’s really transparent, and the compression effect is so subtle, most people wouldn’t even notice – I hardly notice it myself, but I know when it’s not on. And maybe there’s a bit of me being used to the sound. Other than that, it’s real easy to use. You have two knobs: The left-hand knob controls the amount of compression you want to dial in, and the other knob controls the gain. You also have a little trim dial on the side that you can adjust with a small screwdriver to trim the volume up or down – but I’ve never had to use it.

Can I do an A/B comparison from a slight distance away?
Sure thing. Step back about 20 feet, and I’ll show ya.

So I stepped back, and he played some chords and riffs with it on, and with it off. I’ll be damned! He was right. His tone was the same, but had just a tad fatter quality! Now that’s transparency! And that demonstration convinced me on the spot that the Compulator is the box I’m going to buy.

About compression…

For a good article discussing the general concepts of audio compression, click here. It doesn’t go into into the heavy technical details of compression, but it definitely helps to demystify how it works. For a more comprehensive and technical discussion, click here.

COMP-1 Opto Compulator Features

  • Compress Knob – controls amount of gain reduction up to 30dB.
  • Volume Knob – increases/decreases the output volume (aka “makeup gain”).
  • Trim Pot – very nice feature to adjust the unit’s preamp gain. If you plug a hot instrument into the unit, you could get distortion. You can knock down the input gain to avoid that.
  • Powered by a 9 volt battery, but also has a standard 9V jack.
  • Street Price: Generally around $199.00 (do a Google search)

My prospective usage

I normally play in very small, low-ceiling venues, so compression has not been a big issue for me. However, when I play with my band at my church, I have to play at fairly low volumes, which makes playing in distortion a huge challenge, because in order to hear the effect, I have to turn up my volume. That usually makes me stomp on the mix. With a fatter signal, I should be able to punch through the mix much more effectively without having to pump up my volume too much (or as much as I have been 🙂 ).

After hearing this unit, I’m convinced this is the right pedal. And getting input directly from a guy who swears by it and was willing to demonstrate how it worked had me sold.

Read Full Post »

My blog buddy, IG over at igblog always compels me to really think about playing. It’s uncanny. Thanks, IG. Anyway, in one of his latest installments entitled “You gotta fight your guitar a little…” he talked about how different guitarists actually “fight” with their guitar; overcoming bad setups or dead spots to really push them to be more expressive. That got me to thinking about my own experience in “fighting” with my guitars.
As far as dead spots and bad setups are concerned, I’m fortunate that my guitars are set up really well (a touch of luthier work here and there). But I do have a quirk that has actually served to push my expressiveness on the guitar. I don’t change my strings that often; in fact, I’ll have my strings on for months and months at a time, though it’s not out of laziness. I actually like the “duller” sound of worn strings. But there’s actually more to it than that.

Several years ago, I didn’t make much money – just about enough to support my family and have a bit left over to have some fun with. Unfortunately, that didn’t include guitar gear. And even though I played often, spending money on gear just wasn’t in the stars for me then. So I didn’t regularly change my strings. If one broke, I’d replace it, but generally, they’d stay on for a long time. I now have the means to buy strings and gear when I “need” to, but I still keep my strings on my guitars for a long time without replacing them. First, for the reason I mentioned above, but secondly because of a more important thing: Those dull strings push me to eek out as much sound from my guitars as possible.

When I didn’t have the means to buy gear very often, I actually had to learn how to do things with my guitar that I don’t think I otherwise would’ve done. You see, worn strings don’t have all that much sustain, so you have to do other things to sort of “fill in the spaces” like strum a chord then play an arpeggio, or sneak in a palm mute right before a chord to add some rhythm, not to mention strategically placed hammer-ons and pull-offs. I learned all these things not because they were cool to do (they were and still are), but more out of a drive to compensate for my dull-sounding strings.

To this day, I keep worn strings on my guitars. It creates a tension that pushes me to explore tonal areas that I probably wouldn’t go to otherwise.

Thanks to IG for jogging my memory!

Read Full Post »

Presonus TUBEPre

Why use a pre-amp? Quite simply, a pre-amp greatly aids in either bolstering the signal of either a mic or line-level device, but it also can add some very helpful signal conditioning that will add “warmth” to the tone a device produces. I use the Presonus TUBEPre not only for microphone applications, but also for adding a touch of warmth to the signal of my acoustic guitar. The difference that it makes in the overall tonal quality that my guitar produces while plugged into an amp is so immense that it has become an essential piece of hardware when I gig or record.

Among the “lower cost,” sub-$100 pre-amps on the market, I believe that the TUBEPre offers the best value. With its standard features, it surpasses many tube-based pre-amps in this price range. Most tube pre-amps just provide drive and gain knobs and perhaps a phantom power switch, but the TUBEPre also includes four extra features that definitely add to its value.

As the name implies, the Presonus TUBEPre is a vacuum tube-driven device. Specifically, the tube used is a fairly standard 12AX7 tube. Here are the extra features that accompany the pre-amp:

  • Phase Inverter Switch – I’ve never had to use this, but pressing this switch reverse the polarity of the XLR connection to avoid phase cancellation when two mics operate in close proximity.
  • -20db Pad – This is incredibly useful when mic’ing a high output device like an amp so you don’t drive the input signal into distortion.
  • 80Hz Rumble Filter – This is very nice feature that will eliminate low frequency background noise such as wind or air conditioners. Since I use mine in my garage, it’s great for filtering out the low frequency drone of my freezer.
  • +48V Phantom Power – For those devices that require a constant power source, such as a condenser mic, getting enough power is just a button press away.

Gripes

I only have one gripe about the TUBEPre, and that is that the meter is completely useless. In my case, once I hit about 9 o’clock on the gain (with Drive set to 11-12 o’clock), the meter becomes incredibly erratic, and tends to peak way too easily. So I tend to rely on my ears, and the clipping alert LED between the drive and gain knobs (which works). Other than this single gripe, it’s all good, and really it’s about the sound anyway.

How it sounds…

Out of the box, the TUBEPre sounds great, adding a very pleasing warmth to your tone, but it sounds even better with a different 12AX7 tube than the cheapo stock tube that comes with the unit. I replaced my 12AX7 with a Mesa Boogie 12AX7 tube, and the already great sound that came out of the TUBEPre sounded even better!

I use the TUBEPre for both microphone and for warming up the signal from my acoustic/electric. In both cases, the resultant sound is very warm and full of texture. My vocals are very clear-sounding, especially when I’m using a heavy-duty cardioid mic, which tends to project a lot of bottom end and at times sound a bit muddy. With that mic hooked up to the TUBEPre, I get a rich, full tone that brings out the subtleties in my voice (though it does pick up those little vocal mistakes 🙂 ). With my acoustic/electric hooked up to the TUBEPre, it actually helps to brighten out the sound of my guitar, and gives the output much more dynamic range. The net result is that my performance can be a lot more expressive.

As far as driving the tube into clipping, that’s not something that I use it for, but I have done it, and it creates a very interesting effect. The sound is very much pre-amp distortion, but it’s a bit thinner. But as I said, this is not something that I’d do with this unit in any case. Driving the tube into clipping too often and for too long will reduce its life. Tubes ain’t cheap, so I tend to baby this unit as much as possible…

To sum it up, the Presonus TUBEPre is a great addition to your gear if you’re looking to warm up your tone.

Read Full Post »

Dr. Z Air Brake

About six months ago, I wrote a little ditty about the Dr. Z Air Brake, but I thought I’d revisit this essential piece of equipment once again. The Air Brake is a power attenuator; in other words, it reduces the amount of signal from your amp that reaches the speaker, thus reducing your audible output. Before I go any further, the big question is: Why would you want to reduce the amount of signal going to your speaker from your amp. There’s actually a very good reason: Overdrive.

With tube amps, especially those with multiple-stage gain, you can’t achieve that warm clipping (read: creamy distortion) without upping the drive to your power tubes. Unfortunately, that also means you have to crank your amp, as achieving those nice distortion characteristics is a function of both drive and gain. The net result in turn can shatter your eardrums in an enclosed space, or worse yet, have your family or neighbors scream at you for playing too loud in your garage. A power attenuator allows you to drive your power tubes into clipping but do so at a significantly reduced volume. For home studio enthusiasts like myself that usually record late into the night, this means you can work on recording projects without the fear of waking up my family or pissing off the next door neighbors (which I have done many times).

There’s a good FAQ about power attenuators and how they work here. I won’t go into the technical details, but suffice it to say that with a power attenuator, you can play at acceptable volume levels while still being able to drive your amp. With that let’s get into the Dr. Z Air Brake features.

The Dr. Z Air Brake is incredibly easy to use, though in addition to the unit, you’ll need a couple of good-quality audio cables with 1/4″ plugs. If your amp’s output goes straight to your speaker and is then soldered to the speaker leads, you’ll have to do some splicing and soldering, though most tube amps today use a 1/4″ output jack. Once you’ve got the unit hooked up, you have five levels of attenuation: 0 through 4 and Bedroom. The “0” setting is total bypass, while the 1-4 settings impose approximately -2.5dB attenuation with each position by default. If you open the unit up, you can actually increase or decrease the amount of attenuation at each position by moving the leads along the resistors (this is explained in the accompanying manual – it’s a single sheet of paper). The “Bedroom” setting is what sold me on the unit. When you have the Attenuator knob set to “Bedroom,” the “Bedroom Level” knob comes into play. This provides variable signal attenuation down to 1 Watt (for sub-100 Watt amps) at the maximum level, though at this amount of attenuation, your tone really changes because the speaker cone doesn’t move enough air, thus producing a VERY thin (read: ugly) tone. I usually set my Bedroom Level knob to about 10-11 o’clock, the play with my drive and volume knobs on my amp until I’ve dialed in a good tone. Frankly, it doesn’t get much easier than this.

In addition to the variable bedroom level control, I chose the Dr. Z Air Brake after evaluating and reading various reviews, and speaking with other folks who have one. The most popular attenuator at the time I was reviewing attenuators was the THD Hot Plate. I tried one out at a shop, but didn’t like the sound that came out of it all. It literally changed my tone. The Dr. Z Air Brake, on the other hand is much more transparent, even at bedroom levels. As far as gigging is concerned, since I play a lot of small venues, it’s a real helpful piece of equipment because it allows me to drive my amp when I play with my band without stepping on the band’s overall output.

CAVEAT EMPTOR

Many people buy attenuators thinking that once they’ve attenuated their signal, they can drive their power tubes to their highest levels. It’s true, you can do this. But you’ll also burn through your tubes pretty quickly, or worse yet, you’ll damage your amp’s electronics. I’ve heard about this happening especially with resistive attenuators. People crank their drive, and after a few minutes start smelling something burning as their amp’s internal electronics fry. Also, driving your power tubes into super saturation doesn’t do anything but cause a lot of ugly distortion. When you drive your power tubes, the tone you should expect is a smooth distortion, as the intermixing sound waves weave together beautifully. Adding even more power creates a much larger contrast between the peaks and valleys of the distorted wave, and what you end up getting is a very “dirty” sounding distortion that is not in any way pleasing to the ears. So beware if you’re in the market for an attenuator!

In closing, if you’re like me, and play in a variety of small- to medium-sized venues, a power attenuator can be your friend. For me, mine is always hooked up. It has saved me from a lot of headaches and eliminated complaints!

ROCK ON!

Read Full Post »

Ibanez TS808 Tube ScreamerSince I recently did a review on the Fulltone OCD, I thought that I’d do a review on the much-revered TS808. As many in the know, this is the pedal that defined Stevie Ray Vaughn’s sound. But it’s not the reason why this pedal is so special. The Tube Screamer has a unique, transparent tone; the keyword being “transparent.” Want to add drive and breakup to your tone – just switch it on. What you’ll get is a warm-sounding overdrive that is like candy for the ears.

Like the OCD, this is not a distortion box. It’s an overdrive box. The difference between overdrive and distortion are important, because they involve different approaches to the electronics. Click here for a good discussion. Overdrive boxes are known as “soft clipping” devices where gain is inversely proportional to input signal. Usually the boost is in the midrange with the high and low ends slightly cut off. The Tube Screamer is a pure midrange booster, and produces a beautiful, warm tone. The OCD on the other hand also boosts in the middle, but has added electronics that add sustain and boost harmonics and overtones. With the OCD, you can get a FAT, almost compressed tone. With the TS, you just get a boost – but that’s not a failing in the least!

As with the previous review, neither pedal is better than the other. They both have their uses. When I want lots of sustain – especially with solos – I’ll use the OCD. But for general broken-up rhythm, I’ll use the TS, but that’s not necessarily a de facto standard…  In any case, let’s discuss some features…

Note to metal players: This is not the pedal for you, if you’re looking for a real hairy kind of distortion. Think of this box as a driver to achieve pre-amp distortion. That tends to be on the brighter side. This box will not produce a fat tone, so buyer beware!

But if you’re looking for warm type of pre-amp breakup, this box is for you! It couldn’t be easier to use, either. Just three knobs: Overdrive, Tone, and Level. To get the tone you like, just fiddle with the knobs until it sounds right to you. Generally, I set the tone knob to 12 o’clock, which is pretty neutral (though the tone knob really doesn’t have that much dynamic range), set the overdrive to 10 – 12 o’clock, then set the level to slightly louder than the volume of my amp with the box switched off.

As far as build quality is concerned, it’s an all-metal casing. I gig with this box a lot so its hefty weight and solid build is a boon to gigging. And unlike the normal toggle switch you find on most boxes, the TS is (de)activated with a square switch. It’s not only aesthetically pleasing, it’s also really functional. The only beef I have with the box is that the light source of the LED is set kind of deep, so you have to be practically right over the box to see if it’s switched on or off.

Finally, the Tube Screamer is not cheap. A “Re-issue” like mine will set you back ~$169.00, while vintage boxes run up to $450.00. All I can say is that the money you spend is entirely worth it!

Read Full Post »

Fulltone OCD Drive Pedal
There have only been a few times in all the years that I’ve been playing guitar that I’ve had an epiphany with a pedal, where after just playing a few notes, a light bulb would go off in my head, and I’d exclaim, “That’s the sound I’m after!” The Fulltone OCD did that to me this afternoon. I just love when that happens! Here are some of the features of this little beast:

  • First off, it has a true bypass switch, so when it’s off, it’s off, and you don’t have to remove the battery if you’ve got it plugged into a 9 volt power source.
  • Volume knob – speaks for itself. But here’s a real treat: The volume knob can give you up to 30dB of boost!!! Need a clean booster? Here it is, plus you can get that sexy, smooth distortion out of it as well. Special note for my friend IG over at igblog: Here’s your clean booster, and you get a freakin’ amazing distortion box to boot!!!
  • Tone knob – according to the manual (and I confirmed this as well), the tone knob only affects the high frequencies, but you can use it to sweeten up a lead or get a more squishy, punchier sound – very cool.
  • Drive knob – again self-explanatory. It’ll give you more or less distortion depending up on the position you set it to.
  • HP/LP switch. This is unique to this pedal. Set it to (H)igh (P)eak and you get glorious sounding bottom end and increased dynamic range, plus more distortion throughout various volume levels. Set it to LP, turn down the drive, and the pedal acts as a clean booster with the volume knob.

How it sounds

  • Whether you’re in HP or LP mode, the thing that I noticed the most was the amount of sustain it added to the notes I was playing. One thing that can be a bit of a frustration for me when playing my Strat is when I bend a high note (above the 12th fret), there’s just not much sustain in the guitar itself (of course, unless I crank my amp). But the OCD adds a lot of sustain with hardly any tonal interference (that makes your sound really muddy).
  • As far as distortion is concerned, the OCD will not muddy your tone – especially at lower volumes, and you get all the juicy, complex harmonics that you get out of a cranked amp. With the OCD, your tonal clarity is retained, even with heavy distortion, AND you get those overtones and harmonics – EVEN AT BEDROOM LEVELS!!! Think of the OCD’s distortion as an extension and enhancement of your tone. It’s very much in character with a box like the Ibanez TS-808, another overdrive box that I have that I love for its transparency.
  • With the OCD, you also get the touch sensitivity you’d expect out of a cranked amp. That’s yet another amazing thing about the OCD, it’s sensitive as all get-out even at lower volumes.
  • I haven’t confirmed this, but from other reviews I’ve read, and from the dude that sold me the pedal (I trust him mightily), the more voltage you run through the OCD, the better it sounds. I only have a 9 volt power supply, but it’ll take up 18 volts, though I’ve read that 12 volts is probably the best.

In a nutshell, if you’re looking for a distortion box that will make your good tone sound even better, this box is for you. That said, before Mike Fuller released this box, there was A LOT of hype surrounding it. Once it was released, a lot of players were disappointed, thinking that this would be the be-all, end-all of distortion boxes. It’s not. It has a different character; actually, a VERY unique character, that will endear it to some, and ward off others, especially those who are expecting a real low-end oomph. The OCD has that, but that’s not its strength. As I mentioned, it’s a tone enhancer, that will break up your signal as much or as little as you want. It won’t pour on oodles of low-end, especially if your setup is on the thin side.

An important note: The OCD works best with a single channel Class A amp, or on the clean channel of a multiple gain stage amp. It does not sound good when used in the drive channel, which already breaks up your tone. That said, if you do use it with a drive channel, either let it do the driving, and turn your amp’s boost down, or turn down the OCD’s distortion, and pump up the volume knob on the box. Otherwise you’ll get a very rough (read: ugly) distortion. A lot of folks have complained about this pedal clipping too much with their amps. Most likely, they’ve tried to use it in the way I described above.

Comparisons? Well, I’m never one to say this box is better than this box, unless the tonal quality is perceptibly that much better. The closest box I can think of to compare the OCD to off the top of my head would be the box I mentioned above: The TS-808 Tube Screamer. But where the Tube Screamer is more of a midrange booster, and it produces a much more crunchy tone, the OCD has much smoother distortion characteristics, and has way more inherent sustain than the Tube Screamer. Which one is better? Neither. For me, they both have their uses, though I’ll have to admit that the Tube Screamer will most likely be my go-to box for crunchy rhythms, and the OCD will be used for leads and more funky rhythm parts played high on the neck.

Sometimes, it’s just in the stars…
I stayed home from work today to take care of my toddler who has an ear infection. He’s been cranky all day with a fever, and of course, the incessant annoyance of the inner ear infection. So to calm him down, and help him take a nap, I took him for a drive. I wasn’t actually intending to go to my local guitar gear shop but I ended up exiting the freeway on the street that the shop was on, and just happened to drive in the direction of the shop (I really wasn’t meaning to go there, dammit! 🙂 ) Anyway, as I was driving, I noticed the “Guitar Showcase” sign, and turned into the parking lot. I figured I could browse around in the nice, air-conditioned space, which would be great for my little boy with a fever. So I put the baby in the stroller and entered the store.

Once I entered the store, I noticed that Peter, who sold me my Fender Hot Rod Deluxe was working behind the counter, so I struck up a conversation with him. He’s a touring musician, so I asked him how the gigging was going, and we swapped stories. Then it occurred to me to ask him about a good drive/distortion pedal that I could use in conjunction with my TS-808 (which he also sold me and also plays through). He said, “Man, here it is: The Fulltone OCD. This’ll do the job for you. You can use it as a clean boost, but you’ll get the sweetest, creamiest distortion you’ve ever heard. Other pedals, can sometimes make your tone turn muddy, but this will break up your signal and retain your clarity.” Peter knows what I play through, and the guitars that I have, so he knows how important my tone is. With that, I replied, “You know, I wasn’t banking on buying any gear today, but based on what you’re saying, I’ve got to try this pedal out.”

So Peter hooked me up to a Hot Rod Deluxe. I played one simple phrase: An ascending minor scale in E. Actually it was more like 4 notes with a bend and vibrato at the end, and my jaw just dropped!!! I couldn’t believe the sexy tones that came out of this little box! It was like the sea had parted and the way was made clear! Then Peter twiddled the knobs a bit, then told me to play some funky rhythm line, and it’s like the song just came to life! I swear, within a minute of playing through the OCD, I just turned to Peter and said, “Sold. I’m gonna play a bit more, but you can start writing up the order. I’m not leavin’ the store without one.” So, I am now the proud owner of a Fulltone OCD.

Read Full Post »

In my latest GarageBand project, I just finished recording a song that I wrote back in 2004, but never managed to record it until now. The song is called “I Will Sing (of Your Salvation).

While the song is very special to me, the recording was actually a bit of an experiment as I wanted to see if I could replace my synthesizer using only vocals. As far as the whole album of which this song is part, I wanted to take a very minimalistic approach to instrumentation to see how full a sound I could achieve with as few instruments as possible.

As always, I welcome your comments!

Read Full Post »

Last night, I finally finished re-recorded a solo for a song I’ve been working on releasing (Great God). The original solo was actually pretty good, but because of some errant picking on my part, there some distracting “extras” that I could easily wave edit away. So I decided to re-do the solo entirely. But that’s not the painful part. The painful part is actually physical. I ended up doing over 200 takes over the past couple of nights to get the solo just right. It’s still not perfect, but it’ll do for now… I need to rest my fingers a spell…

With my first set of takes, I duplicated the original solo. This only took a few takes to get it right. But then, I had a bit more complicated of a solo in my head, and it just wouldn’t let me settle. The only problem was that I had to learn how to play it! If you listen to the solo, it’s not a very difficult solo for anyone with the technique. I could actually play it myself from a technical standpoint, but the challenge for me was to play it entirely clean, without any added “touches.” It’s amazing how playing in overdrive masks out those little mistakes! A brush with the pick here, a mis-fingering there, and it just messes up the phrase, not to mention bending strings to just the right pitch. Playing clean, you can’t hide behind any kind of signal breakup.

So I used this recording session as much for recording as I did for a practicing clean technique; and this is where the pleasure kicks part kicks in. I still need to re-record the solo because I missed some pitch bends, but I’ve now learned some new technique that I can employ in other songs…

Read Full Post »

All I can say is WOW! GarageBand is absolutely OFF THE HOOK!

As I mentioned in a previous post, I was going to be using GarageBand to create song foundations for performing live. But to get myself more familiarized with the application, I decided to lay down a groove for a worship song that I wrote to see how easy it would be. I was not at all disappointed. I first auditioned a bunch of drum loops (BTW, I went out and purchased both iLife ’08 and the Rhythm Section Jam Pack today), found a fill, then inserted the loop into a new track. I then found a decent bass line, and dropped that in as well.

Software instruments such as the bass in GarageBand are actually software MIDI instruments. GarageBand makes it so easy to work with software instruments by providing a MIDI grid to adjust note pitches, duration, velocity, etc.. So once I selected a bassline, I could move notes around to fit to my song. Then it was a simple copy/cut/paste affair to get the bass “measures” into their proper places.

Once I had those two things laid down, I recorded my Strat for the rhythm track. Now here is where things got interesting. For my home recording studio, I use a DigiDesign MBox 2. It turns out that DigiDesign provides a Mac driver for the MBox 2 that you can download from their site. So now, I have my trusty MBox 2 hooked up to my iMac through a USB port, and I can switch from guitar to vocals or add some keyboard tracks with ease.

A totally cool new feature in GarageBand is the ability to loop record; that is, selecting a region in a song, then play several takes while looping over the same region. This is an awesome feature that I’ve appreciated in ProTools, but it’s here in GarageBand! With multi-take loop recording, you can dial in a section until you have it perfect. This saves so much time in the recording process because you don’t have to get to a spot, record, then splice the end. You just keep on playing that section over and over again until you’ve got it right. It also allows you to approach a particular phrase in different ways.

I’m really jazzed right now because I’ve finally found a music production tool that is incredibly easy to use. It’s so easy, it’s almost scary.

BTW, I need to put in a plug for GarageBand ’08. If you’re already a GarageBand user, YOU NEED TO GET iLife ’08 now! It is head and shoulders far more powerful and feature complete than the previous versions of the software. For a mere $79.00, it’s a cheap investment.

Read Full Post »

I’ve been a gigging musician for several years, playing in all sorts of venues. 90% of my gigs are just me singing and accompanying myself with a single guitar and keyboard, which has worked for me for a long time. But as of late, the artist in me has yearned to stretch his wings and produce a more sophisticated sound when I’m solo. It’s frustrating to play songs that have a lead in the middle of the song, and I’ve just got to strum along, or if it’s on the piano, I’ve just got to stick with the chart (I can’t improvise very well on the keys). So what to do?

Since I’ve made the switch to the Mac, I’ve discovered a wonderful little program called GarageBand that allows you to record music on your Mac. But interestingly enough, it also includes audio loops of all sorts of instruments, so you can literally create a song using just loops. The ramifications are clear: I finally have a way of easily creating song foundations for when I play solo. All I have to do is move the songs to my iPod! So begins my latest journey of creating song foundations. It’s very exciting to me because it’ll allow me to arrange songs for a wider genre of music than I’ve been playing. Talk about having a “band in the box.”

What inspired me to start doing this was seeing a guy at Downtown Disney a few months ago using an Akai MPC1000 Music Production Center for his background stuff, and playing guitar on top of his laid down tracks. I don’t have an extra $1000 to spend on something like that so it has been difficult getting started down this road. But with GarageBand, I should be able to lay down tracks really easily. Oooh I’m excited!

Read Full Post »

« Newer Posts - Older Posts »