Feeds:
Posts
Comments

Archive for the ‘performing’ Category

Fender Champion 600 Re-issue
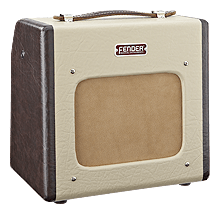
You really don’t get a taste for how well gear actually performs until you use it in a performance or recording situation. After all, doing tests is one thing; mixing it up in a band or recording a track with it are entirely different animals. This past weekend, I had the chance to put my new Champ 600 through its paces in both a recording and performance situations. Before I go into specific details, let me just sum up for those who don’t want to read on: In my book, for what the Fender Champion 600 has to offer, it is an absolute champ! Don’t let the diminutive size fool you. Even in stock livery, the Champion 600 produces beautiful tone; that is, it produces the natural tone of your guitar. As long as you don’t expect it to be more than what it is and what it offers, this little amp will make you very happy! I’m very tickled by this amp and the experience I just had with it.

Let’s dive into how I actually used it, shall we?

Into the Studio

As some of you may know, I have a home studio, and if you’ve read my past articles, I’ve written several articles centering on gear that could be used in low-volume/small venue applications. I purchased the Champ specifically for this purpose. From the standpoint of volume, the Champ is a dream come true! It’s quiet when idle (some people have mentioned that it hums and cracks – thank goodness I didn’t get one of those), and amazingly enough, it’s a very expressive amp, despite its tiny six-inch speaker. With the single knob to control volume, this amp is meant to produce the natural tonal character of whatever guitar is plugged into it, and it does this incredibly well. But because it has zero bells and whistles such as reverb and EQ, those are things you have to provide, but it takes to pedals quite nicely.

Obviously because of its small size, there are some limitations. You lose a lot of the bottom end you’d normally get from a larger speaker in a bigger cabinet. But if you’re looking to record a high-midrange, ringy tone, the Champ performs like an ace in this range! The tone is gorgeous! Which actually puzzled me when I recorded with it this weekend because I read several reviews where people swapped out the stock speaker because they felt it was too flat. I recorded with it and absolutely loved the tone it produced – and the speaker’s not even broken in yet! Maybe my ears just aren’t as sensitive (which is a huge possibility) as the other reviewers…

Now addressing the lack of bottom end in the Champ, I decided to drive my Hot Rod’s speaker with it, using an extension cord. This is where the amp really shined, in my opinion. You still get the ringy tone, but with a larger speaker, the tone is oh so very rich.

Click here to listen to the song I recorded using just the Champ with three different guitars:

  • Gibson ES-335: I used this for the main rhythm track using the stock amp with the little 6″ speaker. For effects I added a smidgen of reverb, and layered chorus on top of that. The result was a gorgeous ringing tone!
  • Fender Strat with ’57 Tex-Mex Reissue pickups – This provided the second rhythm track with mild distortion. For this track, I drove my Hot Rod’s cab with the Champ. To fatten out the tone a bit, I employed about a 2.5 to 1 compression. Because my Strat doesn’t have a lot of natural overdrive, I added just a touch of drive using a combination of my TS-808 and OCD pedals, both set to very low drive levels.
  • Epiphone ’58 Korina Explorer Reissue – Again, I used my Hot Rod’s speaker cab. But there’s so much natural drive and sustain with this guitar, that I didn’t have to use ANY effects with it. This added the extra kick in the chorus of the song.

Of course, no sound engineer – amateur or pro – would be worth their salt without some mastering tricks. But truth be told, the ONLY thing I did with the guitar tracks on the song was to adjust their volume levels, and add just a touch of reverb (about 7%) to the Strat track. That’s it! I’m very pleased.

Live Performance

As a test, I brought the Champ to play at my weekly Church service. I figured that I mic my amps anyway, so it would be a great test to see how it performed. In this venue, I’m not worried about cutting through the mix – just having enough volume so I can hear it. Since we employ active mixing, our sound guy knows to pump up my house volume when I do leads or play the main rhythm parts for a song. So how did it perform? Well… a lot better than I expected, but I did miss the bottom end in my output signal. It wasn’t that I was dissatisfied, but in a performance situation, this amp will sound A LOT better driving a large speaker in a bigger cab. Other than that, I was generally pleased with how it sounded.

So to sum it all up, the Champ is a dream in the studio, and with the help of an extension cab, will perform great in small-venue/low-volume performance situations.

Read Full Post »

Mark Kendall

A couple of months ago, I was having a drink with an old-school, elderly jazz guitarist named Patrick before my weekly gig at the restaurant I play at. To this day, I still don’t know Patrick’s last name, but he’s played with great Black jazz greats like Ellis Marsalis, and that whole “N’ah-lens scene, bruh,” as he calls it, and over the last few years that I’ve known him, I’ve really come to respect his unique wisdom and approach to the guitar. We don’t see each other often, and almost all of it has been via chance encounters at the bar. But when we do meet, we always talk about guitar, and life as a guitarist.

One day, we were talking about comping out chords to provide musical and rhythmic counterpoint against the vocals and bass, and out the blue he tells me (in his thick southern drawl – though I won’t try to write it too phonetically), “I can tell you got some chops, bruh. But you more into the groove thang than playin’ all sorts ‘a licks. I like that. Ain’t a song that’s been written that don’t need a good groove. Don’t let nobody fool ya. Let those mutha-f@#kas go off and do their noodlin’. Lots of them dudes can’t hold down a rhythm no-how!” My obvious response was, “Amen!” followed by a high-five and a triple soul-brother handshake.

I was taken by surprise by his compliment because I always feel I need to improve (I guess that’s why I push myself so hard), but I was even more amazed by what Patrick said after that because it underscored a sentiment that I’ve held for a long time: The groove of a song is where it’s at. Not only does it establish the rhythmic foundation for the song, it also forms the character and emotional framework for the entire piece. Without a foundation, you don’t have a song. Period.

Unfortunately, a lot of beginning guitarists focus almost entirely on learning lead parts, and dismiss playing rhythm guitar as merely executing a repetitious chord progression. They learn the chords as an afterthought, but don’t realize that they’re missing all the expressiveness that goes with a chord in relation to the body of a song. Playing good rhythm guitar isn’t just striking a chord on a specific beat – it’s all the stuff that happens within the duration of a chord that counts.

In my work as a music minister at my Church, I come across a lot of budding guitarists who can play leads like there’s no tomorrow. In fact, I have a 16 year old kid in my band whom I’ve had to make unlearn what he’s learned so he could learn how to play effective – and consistent – rhythm guitar. That kid knows John Mayer’s licks down cold, and a lot of other blues lead licks (which I’ve actually learned from him J ), but he couldn’t read a chord chart when he first started with the band and worse yet, had little sense of the rhythmic quality of playing guitar; in other words, no right hand technique. He’s not alone in this ignorance, and I place a lot of blame on guitar teachers for perpetuating this ignorance.

My message to them is this: Stop teaching leads to your beginning students. Teach your students how to play the damn guitar first. Teach them how to recognize the groove in a song, and teach them the groove!!! If they’ve got the groove down, then they’ve got the canvas to paint the colors of their leads. They’ll have a deeper understanding of their instrument, and how it fits in a song.

How important is groove? Don’t let me try to convince you. A couple of issues ago in Guitar Player, Rudolf Schenker and Matthias Jabs of the Scorpions were interviewed. Jabs is an incredible lead guitarist, but he mentioned in the article that playing good rhythm guitar was more important than playing leads. “After all,” he said (paraphrasing), “I’m playing rhythm guitar 90% of the time. Leads take up 10% of a song.” Then in the latest issue of Guitar World, Lenny Kravitz had some great insights into the importance of the groove of a song and playing good rhythm guitar. “You could have a guy that can play up and down the neck all day long, but playing a rhythm part consistently for four minutes without stopping is another story. It’s amazing to me when I see players that can play a lot of stuff, but they obviously haven’t concentrated on how to groove.

So how do you learn how to groove? Listen to all sorts of songs from different genres. Forget about leads for the moment, and listen for the groove in each song. Learn the chord progressions, yes, but learn what each guitarist is doing in between chords. Are they scratching? Are they adding colorful motes of a couple of strings? Are they adding alternate shapes or a 2 or 4 sustain to a chord. Take that all in… But after having said all that, don’t copy what they’re doing note for note. Just like with leads, learn the technique, then incorporate it into your own style.

I’ll be the first to admit that learning to be great a rhythm guitarist is hard. In fact, I find it a lot hard to learn rhythm riffs than leads, mainly because with most leads, you can follow a pattern. But with good rhythm, you have to feel what’s going on with the song you’re playing then use different techniques to affect a certain groove. But remember, the groove is what you’re after.

Read Full Post »

image-250.jpg
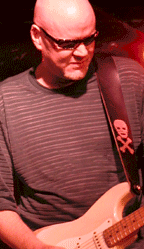
I mentioned in a previous post that I played for an audience of 750+ folks. What a rush! Anyway, there was a great photographer flitting about the place, and he happened to get some shots of the The Dawg playing, so I thought I’d share them to put a face to the name. Based upon the capo position, I think I was playing “Something in the Way She Moves” by James Taylor.

image-251.jpg

Read Full Post »

On Monday night, I performed solo in front of 700+ people; just me and my guitar. It was probably the largest crowd that I’ve ever played for as a solo act, and it was a totally cool experience. I did a lot of covers in my set ranging from James Taylor to the Beatles – even some Lynrd Skynrd. But the highlight for me was playing my new instrumental song, “Que Cosa.” I created a backing track that I downloaded to my iPod, which I routed through my PA, then played the guitar lead over the backing track. I’ve actually been rehearsing doing this for months, but finally worked up the courage to try it out in a real gig. I was really overwhelmed by the response.

I think the issue for me doing a purely instrumental piece had to do with some self-doubt. I really didn’t know if I’d be “good enough” to pull it off. But I broke through that doubt because there was only one way to find out if I was good enough. Based upon the response from the crowd, I guess I did fine. Of course, I’m always pushing to be better, but at least now I have the confidence to continue doing things like this.

Read Full Post »

Demeter Opto Compulator
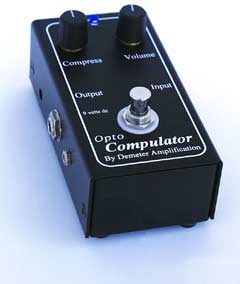
I was at a casino last weekend, sitting in a bar with a couple of friends and listening to this great duo play classic rock hits. During one of their breaks between sets, I went to the stage to talk to the guitarist (he had a cool name: Buford) and checked out his gear. He had a fairly simple setup: Just two effect boxes going into a Vox amp modeler that then went straight into his mixing console. What caught my eye though were his two effect pedals, both by Demeter (pronounced Deh’ meh tur) Amplification. One was Demeter’s FUZ-1 Fuzzulator drive box, and the other was the Opto Compulator. I knew a bit about the Fuzzulator, but I wanted to know more about the Compulator, as I’ve been considering purchasing a compression pedal for some time. So I asked him a few questions about the box. Here’s how the conversation went:

What’s your main application for the compressor?
Even though this is a pretty small stage, we’re playing in a fairly open environment at low volume. When I need to play distorted, I’ve got to fatten up my signal a bit, so I can cut through the crowd noise. Distortion always thins out your tone a bit, so this helps me compensate for that.

Doesn’t a compressor affect your overall tone?
In general, yeah. But this has got to be the most transparent compressor I’ve ever used. With this box, I maintain my tone, but just give it a slightly fatter delivery. And like I said before, in this environment, I need a fatter signal to cut through the crowd noise. I’ve played with a bunch, and this one is the absolute best I’ve ever had.

So what’s so special about the Compulator?
Like I said, it’s really transparent, and the compression effect is so subtle, most people wouldn’t even notice – I hardly notice it myself, but I know when it’s not on. And maybe there’s a bit of me being used to the sound. Other than that, it’s real easy to use. You have two knobs: The left-hand knob controls the amount of compression you want to dial in, and the other knob controls the gain. You also have a little trim dial on the side that you can adjust with a small screwdriver to trim the volume up or down – but I’ve never had to use it.

Can I do an A/B comparison from a slight distance away?
Sure thing. Step back about 20 feet, and I’ll show ya.

So I stepped back, and he played some chords and riffs with it on, and with it off. I’ll be damned! He was right. His tone was the same, but had just a tad fatter quality! Now that’s transparency! And that demonstration convinced me on the spot that the Compulator is the box I’m going to buy.

About compression…

For a good article discussing the general concepts of audio compression, click here. It doesn’t go into into the heavy technical details of compression, but it definitely helps to demystify how it works. For a more comprehensive and technical discussion, click here.

COMP-1 Opto Compulator Features

  • Compress Knob – controls amount of gain reduction up to 30dB.
  • Volume Knob – increases/decreases the output volume (aka “makeup gain”).
  • Trim Pot – very nice feature to adjust the unit’s preamp gain. If you plug a hot instrument into the unit, you could get distortion. You can knock down the input gain to avoid that.
  • Powered by a 9 volt battery, but also has a standard 9V jack.
  • Street Price: Generally around $199.00 (do a Google search)

My prospective usage

I normally play in very small, low-ceiling venues, so compression has not been a big issue for me. However, when I play with my band at my church, I have to play at fairly low volumes, which makes playing in distortion a huge challenge, because in order to hear the effect, I have to turn up my volume. That usually makes me stomp on the mix. With a fatter signal, I should be able to punch through the mix much more effectively without having to pump up my volume too much (or as much as I have been 🙂 ).

After hearing this unit, I’m convinced this is the right pedal. And getting input directly from a guy who swears by it and was willing to demonstrate how it worked had me sold.

Read Full Post »

My blog buddy, IG over at igblog always compels me to really think about playing. It’s uncanny. Thanks, IG. Anyway, in one of his latest installments entitled “You gotta fight your guitar a little…” he talked about how different guitarists actually “fight” with their guitar; overcoming bad setups or dead spots to really push them to be more expressive. That got me to thinking about my own experience in “fighting” with my guitars.
As far as dead spots and bad setups are concerned, I’m fortunate that my guitars are set up really well (a touch of luthier work here and there). But I do have a quirk that has actually served to push my expressiveness on the guitar. I don’t change my strings that often; in fact, I’ll have my strings on for months and months at a time, though it’s not out of laziness. I actually like the “duller” sound of worn strings. But there’s actually more to it than that.

Several years ago, I didn’t make much money – just about enough to support my family and have a bit left over to have some fun with. Unfortunately, that didn’t include guitar gear. And even though I played often, spending money on gear just wasn’t in the stars for me then. So I didn’t regularly change my strings. If one broke, I’d replace it, but generally, they’d stay on for a long time. I now have the means to buy strings and gear when I “need” to, but I still keep my strings on my guitars for a long time without replacing them. First, for the reason I mentioned above, but secondly because of a more important thing: Those dull strings push me to eek out as much sound from my guitars as possible.

When I didn’t have the means to buy gear very often, I actually had to learn how to do things with my guitar that I don’t think I otherwise would’ve done. You see, worn strings don’t have all that much sustain, so you have to do other things to sort of “fill in the spaces” like strum a chord then play an arpeggio, or sneak in a palm mute right before a chord to add some rhythm, not to mention strategically placed hammer-ons and pull-offs. I learned all these things not because they were cool to do (they were and still are), but more out of a drive to compensate for my dull-sounding strings.

To this day, I keep worn strings on my guitars. It creates a tension that pushes me to explore tonal areas that I probably wouldn’t go to otherwise.

Thanks to IG for jogging my memory!

Read Full Post »

Dr. Z Air Brake

About six months ago, I wrote a little ditty about the Dr. Z Air Brake, but I thought I’d revisit this essential piece of equipment once again. The Air Brake is a power attenuator; in other words, it reduces the amount of signal from your amp that reaches the speaker, thus reducing your audible output. Before I go any further, the big question is: Why would you want to reduce the amount of signal going to your speaker from your amp. There’s actually a very good reason: Overdrive.

With tube amps, especially those with multiple-stage gain, you can’t achieve that warm clipping (read: creamy distortion) without upping the drive to your power tubes. Unfortunately, that also means you have to crank your amp, as achieving those nice distortion characteristics is a function of both drive and gain. The net result in turn can shatter your eardrums in an enclosed space, or worse yet, have your family or neighbors scream at you for playing too loud in your garage. A power attenuator allows you to drive your power tubes into clipping but do so at a significantly reduced volume. For home studio enthusiasts like myself that usually record late into the night, this means you can work on recording projects without the fear of waking up my family or pissing off the next door neighbors (which I have done many times).

There’s a good FAQ about power attenuators and how they work here. I won’t go into the technical details, but suffice it to say that with a power attenuator, you can play at acceptable volume levels while still being able to drive your amp. With that let’s get into the Dr. Z Air Brake features.

The Dr. Z Air Brake is incredibly easy to use, though in addition to the unit, you’ll need a couple of good-quality audio cables with 1/4″ plugs. If your amp’s output goes straight to your speaker and is then soldered to the speaker leads, you’ll have to do some splicing and soldering, though most tube amps today use a 1/4″ output jack. Once you’ve got the unit hooked up, you have five levels of attenuation: 0 through 4 and Bedroom. The “0” setting is total bypass, while the 1-4 settings impose approximately -2.5dB attenuation with each position by default. If you open the unit up, you can actually increase or decrease the amount of attenuation at each position by moving the leads along the resistors (this is explained in the accompanying manual – it’s a single sheet of paper). The “Bedroom” setting is what sold me on the unit. When you have the Attenuator knob set to “Bedroom,” the “Bedroom Level” knob comes into play. This provides variable signal attenuation down to 1 Watt (for sub-100 Watt amps) at the maximum level, though at this amount of attenuation, your tone really changes because the speaker cone doesn’t move enough air, thus producing a VERY thin (read: ugly) tone. I usually set my Bedroom Level knob to about 10-11 o’clock, the play with my drive and volume knobs on my amp until I’ve dialed in a good tone. Frankly, it doesn’t get much easier than this.

In addition to the variable bedroom level control, I chose the Dr. Z Air Brake after evaluating and reading various reviews, and speaking with other folks who have one. The most popular attenuator at the time I was reviewing attenuators was the THD Hot Plate. I tried one out at a shop, but didn’t like the sound that came out of it all. It literally changed my tone. The Dr. Z Air Brake, on the other hand is much more transparent, even at bedroom levels. As far as gigging is concerned, since I play a lot of small venues, it’s a real helpful piece of equipment because it allows me to drive my amp when I play with my band without stepping on the band’s overall output.

CAVEAT EMPTOR

Many people buy attenuators thinking that once they’ve attenuated their signal, they can drive their power tubes to their highest levels. It’s true, you can do this. But you’ll also burn through your tubes pretty quickly, or worse yet, you’ll damage your amp’s electronics. I’ve heard about this happening especially with resistive attenuators. People crank their drive, and after a few minutes start smelling something burning as their amp’s internal electronics fry. Also, driving your power tubes into super saturation doesn’t do anything but cause a lot of ugly distortion. When you drive your power tubes, the tone you should expect is a smooth distortion, as the intermixing sound waves weave together beautifully. Adding even more power creates a much larger contrast between the peaks and valleys of the distorted wave, and what you end up getting is a very “dirty” sounding distortion that is not in any way pleasing to the ears. So beware if you’re in the market for an attenuator!

In closing, if you’re like me, and play in a variety of small- to medium-sized venues, a power attenuator can be your friend. For me, mine is always hooked up. It has saved me from a lot of headaches and eliminated complaints!

ROCK ON!

Read Full Post »

Song Title: We Sing with Joy!

Description:
This is a pure praise song, very simple to play and sing, and VERY easy to play. The main riff has only three chords and the bridge only adds another two chords. The trick to this was not to make it monotonous.

Read Full Post »

All I can say is WOW! GarageBand is absolutely OFF THE HOOK!

As I mentioned in a previous post, I was going to be using GarageBand to create song foundations for performing live. But to get myself more familiarized with the application, I decided to lay down a groove for a worship song that I wrote to see how easy it would be. I was not at all disappointed. I first auditioned a bunch of drum loops (BTW, I went out and purchased both iLife ’08 and the Rhythm Section Jam Pack today), found a fill, then inserted the loop into a new track. I then found a decent bass line, and dropped that in as well.

Software instruments such as the bass in GarageBand are actually software MIDI instruments. GarageBand makes it so easy to work with software instruments by providing a MIDI grid to adjust note pitches, duration, velocity, etc.. So once I selected a bassline, I could move notes around to fit to my song. Then it was a simple copy/cut/paste affair to get the bass “measures” into their proper places.

Once I had those two things laid down, I recorded my Strat for the rhythm track. Now here is where things got interesting. For my home recording studio, I use a DigiDesign MBox 2. It turns out that DigiDesign provides a Mac driver for the MBox 2 that you can download from their site. So now, I have my trusty MBox 2 hooked up to my iMac through a USB port, and I can switch from guitar to vocals or add some keyboard tracks with ease.

A totally cool new feature in GarageBand is the ability to loop record; that is, selecting a region in a song, then play several takes while looping over the same region. This is an awesome feature that I’ve appreciated in ProTools, but it’s here in GarageBand! With multi-take loop recording, you can dial in a section until you have it perfect. This saves so much time in the recording process because you don’t have to get to a spot, record, then splice the end. You just keep on playing that section over and over again until you’ve got it right. It also allows you to approach a particular phrase in different ways.

I’m really jazzed right now because I’ve finally found a music production tool that is incredibly easy to use. It’s so easy, it’s almost scary.

BTW, I need to put in a plug for GarageBand ’08. If you’re already a GarageBand user, YOU NEED TO GET iLife ’08 now! It is head and shoulders far more powerful and feature complete than the previous versions of the software. For a mere $79.00, it’s a cheap investment.

Read Full Post »

I’ve been a gigging musician for several years, playing in all sorts of venues. 90% of my gigs are just me singing and accompanying myself with a single guitar and keyboard, which has worked for me for a long time. But as of late, the artist in me has yearned to stretch his wings and produce a more sophisticated sound when I’m solo. It’s frustrating to play songs that have a lead in the middle of the song, and I’ve just got to strum along, or if it’s on the piano, I’ve just got to stick with the chart (I can’t improvise very well on the keys). So what to do?

Since I’ve made the switch to the Mac, I’ve discovered a wonderful little program called GarageBand that allows you to record music on your Mac. But interestingly enough, it also includes audio loops of all sorts of instruments, so you can literally create a song using just loops. The ramifications are clear: I finally have a way of easily creating song foundations for when I play solo. All I have to do is move the songs to my iPod! So begins my latest journey of creating song foundations. It’s very exciting to me because it’ll allow me to arrange songs for a wider genre of music than I’ve been playing. Talk about having a “band in the box.”

What inspired me to start doing this was seeing a guy at Downtown Disney a few months ago using an Akai MPC1000 Music Production Center for his background stuff, and playing guitar on top of his laid down tracks. I don’t have an extra $1000 to spend on something like that so it has been difficult getting started down this road. But with GarageBand, I should be able to lay down tracks really easily. Oooh I’m excited!

Read Full Post »

« Newer Posts - Older Posts »